> For the complete documentation index, see [llms.txt](https://luw-ai.gitbook.io/luw.ai-studio/llms.txt). Markdown versions of documentation pages are available by appending `.md` to page URLs; this page is available as [Markdown](https://luw-ai.gitbook.io/luw.ai-studio/luw.ai-ai-tools/render-with-ai.md).

# Render with AI

Turn the 3D view into a photoreal image from the Create tab, find every result in the project's Gallery, and make a video from a render with Archiagent.ai.

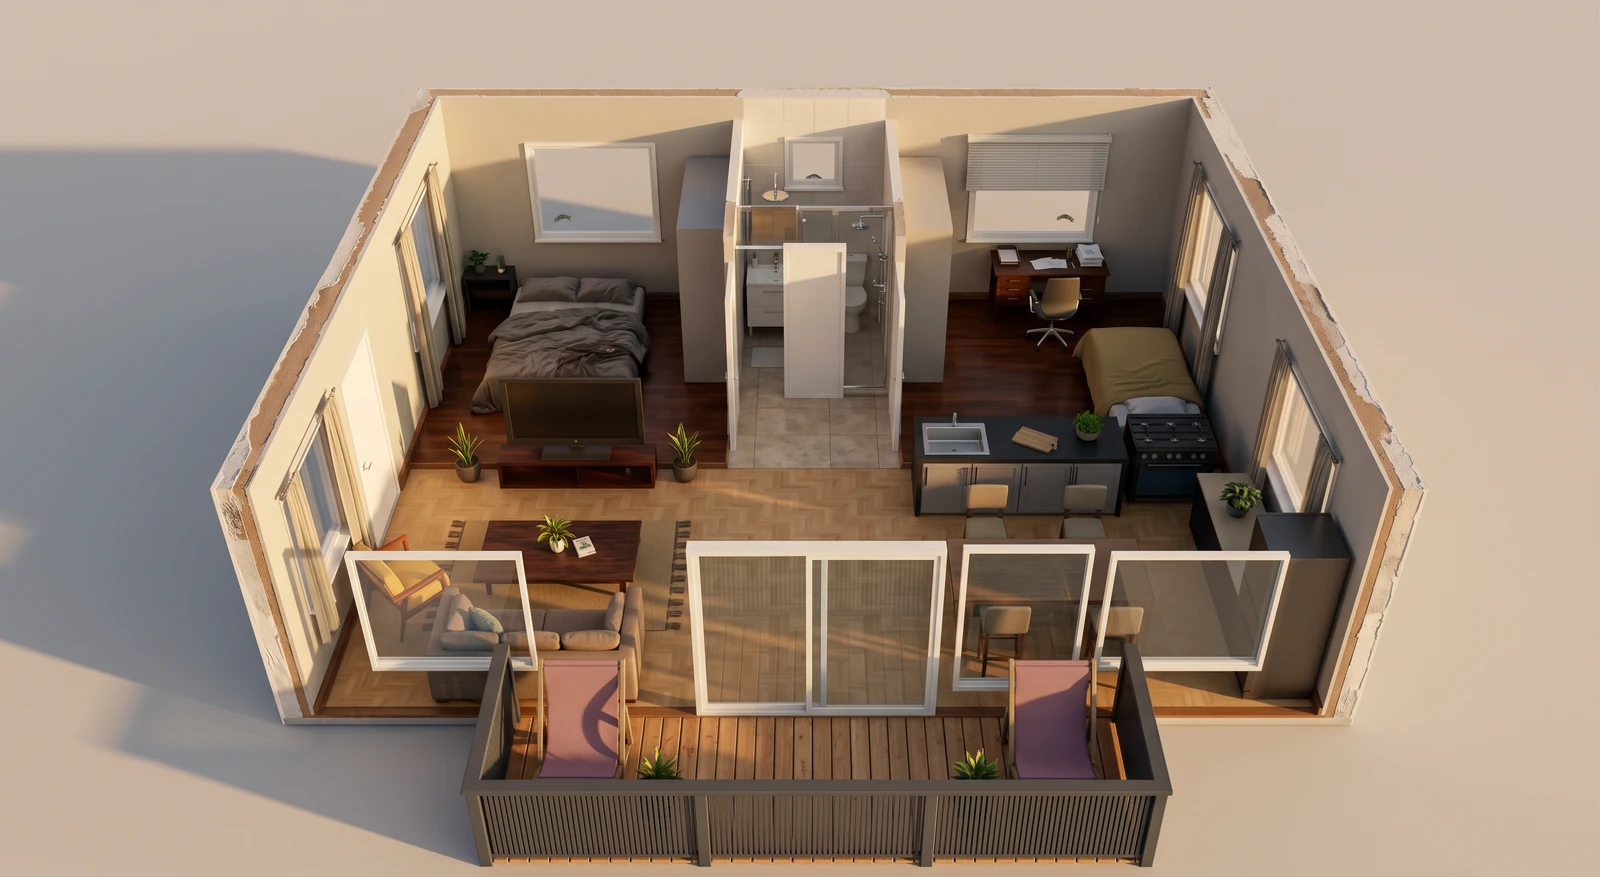
The 3D view tells you how a design is put together. A render tells you how it will feel to stand in it. Luw\.ai Studio renders inside the editor: frame the view you like, choose the light and the mood, and a photoreal image arrives in the project's **Gallery** a little later. From there it can become the project cover, a download, or the first frame of a video.

<figure><img src="https://1629954275-files.gitbook.io/~/files/v0/b/gitbook-x-prod.appspot.com/o/spaces%2F3c2lKXqxOtmrzgrQQpGP%2Fuploads%2Fgit-blob-32de64e27891fc5cedc30b0a83b0148ab4bb364f%2Fai-render-result.webp?alt=media" alt="A photoreal render of a furnished two-bedroom flat seen from above with the roof off, in warm low evening sun: two bedrooms and a bathroom at the back, an open kitchen with a hob, a living area with a sofa, a coffee table and a TV on its stand, and a south balcony with two deck chairs"><figcaption><p>A golden-hour render of a cutaway view. The layout and furniture come from the scene; the light and materials come from the renderer.</p></figcaption></figure>

## Before you start

* **Sign in.** Signed out, **Render** sends you to sign in first.
* **Open a project.** Results are filed in the Gallery of the project that was open when you started them.
* **Check your credits.** A render costs 1 credit per image, and 4K adds 1. See [Credits](/luw.ai-studio/account/credits.md).

## Render the view

{% stepper %}
{% step %}

### Frame the shot

Set up the 3D view exactly as you want the picture: the angle, the walls mode, the level, the furniture in place. The render starts from what you see, so the framing is yours. [Frame a good shot](#frame-a-good-shot) has tips.
{% endstep %}

{% step %}

### Open the Render form

Click **Render** in the viewer toolbar at the top right of the canvas (tooltip **Render this view with AI**). The **Create** tab opens in the sidebar on its **Render** form. You can also open **Create** from the left rail and pick **Render** at the top.
{% endstep %}

{% step %}

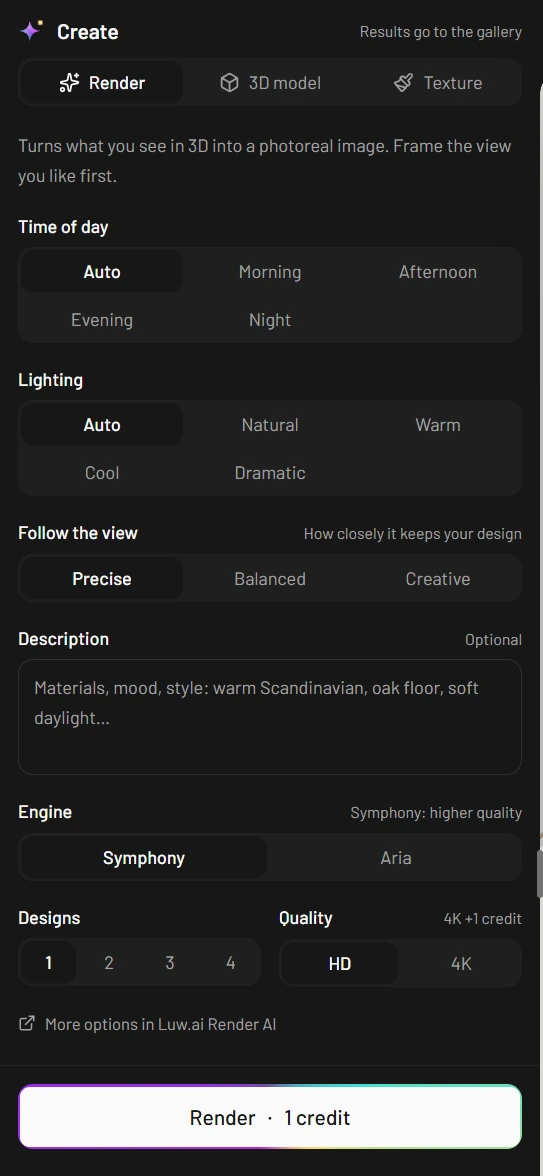
### Choose the look

Every field is optional; leave them on their defaults for a natural daylight render.

| Field               | Choices                                                      | What it does                                                                                                                             |
| ------------------- | ------------------------------------------------------------ | ---------------------------------------------------------------------------------------------------------------------------------------- |
| **Time of day**     | **Auto**, **Morning**, **Afternoon**, **Evening**, **Night** | When the scene is lit. **Auto** lets the renderer decide.                                                                                |
| **Lighting**        | **Auto**, **Natural**, **Warm**, **Cool**, **Dramatic**      | The character of the light.                                                                                                              |
| **Follow the view** | **Precise**, **Balanced**, **Creative**                      | How closely the image keeps your design. **Precise** stays truest to the scene; **Creative** gives the renderer more freedom.            |
| **Description**     | Free text                                                    | Materials, mood or style in a few words, for example "warm Scandinavian, oak floor, soft daylight".                                      |
| **Engine**          | **Symphony**, **Aria**                                       | Which of Luw\.ai's two engines makes the image. **Symphony** is the default and the higher-quality one. Both cost the same for a render. |
| **Designs**         | **1** to **4**                                               | How many separate images to make from the same view. Each is its own render.                                                             |
| **Quality**         | **HD**, **4K**                                               | **4K** adds 1 credit per image.                                                                                                          |
| {% endstep %}       |                                                              |                                                                                                                                          |

{% step %}

### Render

The button at the bottom shows the total, for example **Render · 1 credit**, or **Render · 4 credits** for two designs in 4K. Click it. The Studio switches to the 3D view if it wasn't showing, captures the view with your current camera, and starts the render.
{% endstep %}
{% endstepper %}

<figure><img src="https://1629954275-files.gitbook.io/~/files/v0/b/gitbook-x-prod.appspot.com/o/spaces%2F3c2lKXqxOtmrzgrQQpGP%2Fuploads%2Fgit-blob-93f9eb51693262531c438fd417649d8f4150b509%2Fcreate-render.webp?alt=media" alt="The Create tab on its Render form: Time of day, Lighting and Follow the view set to Auto, Auto and Precise, an empty Description box, Engine set to Symphony, Designs 1, Quality HD, a More options in Luw.ai Render AI link and the Render · 1 credit button"><figcaption><p>The Render form with its defaults. The button always shows what the render will cost.</p></figcaption></figure>

The **Gallery** opens beside the 3D view with a card for each render on its way, showing its progress. You don't have to wait for it: keep working, switch tabs, even open another project. When the image is ready, it appears in the Gallery of the project where you started it.

If the render can't start, for instance because your balance is too low, the form says so. Out of credits, it reads **You're out of credits.** with a **Get more credits** link to your account on app.luw\.ai.

## Frame a good shot

**Get down to eye level.** Views from above make clear diagrams; interiors look most convincing from where a person would stand. Click **Walkthrough** (the footprints icon) in the viewer toolbar and walk to your spot, or orbit low with the right mouse button.

**Use a spawn point** to start every walkthrough from the same doorway. Add it from **Build** → **Advanced** → **Spawn point**. See [Walkthrough and VR](/luw.ai-studio/plugins/walkthrough-and-vr.md).

**Set up the view first.** The render starts from your current 3D view, so adjust it before you click **Render**:

* In the **Display** menu, turn on **Shadows** and use the **Perspective** camera for a natural picture.
* For interiors, set the walls to **Full height**. For a doll's-house view of a whole floor, **Cutaway** works well.
* Show the level you want with **Stack**, **Exploded** or **Solo** in the toolbar.

**Finish the surfaces.** The renderer builds on what's in the scene, so painted walls and floors give it more to work with than plain grey ones. See [Materials and paint](/luw.ai-studio/items-and-paint/materials-and-paint.md) and [AI textures](/luw.ai-studio/luw.ai-ai-tools/ai-textures.md).

**Try a few designs.** Setting **Designs** to 2 or 3 gives you different takes on the same view to choose from, at 1 credit each.

## The Gallery

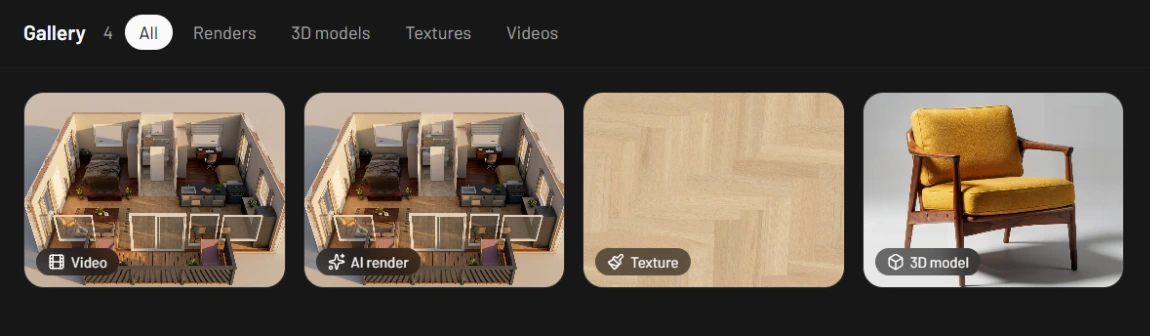
Everything a project makes with AI is collected in its Gallery: renders, 3D models, textures, videos and snapshots. It's kept with the project, so it's the same on any computer you sign in from.

Open it from the views bar at the top left of the canvas, where **Gallery** sits next to **3D** and **2D**. When you start a render, a 3D model or a texture from the **Create** tab, it opens beside the 3D view by itself.

<figure><img src="https://1629954275-files.gitbook.io/~/files/v0/b/gitbook-x-prod.appspot.com/o/spaces%2F3c2lKXqxOtmrzgrQQpGP%2Fuploads%2Fgit-blob-d6c578b32d8fb690c68cc717ad4139ec2aeda6f2%2Fgallery.webp?alt=media" alt="The Gallery header with the count 4 and the filters All, Renders, 3D models, Textures and Videos, above four cards labelled Video, AI render, Texture and 3D model"><figcaption><p>A project's Gallery with a video, a render, a texture and a 3D model.</p></figcaption></figure>

* **Filters.** **All** shows everything. **Renders**, **3D models**, **Textures**, **Videos** and **Snapshots** appear once the project has something of that kind. The star button at the right end shows **Starred only**.
* **Work in progress.** A card with a progress bar shows a percentage, then **Almost ready…** while the finished file is being stored.
* **A failed generation** keeps its card with the reason. **Delete & refund** asks for its credits back (the card then reads **Refund requested. Its credits come back within 24 hours.**); **Dismiss** just removes the card.
* **An empty Gallery** reads **Everything this project makes collects here**, with buttons to **Take a snapshot** or **Render this view**. The second one asks [Archiagent.ai](/luw.ai-studio/luw.ai-ai-tools/archiagent.md) to render the current view in the chat.

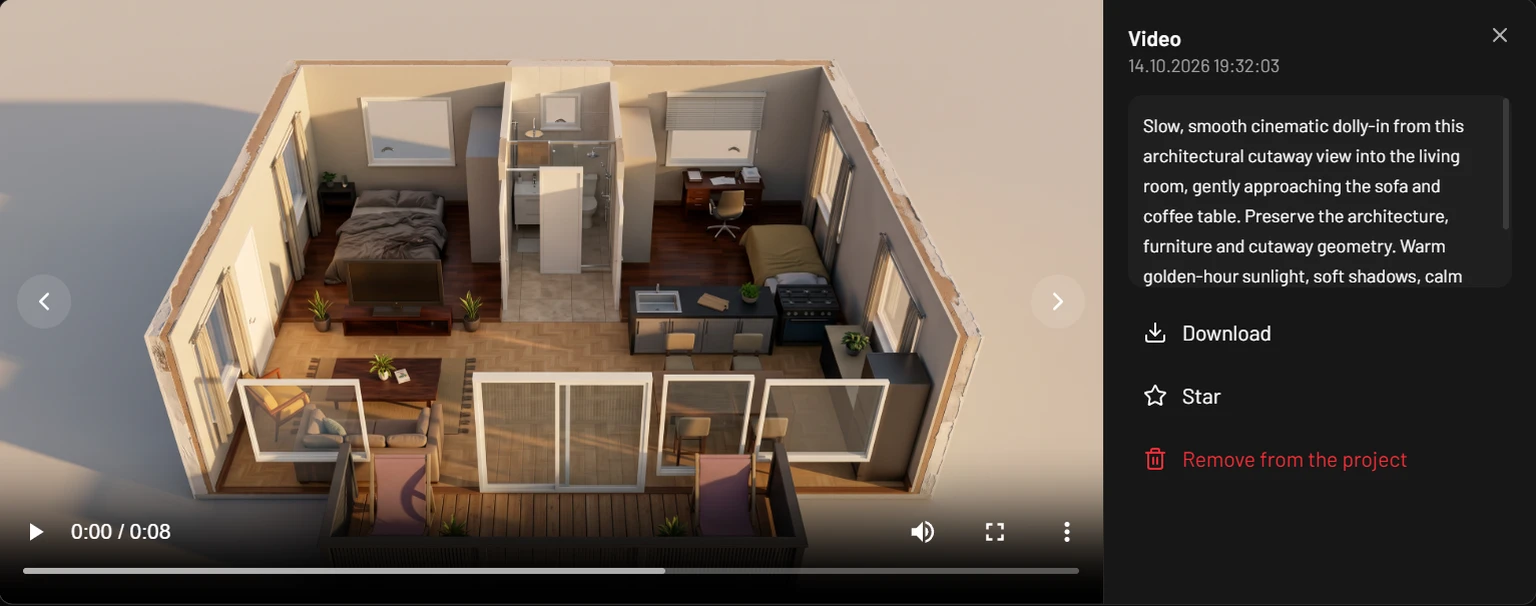
Click a card to open it large. `←` and `→` (or the arrows at the sides) step through the cards. Next to the picture you see when it was made and the description it was made with, and the actions that fit it:

| Action                       | For                   | What it does                                                  |
| ---------------------------- | --------------------- | ------------------------------------------------------------- |
| **Add to the scene**         | 3D models             | Places the model in your project.                             |
| **Paint with it**            | Textures              | Loads the texture on your paint brush.                        |
| **Use as the project cover** | Renders and snapshots | Makes it the picture on the project's card in **Projects**.   |
| **Download**                 | Everything            | Saves the file to your computer.                              |
| **Star** / **Unstar**        | Everything            | Marks a favourite. Hover a card to star it from the grid too. |
| **Remove from the project**  | Everything            | Takes it out of this project's Gallery.                       |

<figure><img src="https://1629954275-files.gitbook.io/~/files/v0/b/gitbook-x-prod.appspot.com/o/spaces%2F3c2lKXqxOtmrzgrQQpGP%2Fuploads%2Fgit-blob-d0df1d49bb6f19371291eb08c9004b4475d6fce2%2Fgallery-viewer.webp?alt=media" alt="A Gallery item opened large: an 8-second video of the flat playing on the left, and on the right its title Video, the date, the description of the camera move, and Download, Star and Remove from the project"><figcaption><p>A video opened from the Gallery, with the description it was made from.</p></figcaption></figure>

{% hint style="info" %}
Sharing a project? The **Share** button in the top bar has a **The project's renders and videos** option, so people with the link see the Gallery's renders and videos alongside the 3D model.
{% endhint %}

## Make a video from a render

Videos are made by Archiagent.ai, from a picture, usually a render. In **Edit with AI**, ask for both at once, for example "Render this view at golden hour, then make a slow dolly-in video from it", or point it at a render that's already in the Gallery.

* A render followed by a video is two paid steps, so Archiagent first shows a plan with both and the total. **Approve plan** runs them without asking again. The plan's **Run on Symphony** switch, on by default, sets the engine; turned off, the steps run on Aria and the total drops.
* A video on its own asks once, with a button per engine: **Symphony · 20 credits** or **Aria · 10 credits**, and **Skip**.
* The video shows up in the chat and in the Gallery under **Videos**. Open it there to play it or download it.

Describe the camera move and what should move in the picture: "slow dolly forward into the living room, curtains moving gently". See [Archiagent.ai](/luw.ai-studio/luw.ai-ai-tools/archiagent.md) for how approvals work.

## Ask Archiagent for a render

Archiagent can render too. Ask "render the kitchen from the dining table, evening light" and it can frame the view itself before rendering; otherwise it renders what you're looking at. A render it makes costs the same 1 credit, waits for your OK in the chat (unless you've switched off **Ask before spending credits**), and lands in the Gallery like yours.

## More options in Render AI

The full Render AI on app.luw\.ai has more controls than the Create form; the Studio's hand-off window lists a prompt, a reference image, day or night, a choice of looks, and output at up to 4K or 8K. The Studio can hand a view over to it:

* Click **More options in Luw\.ai Render AI** at the bottom of the Render form.
* Or, during a walkthrough, press `Enter`. The hint **Enter render this view** in the bottom-right corner reminds you. The frame is taken from where you stand, then the walkthrough ends so you can use the mouse.

**Capturing your scene**, then **Preparing AI render**, show while the Studio takes a 1920 × 1080 snapshot of the view and uploads it. **Ready to render with AI** then shows the snapshot; click it to check the angle at full size (it's only the starting point, not the render). **Render with AI** opens app.luw\.ai/render-ai in a new tab with the snapshot loaded, and the render is made and charged there, not in the Gallery.

The view you hand over this way also becomes the project's cover picture.

## Your project cover

The picture on a project's card in **Projects** is a fresh 3D thumbnail until you choose otherwise. To use a render or a snapshot instead, open it in the Gallery and click **Use as the project cover**. A view handed to app.luw\.ai becomes the cover by itself. See [Projects and saving](/luw.ai-studio/getting-started/projects-and-saving.md#project-thumbnails).

Rendering never changes your design, and you can render the same view as often as you like.

{% hint style="info" %}
Want a plain picture of the view without AI? Take a snapshot instead. See [Screenshots and snapshots](/luw.ai-studio/import-and-export/screenshots.md).
{% endhint %}