> For the complete documentation index, see [llms.txt](https://luw-ai.gitbook.io/luw.ai-studio/llms.txt). Markdown versions of documentation pages are available by appending `.md` to page URLs; this page is available as [Markdown](https://luw-ai.gitbook.io/luw.ai-studio/luw.ai-ai-tools/ai-textures.md).

# AI textures

Make seamless textures from a description or a photo in the Create tab or the Paint tab, paint them onto walls, floors and roofs at the tile size you choose, and use your own images as textures.

The built-in library covers the everyday woods, stones and tiles. For anything more particular, such as green zellige on a kitchen wall, a terrazzo floor with large chips or herringbone in pale oak, Luw\.ai Studio can make the texture for you. Describe it, show it a photo, or both, and about a minute later it's ready to paint with.

Each texture you make is saved to your Luw\.ai account, so it's there in every project. It also appears in the **Gallery** of the project you had open.

## What you get

An AI texture is a single seamless colour image. Its edges line up with each other, so it repeats across a wall or a floor of any size without visible joins. The Studio tiles it over the surface at the size you pick.

You get the colour image only: there are no separate bump, roughness or height maps.

## Before you start

* **Sign in.** Textures are made with your Luw\.ai account and kept in its library.
* **Open a project**, so the result also lands in that project's Gallery.
* **Credits.** A texture costs 1 credit, whichever engine you choose.

## Make a texture in the Create tab

{% stepper %}
{% step %}

### Open Create › Texture

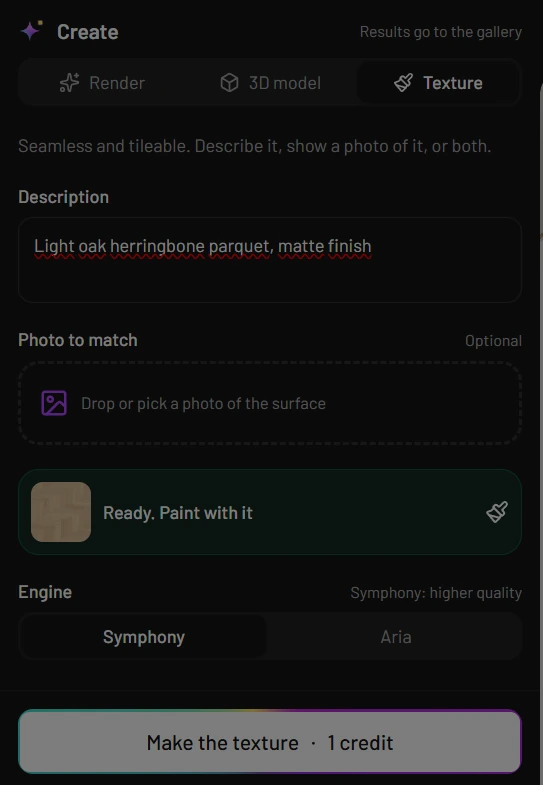
Click **Create** in the left rail, just below **Edit with AI**, and choose **Texture** at the top of the panel. The note under the tabs sums it up: **Seamless and tileable. Describe it, show a photo of it, or both.**
{% endstep %}

{% step %}

### Describe it

Write what you want under **Description**. Name the material, the pattern, the colour and the finish, for example "light oak herringbone parquet, matte finish".
{% endstep %}

{% step %}

### Add a photo to match (optional)

**Photo to match** takes a picture of the surface you have in mind: drop it on **Drop or pick a photo of the surface**, or click to choose one. The cross in its corner removes it again. You can also leave the description empty and work from the photo alone.
{% endstep %}

{% step %}

### Pick the engine

Under **Engine**, **Symphony** is selected by default and gives the higher quality. **Aria** is the alternative. For textures both cost the same.
{% endstep %}

{% step %}

### Make it

Click **Make the texture · 1 credit**. The Studio switches to the 3D view with the Gallery beside it, where a card counts up while the texture is made.
{% endstep %}

{% step %}

### Paint with it

When it's done, a green **Ready. Paint with it** card appears in the panel. Click it and the texture is loaded on your paint brush. Click a surface to paint it; see [Paint with an AI texture](#paint-with-an-ai-texture) below.
{% endstep %}
{% endstepper %}

<figure><img src="https://1629954275-files.gitbook.io/~/files/v0/b/gitbook-x-prod.appspot.com/o/spaces%2F3c2lKXqxOtmrzgrQQpGP%2Fuploads%2Fgit-blob-18755a987ee614f636640a4c98ebbe8919edd0d4%2Fcreate-texture.webp?alt=media" alt="The Create panel on its Texture tab: the description Light oak herringbone parquet, matte finish, an empty Photo to match drop area, a green Ready. Paint with it card with the finished texture, the Engine choice of Symphony or Aria, and the Make the texture · 1 credit button"><figcaption><p>Create › Texture with a finished herringbone texture. One click on the green card puts it on your brush.</p></figcaption></figure>

If your balance is too low, the panel says **You're out of credits.** with a **Get more credits** link to your account on app.luw\.ai.

## Make a texture from the Paint tab

The **Paint** tab has its own way in, the **Textures** dialog. Two buttons open it:

* **Generate** in the **AI textures** strip at the top of the **Paint** tab.
* The **AI texture** tile at the start of any material picker.

At the top of the dialog:

1. Type into **Describe a texture: light oak herringbone, terrazzo, green zellige tiles...**. Here a description is required.
2. To match a photo, drop one on the small square to the left of the box, or click the square to choose a file. The line under the box then reads **Matching the style of your reference image.** **Remove** takes the photo away again.
3. Choose **Symphony** or **Aria** next to the box.
4. Click **Generate · 1 credit**. A **Generating…** tile shows while it's being made.
5. The new texture appears with **Apply** on it. Click it. Opened from the **Paint** tab, the texture goes on your brush; opened from a material picker, it becomes that surface's finish straight away.

Closing the dialog doesn't stop a texture that's being made. It still arrives in your library and in the Gallery. If a texture takes longer than about five minutes, the dialog stops waiting, but the Gallery keeps following it and shows it when it lands.

## Your texture library

Below its prompt, the **Textures** dialog lists every texture on your account, newest first. It's the same pattern library app.luw\.ai uses, so patterns you made there are here too. Hover over a texture to read its name, click it to use it, and use the refresh button in the header to load the list again.

An account without textures shows **No textures yet**.

## Paint with an AI texture

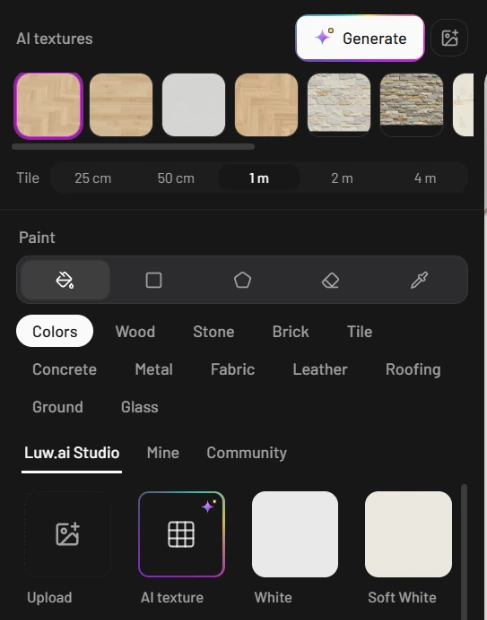
The **AI textures** strip at the top of the **Paint** tab keeps your twelve most recent textures in a row.

1. Click a texture. A coloured ring shows which one is on your brush.
2. Pick the **Tile** size (see below).
3. Paint as with any other material: click a surface, or use the paint modes to cover part of one. See [Materials and paint](/luw.ai-studio/items-and-paint/materials-and-paint.md).

<figure><img src="https://1629954275-files.gitbook.io/~/files/v0/b/gitbook-x-prod.appspot.com/o/spaces%2F3c2lKXqxOtmrzgrQQpGP%2Fuploads%2Fgit-blob-68bfe9ab5cccdf6f2fb2198f5c1e85644c0d3d4f%2Fpaint-ai-textures.webp?alt=media" alt="The top of the Paint tab: the AI textures strip with the Generate button and the upload button, a row of wood, plaster and stone textures with the first one ringed, the Tile choice from 25 cm to 4 m with 1 m selected, the paint modes, the material categories, the Luw.ai Studio, Mine and Community tabs, and the Upload and AI texture tiles"><figcaption><p>The AI textures strip sits above the regular paint tools. The ringed texture is the one on the brush.</p></figcaption></figure>

The small image button next to **Generate** (**Upload an image as a texture**) brings in a picture of your own; see [Use your own image as a texture](#use-your-own-image-as-a-texture).

Signed out, the strip reads **Sign in to make and use AI textures.** With no textures yet, it suggests **Describe a texture and paint it onto walls, floors and roofs.**

## Choose the tile size

**Tile** sets how much surface one copy of the image covers: **25 cm**, **50 cm**, **1 m** (the default), **2 m** or **4 m**.

* A smaller tile repeats the image more often, so the pattern looks finer. Use it for mosaics and small tiles.
* A larger tile spreads one copy over more surface. Use it for long planks, big stone slabs or a wallpaper with a large motif.

Changing the size reloads the texture on your brush with the new tiling. Surfaces you've already painted keep their size until you paint them again. The material pickers use the current **Tile** size as well.

{% hint style="info" %}
Work it out from the real thing. If your image shows about four tiles across and each tile should be 50 cm wide, choose **2 m**.
{% endhint %}

## Use the tiles in a material picker

Every material picker, whether in the **Paint** tab or in the panel of a wall, floor or other surface, starts with two extra tiles:

* **AI texture** opens the **Textures** dialog. Make a new texture or pick one of yours, and it becomes that surface's material.
* **Upload** asks for an image file and puts it straight onto that surface.

Signed out, both tiles take you to sign in.

## Use your own image as a texture

Any picture can serve as a texture: a photo of a brick wall, a scanned fabric, a wallpaper sample.

1. Click **Upload an image as a texture** in the **AI textures** strip, or **Upload** in a material picker.
2. Choose a PNG, JPEG, WebP, AVIF or GIF file.
3. A notice in the corner shows **Uploading pattern** with the file name and a percentage.
4. From the strip, the image goes onto your brush. From a picker, it goes straight onto the surface.

Uploading is free. An uploaded image stays in the **AI textures** strip and the **Textures** dialog until you reload the page; it isn't added to your account's library. Surfaces you painted with it keep it either way.

{% hint style="warning" %}
Your own image is repeated exactly as it is. If its left and right or top and bottom edges don't match, you'll see seams where the copies meet. AI textures are made seamless, so they don't have this problem.
{% endhint %}

## Find your textures in the Gallery

Every texture made while a project is open is also filed in that project's **Gallery**, the view next to **3D** and **2D**. Click a texture there to open it large, with:

* **Paint with it**, which loads it on your brush,
* **Download**,
* **Star**, to find it quickly with the **Starred only** filter,
* **Remove from the project**, which takes it out of this Gallery only.

If Luw\.ai reports that a texture failed, its card stays in the Gallery with **Delete & refund**. Click it and the credit comes back within 24 hours.

## Ask Archiagent for a texture

In **Edit with AI**, [Archiagent.ai](/luw.ai-studio/luw.ai-ai-tools/archiagent.md) can make a texture and put it on the surfaces you mean in one go, for example "give the kitchen walls a white zellige tile texture". It can apply textures to walls, roofs, stairs, fences, slabs and ceilings, and it chooses how large the pattern repeats.

It looks through the material library and your own textures first and only makes a new one when nothing fits. You can also attach a photo of a surface and ask for a texture that follows it.

With **Ask before spending credits** on (the default), the texture waits for your OK on its own row in the chat. Choose **Symphony · 1 credit** or **Aria · 1 credit**, or **Skip**; a skipped texture costs nothing. While it's being made the row reads **Making the texture…**, and afterwards it tells you how many surfaces it was applied to. The texture joins your library and the Gallery like any other.

## Prompt ideas

Start from one of these and adjust the colour or the scale:

* "Weathered terracotta floor tiles, hexagonal, warm orange with darker edges"
* "White metro tiles with thin dark grey grout, glossy"
* "Smooth polished concrete, light grey, faint cloudy variation"
* "Dark walnut parquet in a chevron pattern, satin finish"
* "Sage green linen wallpaper with a fine woven texture"
* "Rough cut limestone blocks, sandy beige, irregular joints"
* "Cement tiles with a blue and white geometric pattern"
* "Cedar shingles for a roof, silvery and weathered"

Short and concrete beats long and poetic: material, pattern, colour and finish usually say enough. If you have a sample in front of you, take a photo of it and add it as the photo to match.