> For the complete documentation index, see [llms.txt](https://luw-ai.gitbook.io/luw.ai-studio/llms.txt). Markdown versions of documentation pages are available by appending `.md` to page URLs; this page is available as [Markdown](https://luw-ai.gitbook.io/luw.ai-studio/items-and-paint/materials-and-paint.md).

# Materials and paint

Give walls, floors, ceilings and furniture new finishes from the Paint tab, paint whole rooms or just part of a wall, and use your own images and AI textures.

A fresh project in Luw\.ai Studio is mostly white: unpainted walls start out **White**, and furniture arrives in the finishes it was modelled with. The **Paint** tab is where you change that. One brush covers the building (walls, floors, ceilings, stairs) and the furniture, so reupholstering an armchair works exactly like retiling a bathroom.

## Open the Paint tab

* Click **Paint** in the left rail, or
* press `P`, or
* choose **Material Paint** in the command palette (`Cmd/Ctrl + K`).

Paint mode stays on as long as the Paint tab is open. Switch to another tab, or press `V` for the Select tool, and you're back to selecting. Every stroke can be undone with `Cmd/Ctrl + Z`.

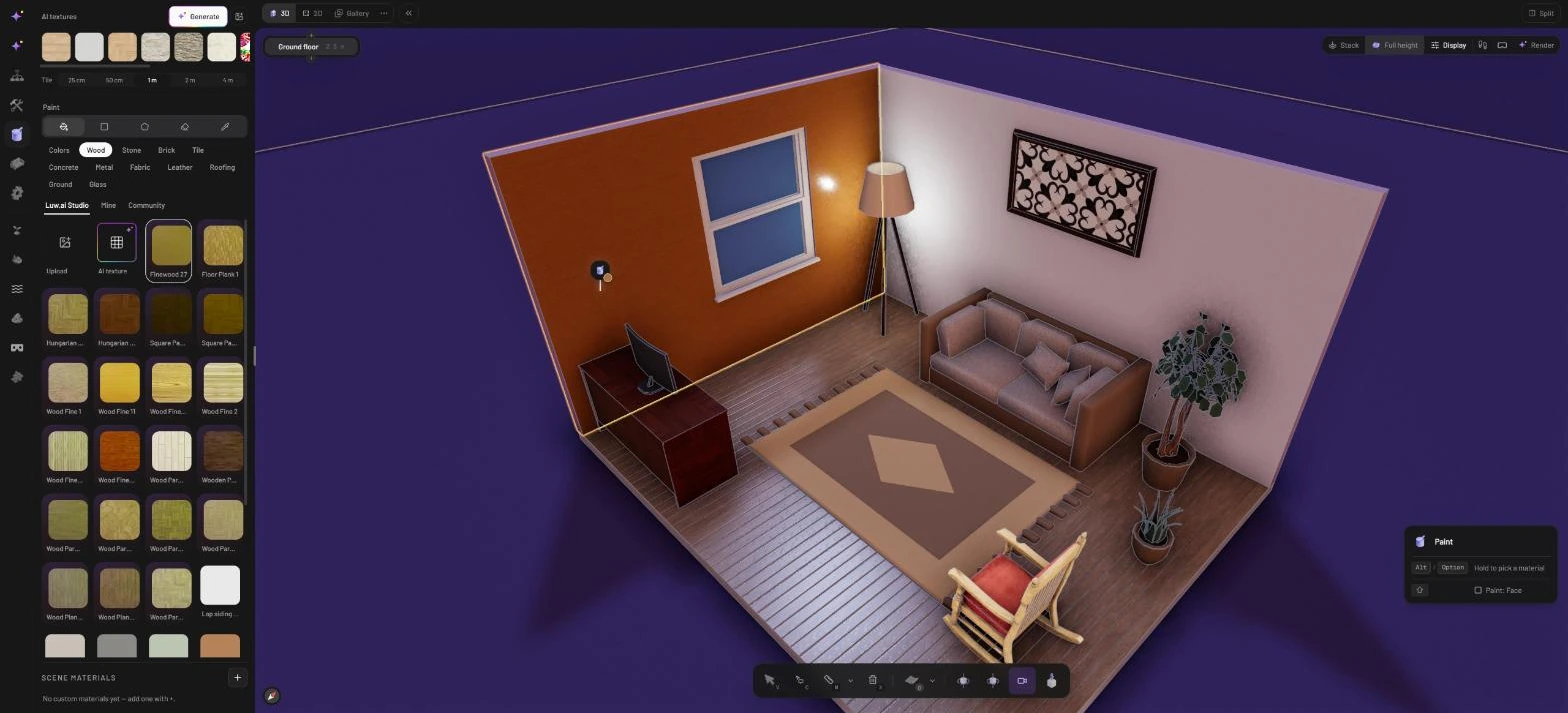
<figure><img src="https://1629954275-files.gitbook.io/~/files/v0/b/gitbook-x-prod.appspot.com/o/spaces%2F3c2lKXqxOtmrzgrQQpGP%2Fuploads%2Fgit-blob-d07f36de891205683bbd736df50dd9a6b1612d4f%2Fpainting-surfaces.webp?alt=media" alt="Paint mode: the left wall previews the wood material and the Paint panel reads Paint: Face"><figcaption><p>Hovering a wall: the face shows the new material before you click. Tap Shift to paint the whole room instead.</p></figcaption></figure>

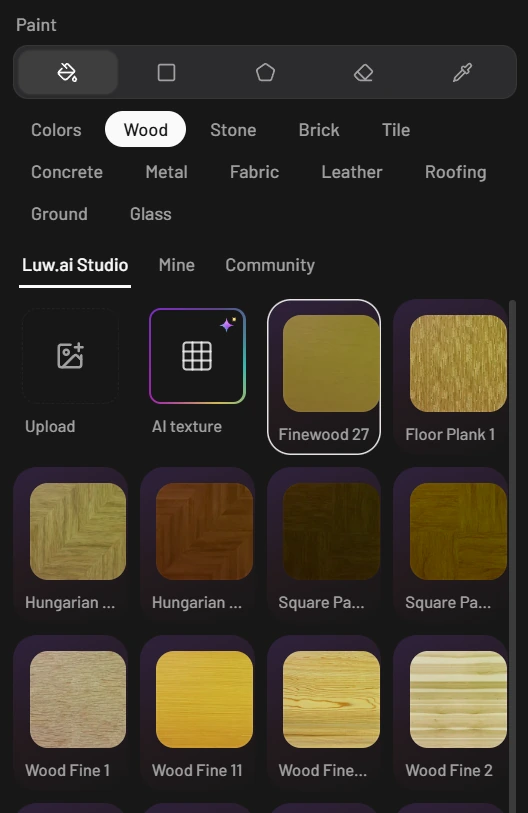
The panel is laid out from top to bottom like this:

1. **AI textures**: your own textures, a **Generate** button and the **Tile** size (see [Use your own images and AI textures](#use-your-own-images-and-ai-textures)).
2. **Paint**: five buttons for the paint mode.
3. Material categories, then the library tabs **Luw\.ai Studio**, **Mine** and **Community**.
4. The swatch grid. It always starts with the **Upload** and **AI texture** tiles.
5. **Scene materials**: materials you've made for this project, with **Add material** (`+`).

## Choose a paint mode

The buttons under **Paint** decide what a click does. Hover over one to see its description.

| Mode              | What it does                                                                                                                                        |
| ----------------- | --------------------------------------------------------------------------------------------------------------------------------------------------- |
| **Whole surface** | A click paints the entire surface under the cursor. This is the mode you'll use most.                                                               |
| **Rectangle**     | Press on a wall, floor or ceiling and drag to the opposite corner to paint just that patch, such as a splashback behind a counter.                  |
| **Polygon**       | Click the corners of a shape on a floor or ceiling, then click the first point again to close it. Good for a tiled entrance area in a wooden floor. |
| **Erase**         | Click a painted patch to remove it, or click a painted surface to put its default back.                                                             |
| **Pick**          | Click a surface to load its material onto your brush, so you can reuse it elsewhere.                                                                |

In **Whole surface** mode you don't have to switch to **Pick**: hold `Alt` (`Option` on a Mac) and click to pick up a material on the spot.

## Pick a material

The built-in library sits under the **Luw\.ai Studio** tab and is sorted into categories:

| Category     | A few examples                                                                                      |
| ------------ | --------------------------------------------------------------------------------------------------- |
| **Colors**   | 45 flat paint colours, from soft whites and greys through sage, teal and navy to plum and berry     |
| **Wood**     | Plank and parquet floors, plus exterior lap siding and board-and-batten cladding in several colours |
| **Stone**    | Terrazzo, quartzite, marble-like white stone, a rough stone wall                                    |
| **Brick**    | Rustic, aged and weathered brick                                                                    |
| **Tile**     | Checkerboard, mosaic, pool, quarry and terracotta tiles                                             |
| **Concrete** | Raw and polished concrete, plaster, stucco, drywall                                                 |
| **Metal**    | Steel, copper, brass, chrome                                                                        |
| **Fabric**   | Upholstery fabrics such as velvet, wool and bouclé                                                  |
| **Leather**  | Black and calf leather                                                                              |
| **Roofing**  | Shingles and clay roof tiles                                                                        |
| **Ground**   | An earth ground finish                                                                              |
| **Glass**    | Glass                                                                                               |

Clicking a category loads its first material onto the brush straight away, so you can start painting immediately; click another swatch to change it. The **Mine** and **Community** tabs are part of the library picker too, but for your own finishes the place to look is the **Upload** and **AI texture** tiles and the **AI textures** strip.

<figure><img src="https://1629954275-files.gitbook.io/~/files/v0/b/gitbook-x-prod.appspot.com/o/spaces%2F3c2lKXqxOtmrzgrQQpGP%2Fuploads%2Fgit-blob-fed33c259ce75177f4445a236b9fe1e15a8254b9%2Fmaterial-catalog.webp?alt=media" alt="The Paint panel with the Wood category selected: the Luw.ai Studio library tab, the Upload and AI texture tiles, and a grid of plank, parquet and fine wood swatches"><figcaption><p>The Wood category of the Luw.ai Studio library, with the Upload and AI texture tiles in front.</p></figcaption></figure>

## Paint a surface

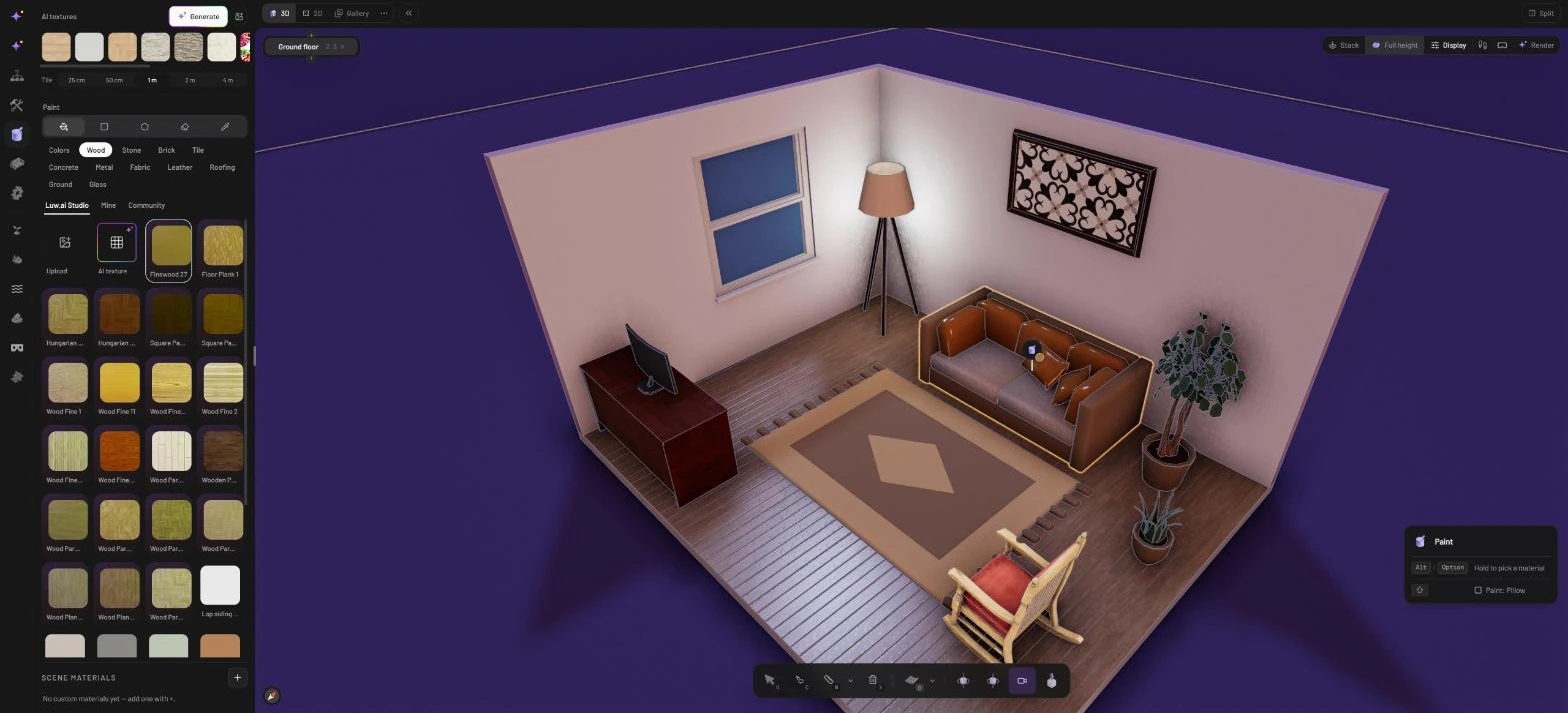
With a material on the brush, move over the scene. A chip at the side of the view tells you what the next click will paint, for example **Paint: Face** on a wall. Before you've chosen a material it says **Select a material to paint**, and when you're not over anything paintable it says **Hover a surface to paint**.

Click to paint. Surfaces are kept apart so you stay in control:

* **Walls:** each side of a wall is painted on its own, so you can colour the inside of a bedroom without touching the facade or the hallway on the other side.
* **Floors:** the top and the sides of a floor are separate.
* **Stairs:** parts such as the treads and the railing take separate materials.
* **Furniture:** items are painted part by part. Click the cushions of a sofa and only the cushions change.

## Paint more at once with Shift

One click normally paints one surface. While you hover, tap `Shift` to widen the scope; clicking the chip does the same. The options depend on what's under the cursor:

| Scope                                                                        | Paints                                                          | Offered for                                        |
| ---------------------------------------------------------------------------- | --------------------------------------------------------------- | -------------------------------------------------- |
| The hovered part (**Face**, **This surface**, or the name of an item's part) | Just that one surface                                           | Everything                                         |
| **Whole item** (or **Whole stair**, and so on)                               | Every part of the object you're over                            | Items and other objects made of more than one part |
| **All matching**                                                             | That part on each copy of the item, wherever it stands          | Catalog items and your own models                  |
| **Room** / **Whole room**                                                    | All the walls, or the whole floor, of the room under the cursor | Walls and room floors                              |

So to give all eight dining chairs green seats, hover a seat, tap `Shift` until the chip says **All matching**, and click once.

<figure><img src="https://1629954275-files.gitbook.io/~/files/v0/b/gitbook-x-prod.appspot.com/o/spaces%2F3c2lKXqxOtmrzgrQQpGP%2Fuploads%2Fgit-blob-28e6d1a96ffa17532dc4f1b5fd00ec0d8a4ba42e%2Fpaint-scope-all-matching.webp?alt=media" alt="Paint mode with a wood material on the brush: the sofa is outlined and the Paint panel reads Paint: Pillow"><figcaption><p>Hovering the sofa: the panel names the part a click will paint. Tap Shift to switch to the whole item or to all matching copies.</p></figcaption></figure>

The scope you choose stays selected as you move on. Where a surface doesn't offer it, the click falls back to just the hovered part.

## Use your own images and AI textures

Every material picker starts with two tiles of its own:

* **Upload** turns an image file from your computer into a material.
* **AI texture** opens the **Textures** dialog, where you can make a new seamless texture from a description (1 credit, on the **Symphony** or **Aria** engine) or pick one you made before.

Both need you to be signed in; if you aren't, the Studio sends you to sign in first.

The **AI textures** strip at the top of the Paint tab gives you the same things with fewer clicks:

* **Generate** opens the same **Textures** dialog.
* The image button next to it uploads an image as a texture.
* Up to twelve of your recent textures sit in a row. Click one to load it onto the brush.
* **Tile** sets how much of a surface one copy of the image covers: **25 cm**, **50 cm**, **1 m** (the default), **2 m** or **4 m**. Pick a small size for fine mosaic, a large one for big stone slabs. Changing it also updates the texture already on your brush.

If you're signed out, the strip shows **Sign in to make and use AI textures.** instead.

You can also make a texture in the **Create** tab of the left rail, under **Texture**; its **Ready. Paint with it** card loads the result on your brush. How to write a good texture prompt, match a photo and what the results contain is explained in [AI textures](/luw.ai-studio/luw.ai-ai-tools/ai-textures.md).

## Make your own scene materials

The **Scene materials** section at the bottom of the panel holds materials that belong to this project. Every texture or image you paint with, from the strip or from the tiles, is added here too. Until there are any, it reads **No custom materials yet — add one with +.**

Click **Add material** (`+`) to create one. Its editor opens right away:

* **Color**: a colour picker plus a field for a hex value, for when you need an exact brand or paint colour.
* **Roughness**: from shiny (0) to matt (1).
* **Metalness**: from non-metal (0) to metal (1).
* **Opacity**: lower it for tinted glass or a see-through screen.
* **Side**: **Front**, **Back** or **Double**, the side(s) of a surface the material shows on.

Each row in the list shows how many parts use the material (**Used by 3 parts**, for example). You can rename a material by editing its name (`Enter` to keep, `Esc` to cancel), and each row has **Paint with** (load it onto the brush), **Edit**, **Duplicate** and **Delete** buttons. Because surfaces point to the scene material rather than to a copy, editing it changes every surface that uses it.

## Paint from a panel

You can also set a finish from the inspector wherever a panel offers a finish row. A building's floor footprint is one example: select it and its panel shows **Edge finish** (the outer edge of the floor) and, for a building raised on a foundation, **Foundation finish**. Click the swatch next to the label to open the same material picker, with its **Upload** and **AI texture** tiles, and the choice is applied to that surface only.

{% hint style="success" %}
[Archiagent.ai](/luw.ai-studio/luw.ai-ai-tools/archiagent.md) can paint for you as well. Ask for "light oak flooring in the living room" or "make the bathroom walls green zellige tiles" and it sets the materials. When the library doesn't have the right one, it makes a texture, which by default waits for your OK in the chat with its 1-credit cost.
{% endhint %}

## Next steps

* [AI textures](/luw.ai-studio/luw.ai-ai-tools/ai-textures.md): generate seamless textures from a description or a photo.
* [Placing and arranging](/luw.ai-studio/items-and-paint/placing-and-arranging.md): move, rotate and copy the furniture you've just painted.
* [Render with AI](/luw.ai-studio/luw.ai-ai-tools/render-with-ai.md): turn the finished room into a photo-real image.