> For the complete documentation index, see [llms.txt](https://luw-ai.gitbook.io/luw.ai-studio/llms.txt). Markdown versions of documentation pages are available by appending `.md` to page URLs; this page is available as [Markdown](https://luw-ai.gitbook.io/luw.ai-studio/getting-started/your-first-scene.md).

# Your first scene

A hands-on first session. Sign in, draw one room, give it a door and a window, furnish it, and look around, all in a few minutes.

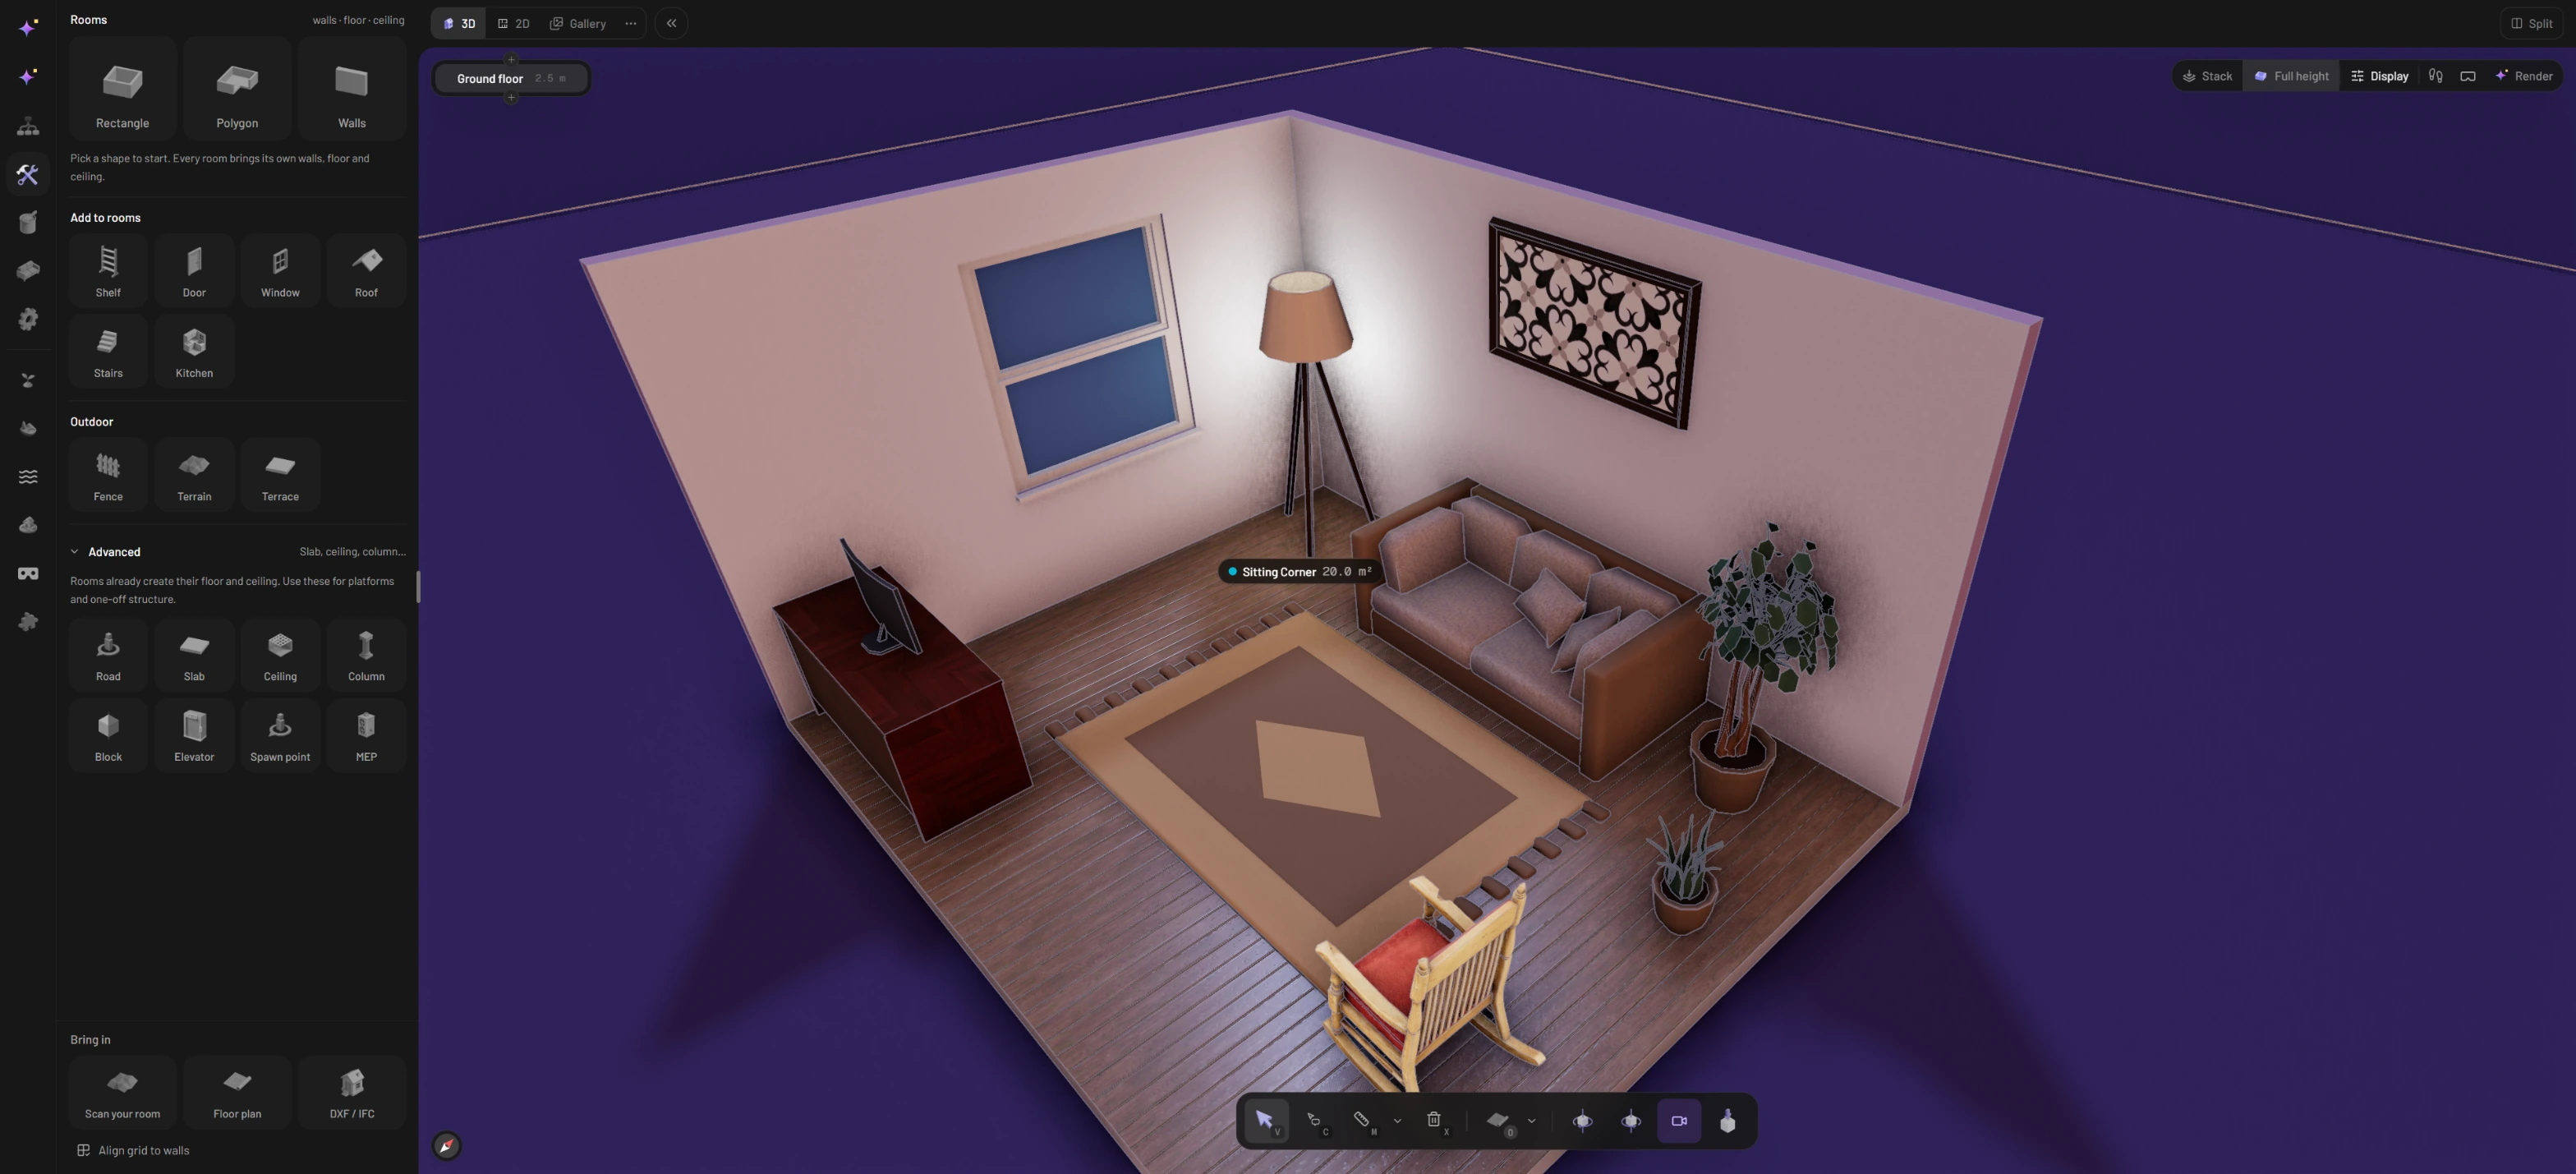
The quickest way to learn Luw\.ai Studio is to build something small. In this walkthrough you'll make a single living room of about 5 × 4 m, put a door and a window in it, bring in a couple of pieces of furniture, and then look at it from every side. Nothing here needs the AI tools, so you can follow along with any account.

<figure><img src="https://1629954275-files.gitbook.io/~/files/v0/b/gitbook-x-prod.appspot.com/o/spaces%2F3c2lKXqxOtmrzgrQQpGP%2Fuploads%2Fgit-blob-1d6a93c92e79a3fae9545b79e34c2f825e6f40a7%2Ffirst-scene-empty-to-furnished.webp?alt=media" alt="A finished sitting corner seen from above: patterned rug, sofa with cushions, floor lamp, framed wall art, desk with a monitor, two potted plants and a rocking chair, labelled Sitting Corner 20.0 m², with the Build tab open on the left"><figcaption><p>Where you're heading: a finished, furnished room</p></figcaption></figure>

## 1. Sign in and get a project

1. Go to [studio.luw.ai](https://studio.luw.ai) in a desktop browser.
2. Click **Sign in** at the top right. You're taken to app.luw\.ai to sign in with your Luw\.ai account, then straight back to the Studio.
3. The Studio opens your most recent project. On a brand-new account it creates one for you, called **Untitled Plan**.

To keep this practice room separate from other work, click the project name in the top bar to open **Projects**, click **New project**, type a name, choose **Metric** or **Imperial**, and press `Enter`. [Projects and saving](/luw.ai-studio/getting-started/projects-and-saving.md) explains the dialog in full.

{% hint style="info" %}
Not ready to sign in? Just start building. The amber **Demo mode** button in the top bar means you're trying the editor as a guest. You can follow every step from step 2 onwards, but nothing is saved and the AI features stay locked.
{% endhint %}

## 2. Pick "Draw it yourself"

An empty project greets you with a window titled **How do you want to start?** (The first time after an update, it opens on **What's new** instead; click **Start designing** to go on.) It offers three routes:

* **Start from an image**: drop, paste or browse for a floor plan, a land or zoning document, or a photo of a piece of furniture. The Studio looks at the image and offers what fits, such as building walls from a plan or making a 3D model of the furniture.
* **Describe it**: type what you want, for example "A studio apartment with a balcony", or pick one of the examples, and press **Build it →**. [Archiagent.ai](/luw.ai-studio/luw.ai-ai-tools/archiagent.md) designs and builds it. The paperclip attaches images or PDFs, such as a plan or a reference picture.
* **Draw it yourself**: draw the walls by hand.

The first two use Luw\.ai's AI and need you to be signed in. For this walkthrough, click **Draw it yourself** (**Start drawing →**); the wall tool is ready straight away. Before you do, check the **Units** switch at the bottom of the window and set it to **Feet** or **Meters**.

The window shows up once per session for an empty project. If you closed it, nothing is lost: everything below starts from the left rail's **Build** tab, and Archiagent is always one click away in **Edit with AI**.

## 3. Draw the room

1. Open the **Build** tab and, under **Rooms**, click **Rectangle**. (Pressing `B` does the same from anywhere.)
2. Click once where one corner of the room should be.
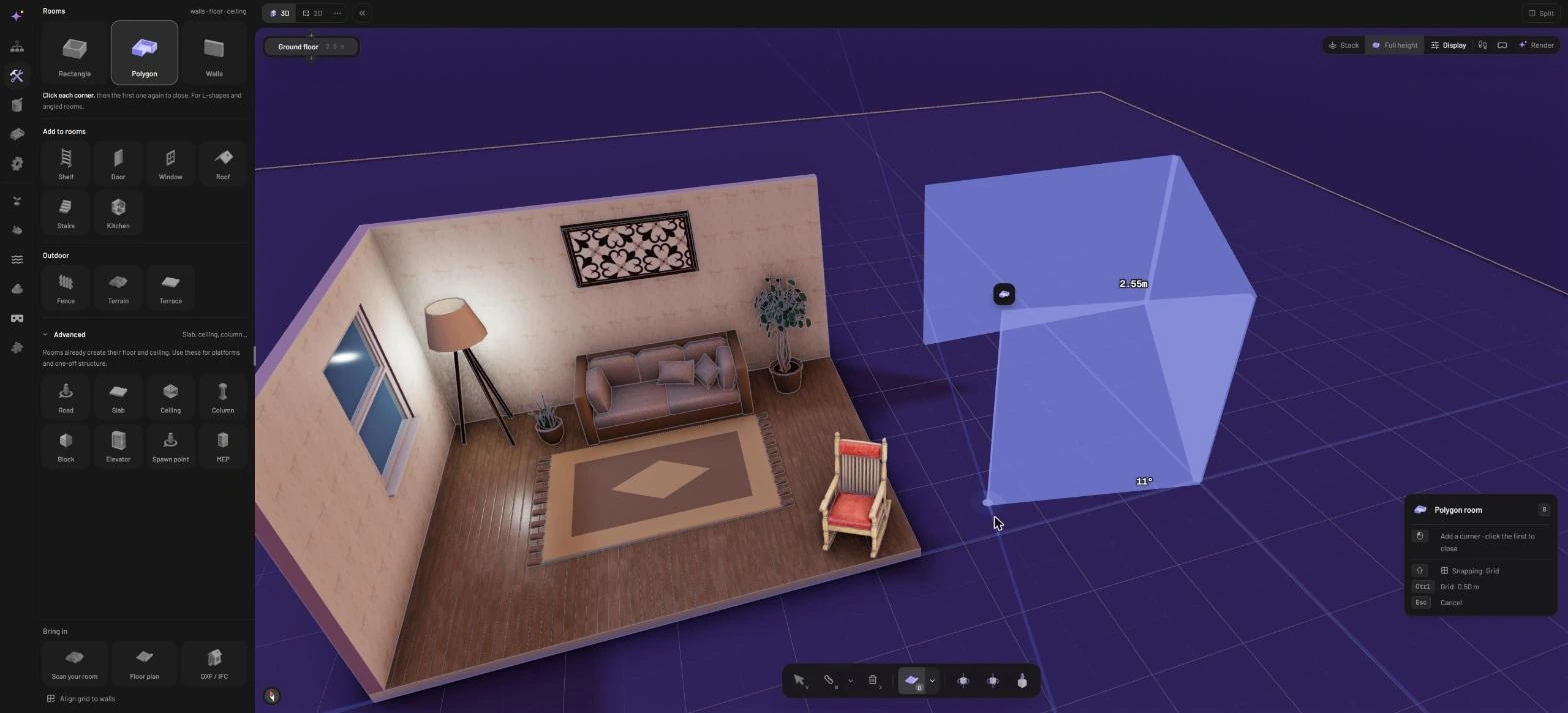
3. Move the pointer away. A preview follows it, with the length of each side written on the walls.
4. Click again when the opposite corner is where you want it, at roughly 5 m by 4 m.

That's the whole room. The four walls go up together, and the Studio adds a floor and a ceiling inside them for you.

<figure><img src="https://1629954275-files.gitbook.io/~/files/v0/b/gitbook-x-prod.appspot.com/o/spaces%2F3c2lKXqxOtmrzgrQQpGP%2Fuploads%2Fgit-blob-352a4f761f8da12204cdca059e9ad795ab3d6d75%2Fdrawing-a-room-wall-tool.webp?alt=media" alt="A new polygon room being drawn beside the furnished corner: purple wall previews with a 2.55 m length label and an 11 degree angle, and the Polygon room panel listing the snapping mode, the grid size and the keys"><figcaption><p>Lengths and angles appear on the wall as you draw; the panel on the right lists the keys that apply</p></figcaption></figure>

A few keys help while drawing:

* `Esc` drops the room you're in the middle of. Press it a second time to put the tool away.
* `Cmd/Ctrl + Z` takes back the last thing you did.
* Tap `Shift` to change how corners snap (to the grid, to lines of existing walls, to fixed angles, or not at all). The current choice is shown in the hint panel.
* Tap `Cmd/Ctrl` on its own to make the grid finer, from 50 cm down to 5 cm.

Want an L-shaped room instead? Pick **Polygon** and click each corner in turn, finishing on the first one. [Walls](/luw.ai-studio/building/walls.md) covers all three shapes.

## 4. Give the room a door and a window

1. In the **Build** tab, under **Add to rooms**, click **Door**.
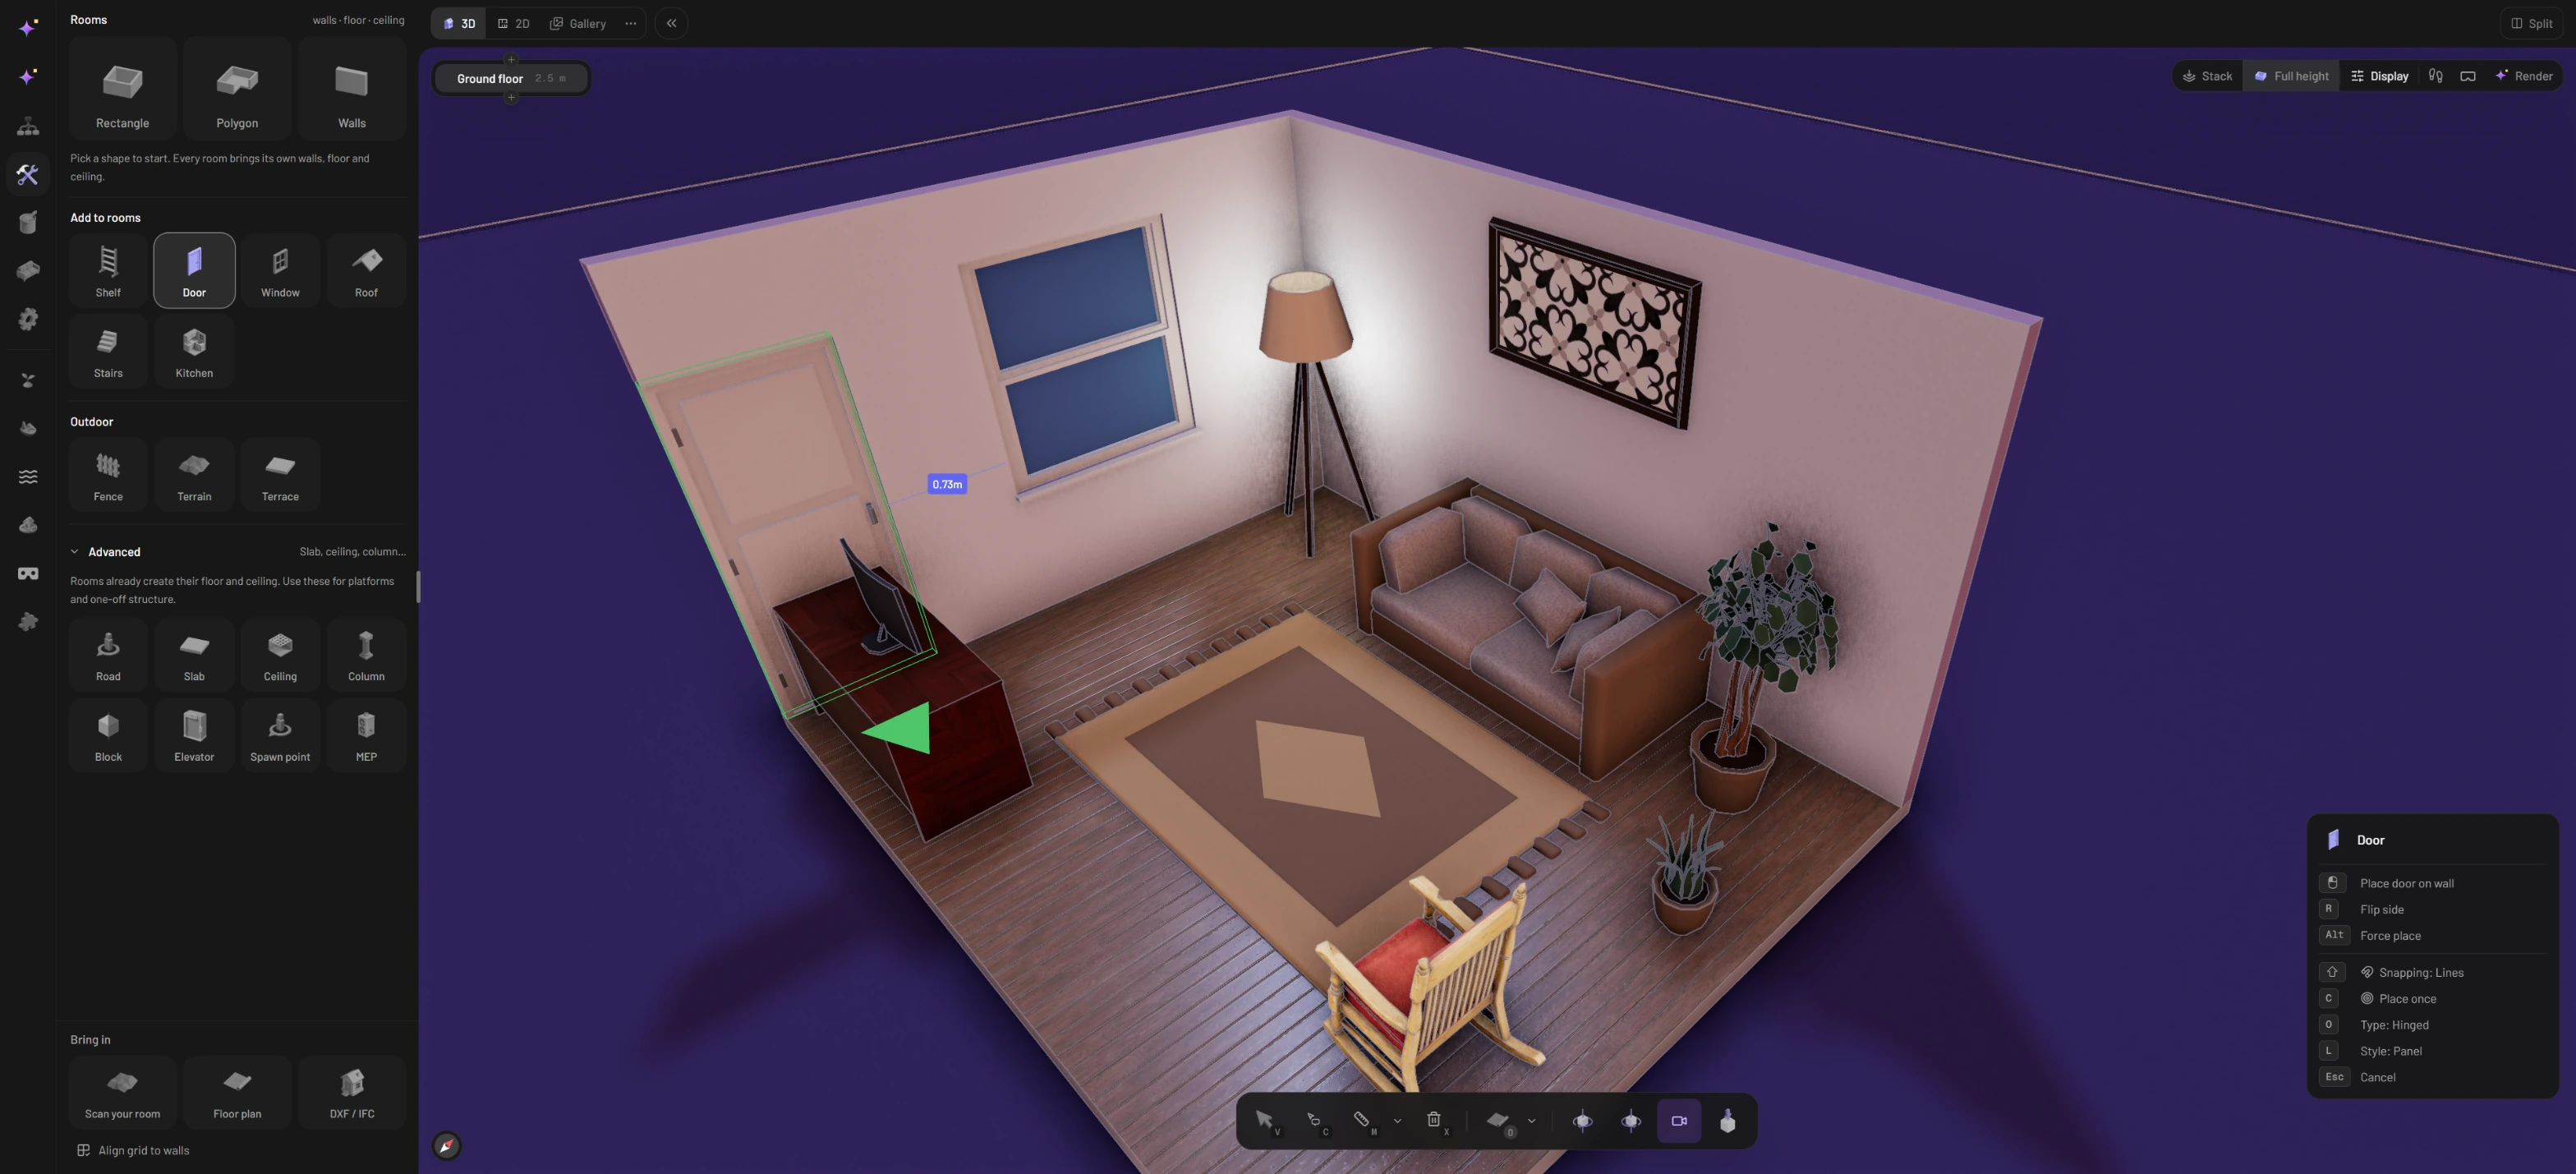
2. Move the pointer over one of the walls. The door sticks to the wall and slides along it, with labels giving its distance to whatever sits on either side.
3. Click to place it.
4. Click **Window** and place it on another wall the same way.

<figure><img src="https://1629954275-files.gitbook.io/~/files/v0/b/gitbook-x-prod.appspot.com/o/spaces%2F3c2lKXqxOtmrzgrQQpGP%2Fuploads%2Fgit-blob-06e55f87833439f301a0f53f21cecd31d1752940%2Fdoor-and-window-in-wall.webp?alt=media" alt="A green door preview on the window wall, to the left of the window, with a 0.73 m label to the window and the Door panel listing its keys"><figcaption><p>The door preview snaps into the wall and shows how far it sits from the window</p></figcaption></figure>

If the door should swing to the other side of the wall, press `R` before you click, or select the door afterwards and press `R`. To see it move, select it and press `E`; press `E` again to shut it. Windows that open respond to `E` too.

Doors and windows come in several styles, from sliding doors to garage doors. See [Doors and windows](/luw.ai-studio/building/doors-and-windows.md) for the options.

## 5. Furnish the room

1. Press `F`, or click **Items** in the left rail.
2. Choose a category (**Furniture**, **Appliance**, **Kitchen**, **Bathroom** or **Outdoor**), or type in the search box.
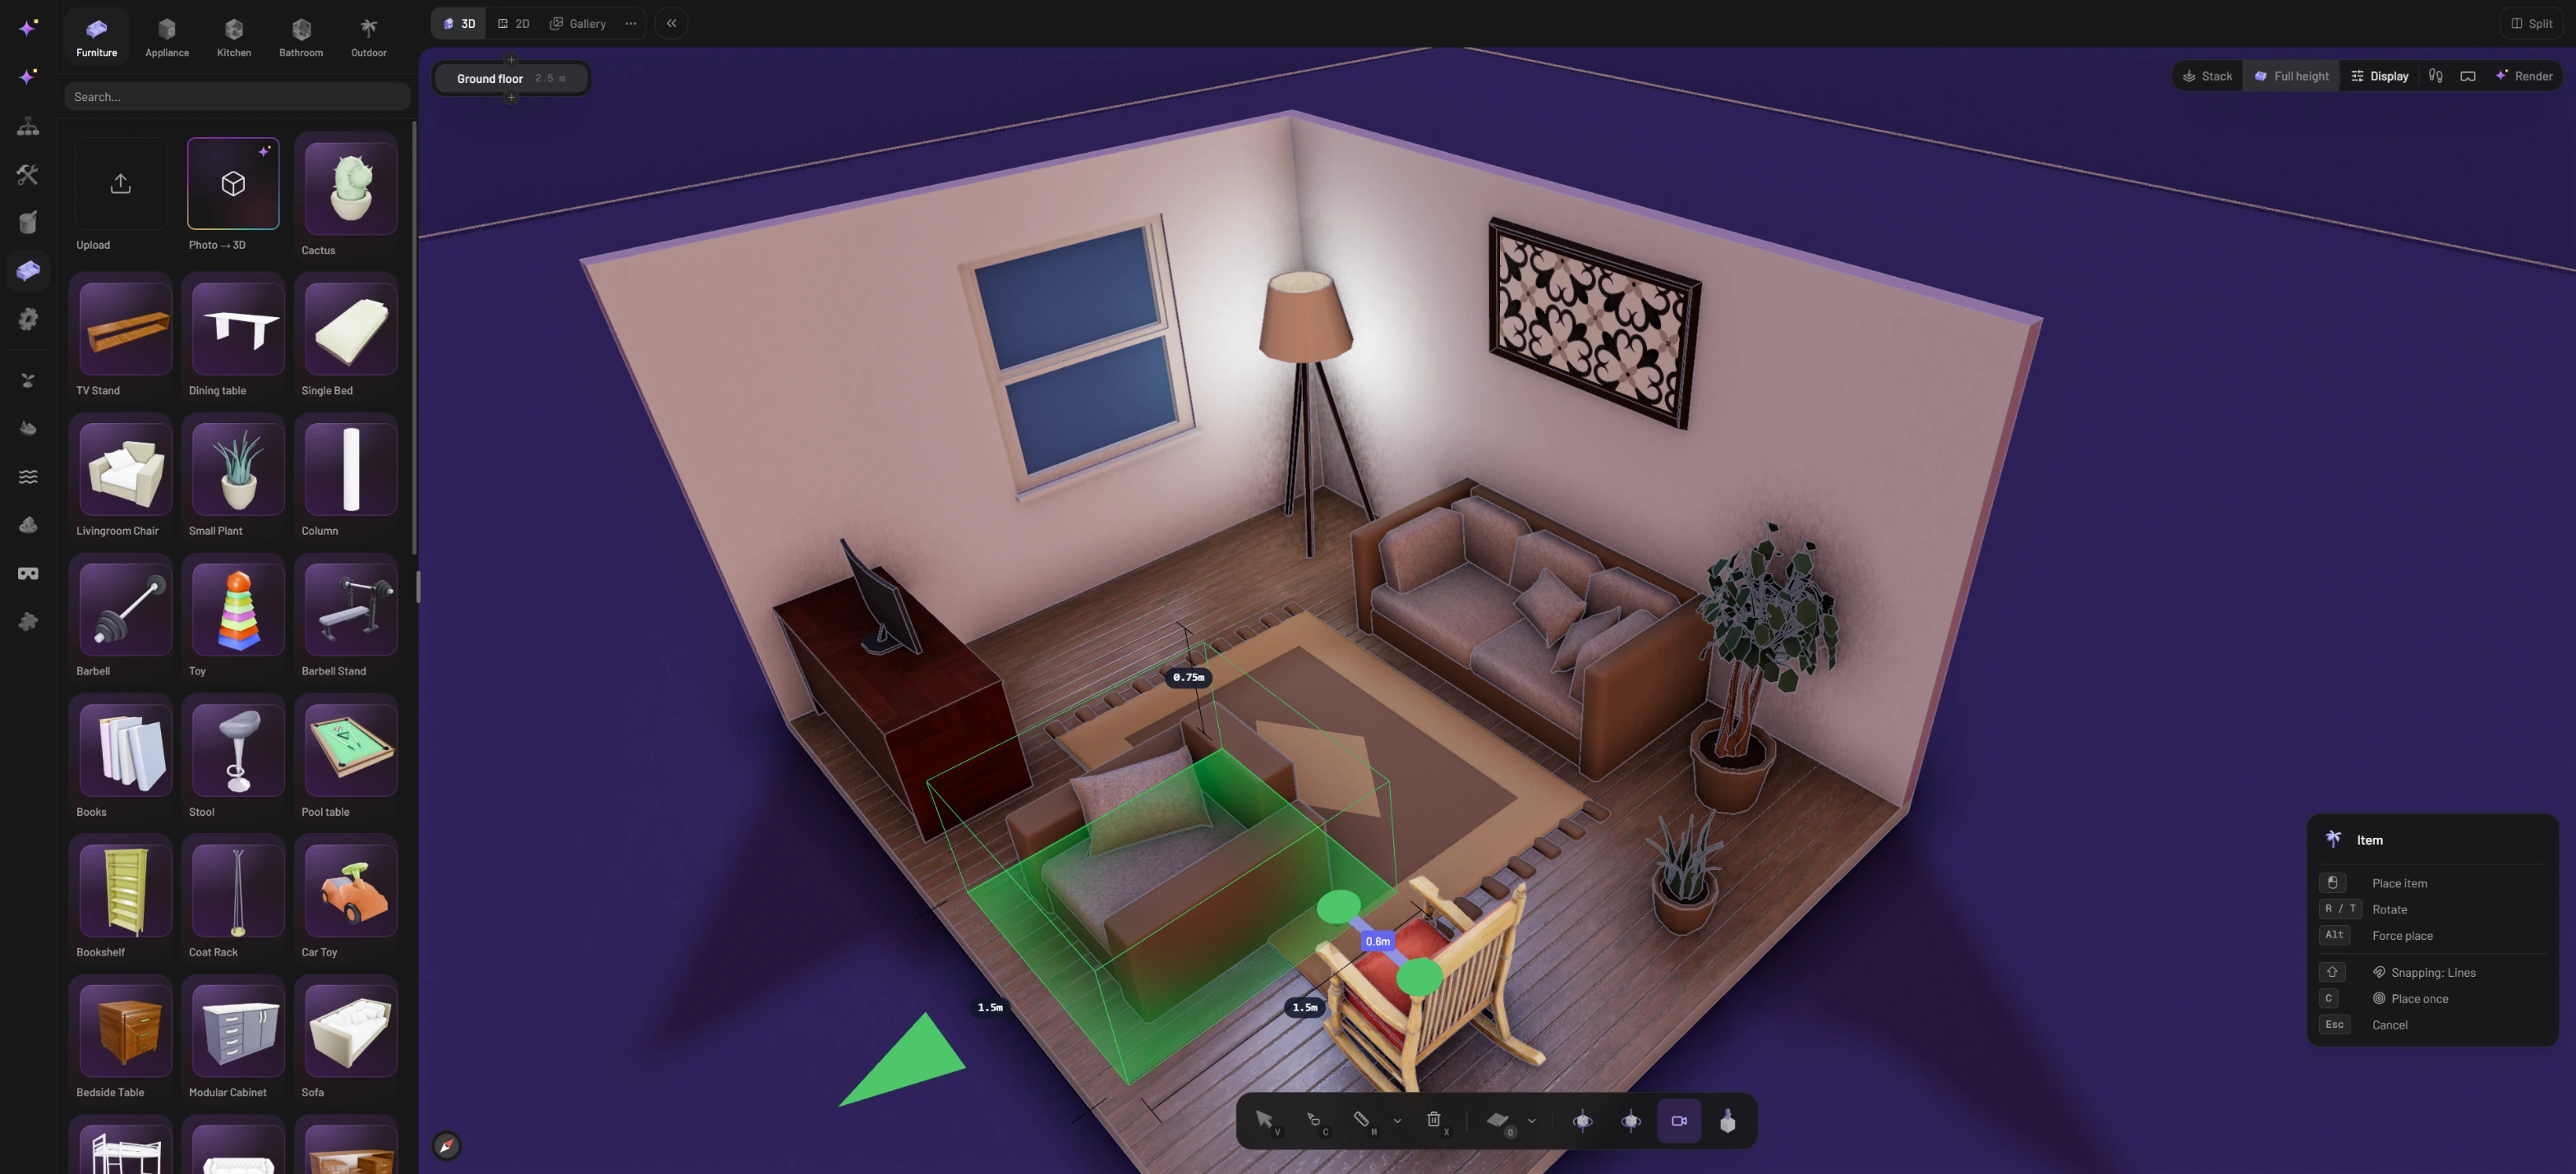
3. Click an item. It now follows your pointer around the scene.
4. Click inside the room to set it down.
5. Press `Esc` when you've finished placing.

<figure><img src="https://1629954275-files.gitbook.io/~/files/v0/b/gitbook-x-prod.appspot.com/o/spaces%2F3c2lKXqxOtmrzgrQQpGP%2Fuploads%2Fgit-blob-66cd32c87c89027d0ea32824ea6e5199d33e5c44%2Fplacing-furniture-catalog.webp?alt=media" alt="A large armchair following the pointer at the front of the room, with its 0.75 m height and 1.5 m width and depth labelled and a 0.6 m guide to the rocking chair"><figcaption><p>An armchair following the pointer, with its size shown as you place it</p></figcaption></figure>

Turn a piece in 45° steps with `R` and `T`, before you place it or after you select it. By default a click sets down a single item; press `C` to switch between **Place once** and **Place multiple** when you want several of the same chair.

The Studio keeps an eye on the layout. If a piece is too big for the room or would block a door, the hint panel says so, but it still lets you place it. A footprint that turns red marks a spot the Studio won't accept; hold `Alt` while clicking to place it anyway.

More on browsing and arranging: [Finding items](/luw.ai-studio/items-and-paint/finding-items.md) and [Placing and arranging](/luw.ai-studio/items-and-paint/placing-and-arranging.md).

## 6. Look at it from every side

With a mouse:

* Hold the **right** button and drag to orbit around the room.
* Hold the **middle** button and drag to slide the view. Holding `Space` while dragging with the left button does the same.
* Scroll to zoom in and out.
* `W`, `A`, `S` and `D` also slide the view.

Prefer clicking? In the bottom toolbar, **Top View** looks straight down on the room, while **Orbit Left** and **Orbit Right** turn the camera around it. At the top left of the canvas, flip between the **3D** model and the **2D** plan, or press **Split** (or `\`) to see both side by side.

For the full experience, click **Walkthrough** (the footprints icon at the top right). You're now standing in the room: move with `W` `A` `S` `D`, look around with the mouse, and press `Esc` to step back out.

## 7. Check that it's saved

There's no save step to remember. About a second after each change, the Studio saves the project to your Luw\.ai account, and the label next to the project name in the top bar moves from **Saving…** to **Saved**. If you want to be sure before closing the tab, press `Cmd/Ctrl + S` to save immediately.

In demo mode nothing is kept, so sign in before you build anything you want to come back to. If the label ever says **Not saved**, see [Projects and saving](/luw.ai-studio/getting-started/projects-and-saving.md) for what each message means.

## Keep going

* [Interface tour](/luw.ai-studio/getting-started/interface-tour.md): get to know the rest of the screen.
* [Keyboard shortcuts](/luw.ai-studio/getting-started/keyboard-shortcuts.md): speed up the steps above.
* [Guide images](/luw.ai-studio/building/guide-images.md): trace over a real floor plan instead of guessing measurements.
* [Floors and levels](/luw.ai-studio/building/floors-and-levels.md) and [Roofs](/luw.ai-studio/building/roofs.md): grow the room into a house.
* [Materials and paint](/luw.ai-studio/items-and-paint/materials-and-paint.md): give the walls and floor a finish.
* [Render with AI](/luw.ai-studio/luw.ai-ai-tools/render-with-ai.md): turn your view into a photoreal image.