> For the complete documentation index, see [llms.txt](https://luw-ai.gitbook.io/luw.ai-studio/llms.txt). Markdown versions of documentation pages are available by appending `.md` to page URLs; this page is available as [Markdown](https://luw-ai.gitbook.io/luw.ai-studio/building/walls.md).
# Walls
Draw rooms and single walls with live measurements and snapping, then reshape, split, curve or remove them.
Most projects in Luw\.ai Studio begin with walls. They mark out the rooms, they carry the [doors and windows](/luw.ai-studio/building/doors-and-windows.md), and as soon as a run of walls encloses a space, that space becomes a room with its own floor and ceiling. You never have to draw those separately.
## Pick a shape and start drawing
In the **Build** tab, the first group, **Rooms**, offers three tiles. Choose one before you click in the scene:
| Tile | Best for | How you draw |
| ------------- | --------------------------------------------- | ------------------------------------------------------------------------------------------------------------------------- |
| **Rectangle** | A plain box-shaped room | Click one corner, then the opposite corner. All four walls, the floor and the ceiling appear in one go. |
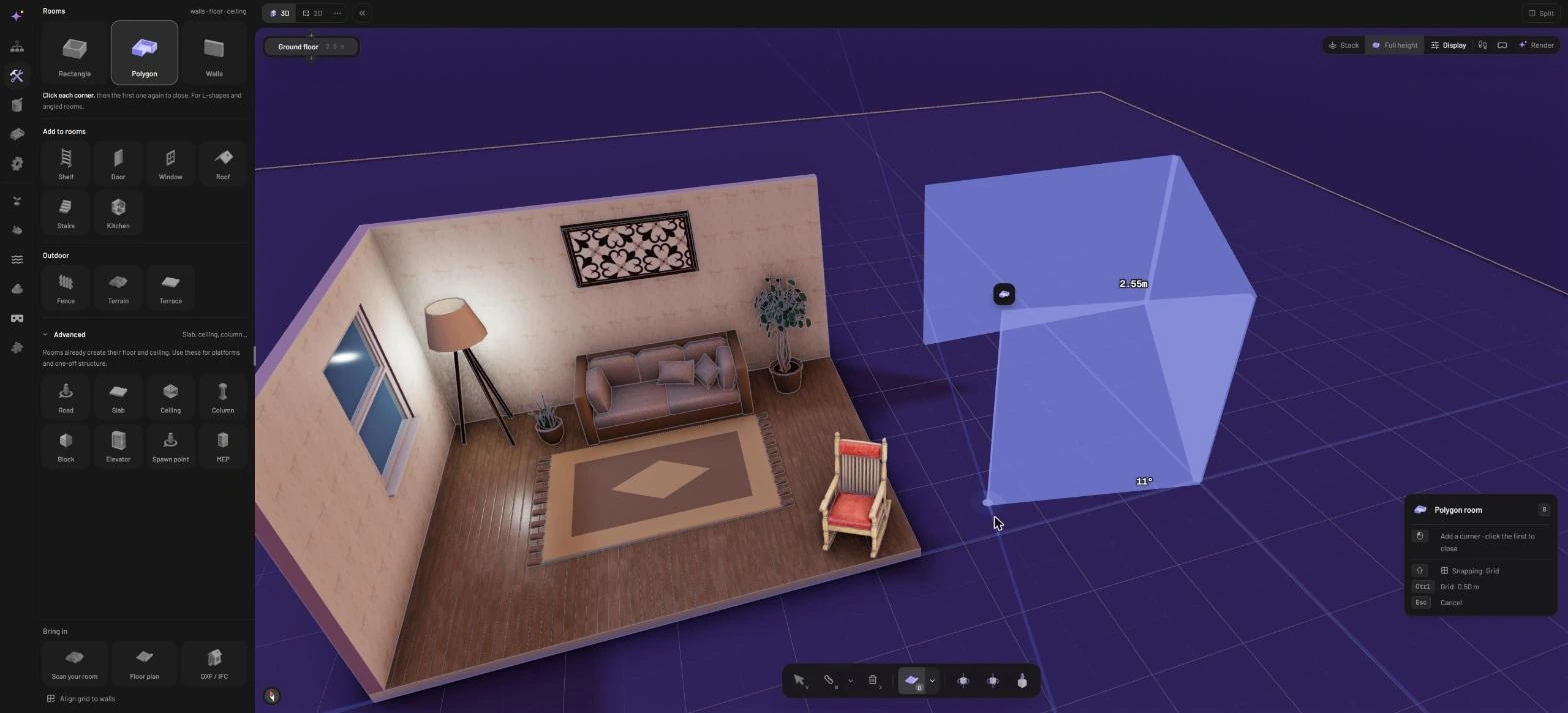
| **Polygon** | L-shaped, angled or irregular rooms | Click each corner in turn. Click the first corner again to close the shape, and every wall is built at once. |
| **Walls** | Partitions, garden walls, anything open-ended | Two clicks make one wall. The tool then waits for the next wall's start point. Close a loop and you get a room after all. |
Press `B` at any time to jump to the **Build** tab with **Rectangle** ready to draw. Drawing works the same in the 3D view and on the 2D floor plan, so use whichever you find easier.
The helper panel on the right edge of the canvas names the shape you're drawing (**Rectangle room**, **Polygon room** or just **Walls**) and reminds you which clicks it expects. `Esc` cancels.
### A few things worth knowing
* **Rectangle** rooms are always square to the building's grid. Each side needs to be at least 5 cm. If one side runs along a wall that's already there, the existing wall is reused instead of a second one being stacked on top.
* **Polygon** draws nothing permanent until the shape is finished, and then adds all its walls as a single step you can undo. It also finishes by itself when a corner lands on an existing wall. To stop early and keep the walls drawn so far, double-click. `Esc` throws the unfinished shape away, and so does switching level, view or shape.
* **Walls** stays active after each wall, so you can draw one partition after another without picking the tool again.
## Read lengths and angles as you go
A length label rides along with the wall you're drawing, at the middle of the segment. With **Rectangle** you get two labels, one for each side that meets at the cursor. Lengths appear in metres or in feet and inches, depending on your unit setting.
Angles show up as small arcs with a degree value. You'll see one where the new wall meets a connected wall, and one at the start of the segment showing its angle to the nearest grid axis.
Lengths and angles ride along on the walls you are drawing
You can't type a length while drawing. To get an exact figure, draw the wall roughly, then either set **Length** in its properties panel, or, on the 2D floor plan in Select mode, click the wall's dimension label and type the value you want, for example `3.81m` or `12'-6"`.
## Control snapping
With a wall tool armed, look for the **Snapping** chip in the helper panel. A quick tap of `Shift` on its own, or a click on the chip, moves to the next mode. The Studio remembers your choice.
| Mode | What your clicks snap to |
| ------------------ | ---------------------------------------------------------------------------------------------------------------------------------------------------------------------------------------------- |
| **Grid** (default) | Points on the grid. Tap `Ctrl` (`Cmd` on a Mac) to make the grid finer, from 0.5 m down through 0.25 m and 0.1 m to 0.05 m, then back to the start. The **Grid** chip shows the current step. |
| **Lines** | Existing walls: their corners, midpoints, crossings and bodies. Dashed alignment guides also pull the point into line with nearby geometry. A marker shows the exact point you've locked onto. |
| **Angles** | Directions in 15° steps from the segment's start. The length stays free. |
| **Off** | No grid, angle or guide snapping. The point follows the cursor. |
Even in **Grid** and **Angles** mode, you still see alignment guides; they only pull the point in **Lines** mode. And whatever the mode, a point that comes within 5 cm of a wall sticks to it, so your rooms close properly.
### Joining onto an existing wall
If a new wall ends partway along an existing one, the existing wall is split at that point so the two connect properly. A wall drawn right across another splits both. Any doors, windows or wall-mounted items end up on whichever piece they were sitting on. The one exception is a junction that falls inside an opening: that wall isn't split.
## Reshape a wall
Click a wall in either view to select it. Then:
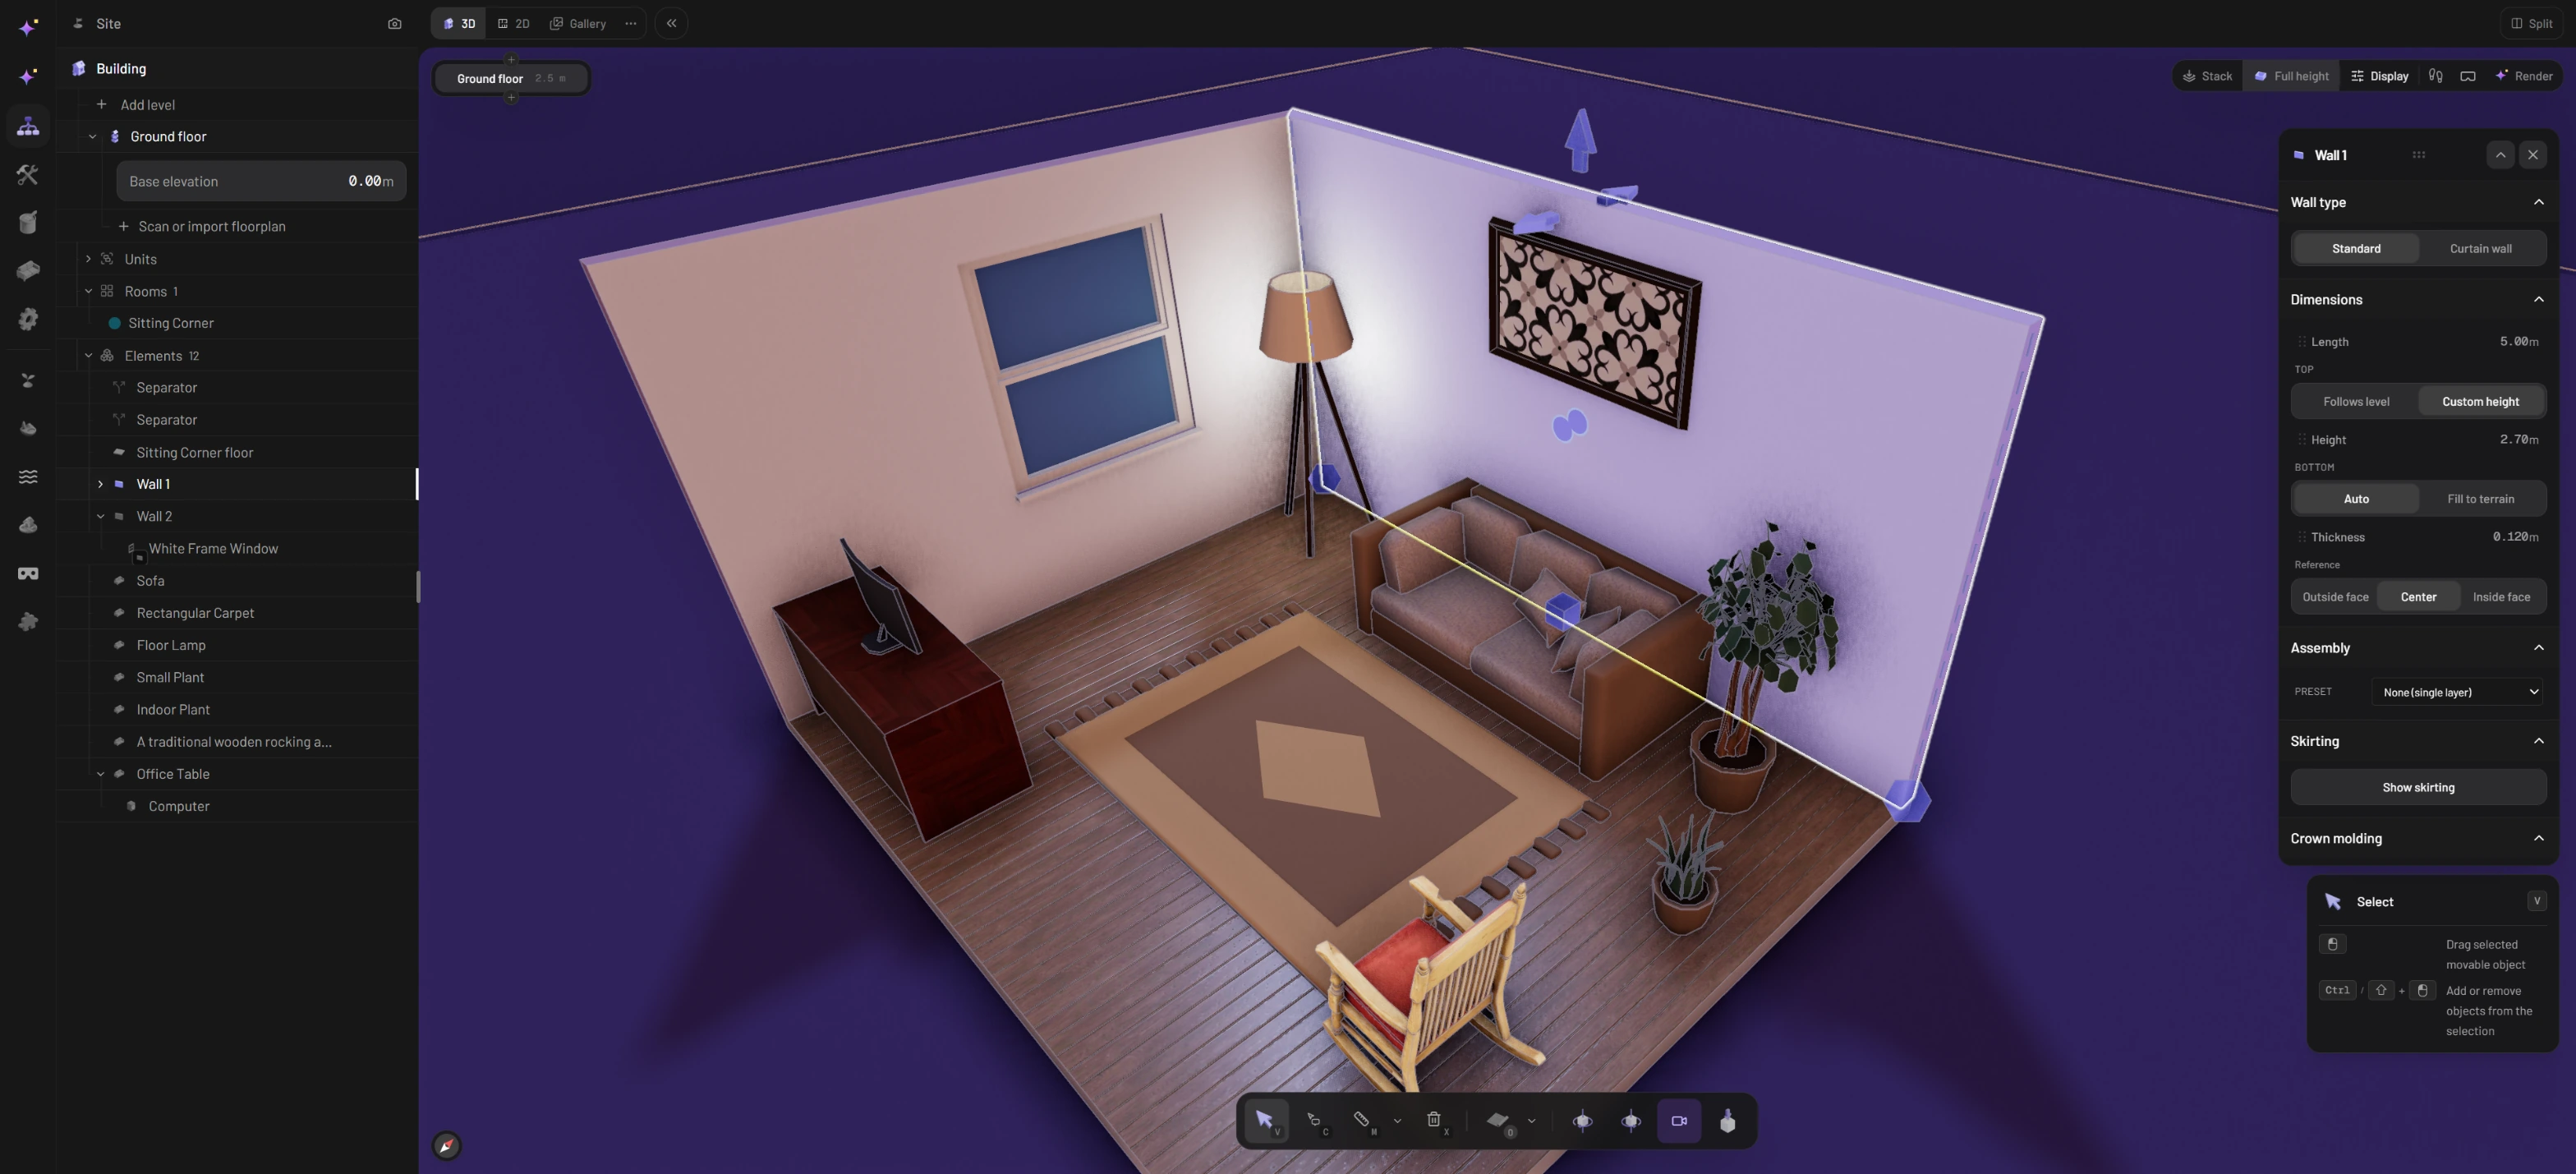
* **Drag an end point** to move that end. Walls joined at the same corner move with it, so the corner stays closed. To pull one wall away from the corner, hold `Alt` while you drag; the cursor shows **Detaching corner**.
* **Drag a side arrow** to push the whole wall sideways, keeping its direction.
* **Drag the top arrow** to make the wall taller or shorter. This gives the wall its own height (**Custom height**), with 0.5 m as the lowest.
* **Type exact values** in the properties panel (see below).
A selected wall: end handles, push and height arrows, and the floating action menu
The floating menu above a selected wall has **Move**, **Curve**, **Duplicate**, **Delete** and **Split wall**. With several walls selected, **Merge walls** joins them into one. **Split wall** shows marks where the cuts will go. Scroll to add more cuts (they're spaced evenly), or hold `Alt` to place them freely.
Doors and windows belong to their wall, so they travel with it when you move or reshape it.
### Exact sizes in the properties panel
Under **Dimensions** you'll find:
* **Length**.
* **Top**: **Follows level** keeps the wall as tall as the storey (2.5 m on a new level). **Custom height** lets you type a height for this wall only.
* **Bottom**: **Auto**, or **Fill to terrain** to extend the wall down to meet sloping ground.
* **Thickness**: new walls are 0.1 m thick.
* **Reference**: which part of the wall sits on the line you drew: **Outside face**, **Center** or **Inside face**. (For a wall without a room on exactly one side, the choices read **Left**, **Center** and **Right** instead.)
* **Curve**: bends the wall into an arc.
You'll only see **Curve** on a wall that has nothing set into it: no door, window or wall-mounted item. Openings need a straight wall, so add them after you've curved it.
Further down are **Assembly** (the layers that make up the wall), **Paint regions**, and three trims you can turn on for either side or both: **Skirting**, **Crown molding** and **Chair rail**. At the top of the panel, **Wall type** switches between a **Standard** wall and a **Curtain wall**.
{% hint style="info" %}
Rooms whose walls all have a custom height under 0.5 m, such as a pool rim, a planter or a kerb, don't get a ceiling.
{% endhint %}
## See into the rooms
The wall button in the viewer toolbar at the top right changes how walls are shown while you work: **Cutaway**, **Full height**, **Low** or **Translucent**. Lowering the walls is handy when you're furnishing a room and the walls keep getting in the way of the camera.
## Straighten the grid for an angled plan
If your building doesn't sit square to the grid, for example because you traced a plan that was scanned at an angle, snapping fights you. At the bottom of the **Build** tab, under the **Bring in** tiles, click **Align grid to walls**. The Studio looks at the walls on the active level (longer walls count for more), and turns the building so the grid and snapping line up with them. Nothing moves on screen, and the change is a single undo step.
A short note under the button tells you what happened: how many degrees the grid turned, that it already ran along the walls, or that you need to draw some walls first.
## Delete walls
* Select a wall and press `Delete` or `Backspace`. If you've selected ten or more things at once, you're asked to confirm.
* Press `X` for delete mode, then click walls on the current level to remove them one by one.
* Or click **Delete** in the floating menu.
Doors, windows and wall-mounted items in a deleted wall go with it. If the wall closed off a room, that room opens up and loses its automatic floor and ceiling. Close the gap again and they come back.
## Related pages
* [Floors and levels](/luw.ai-studio/building/floors-and-levels.md)
* [Guide images](/luw.ai-studio/building/guide-images.md), to trace walls over a floor plan
* [Zones](/luw.ai-studio/building/zones.md), to name your rooms
* [Keyboard shortcuts](/luw.ai-studio/getting-started/keyboard-shortcuts.md)