> For the complete documentation index, see [llms.txt](https://luw-ai.gitbook.io/luw.ai-studio/llms.txt). Markdown versions of documentation pages are available by appending `.md` to page URLs; this page is available as [Markdown](https://luw-ai.gitbook.io/luw.ai-studio/building/mep.md).

# HVAC and plumbing (MEP)

Draw air ducts, drain and vent pipes and refrigerant lines along walls and ceilings, add registers, HVAC units and fittings that join up through their ports, then edit the runs and check the whole sys

The **MEP** tools add the building services: ducts with their registers and HVAC units, refrigerant lines, and drain and vent pipes. You draw a run like a wall, one click per segment, and Luw\.ai Studio adds the elbows, tees and end caps. Parts connect through ports, so a duct that reaches a register's collar is joined to it.

Ducts, pipes and collars are sized in inches, the way they're sold.

## Open the MEP tools

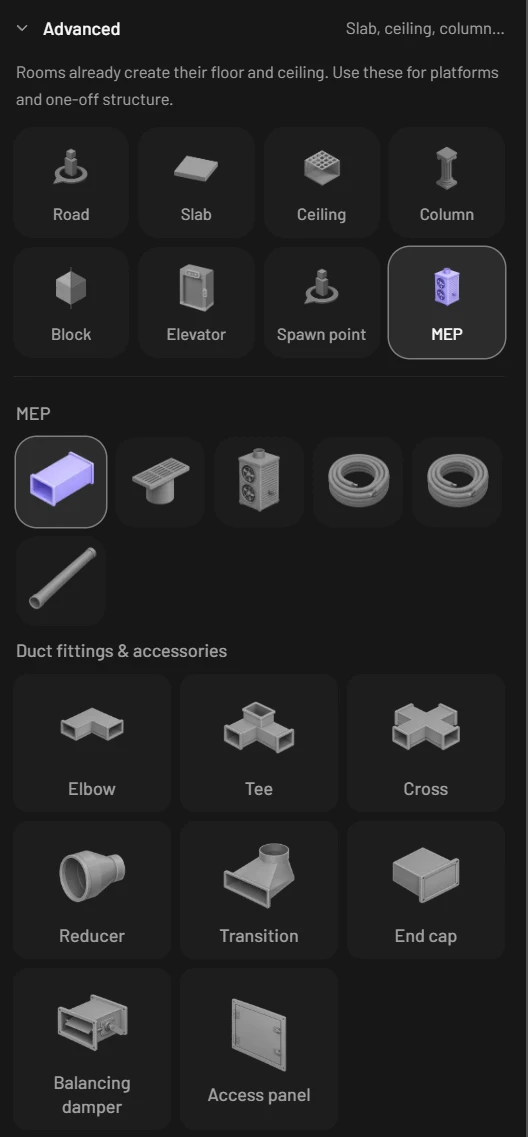
In the **Build** tab, unfold **Advanced** and click **MEP**. Six tiles open underneath; hover one to see its name.

| Tile            | What it adds                                                    |
| --------------- | --------------------------------------------------------------- |
| **Duct**        | Air ducts: round, rectangular or flat oval                      |
| **Register**    | A supply register, ceiling diffuser or return grille            |
| **HVAC Unit**   | A furnace, air handler or condenser                             |
| **Lineset**     | The copper refrigerant pair from a condenser to the indoor coil |
| **Liquid Line** | A single thin copper line                                       |
| **DWV Pipe**    | Drain, waste and vent pipes                                     |

<figure><img src="https://1629954275-files.gitbook.io/~/files/v0/b/gitbook-x-prod.appspot.com/o/spaces%2F3c2lKXqxOtmrzgrQQpGP%2Fuploads%2Fgit-blob-56f69325e079067e24ea7963eb49460c319ab754%2Fmep-build-panel.webp?alt=media" alt="The Advanced group of the Build tab with the MEP tile lit, the MEP grid of six tiles with Duct active, and the Duct fittings and accessories row: Elbow, Tee, Cross, Reducer, Transition, End cap, Balancing damper and Access panel"><figcaption><p>Build › Advanced › MEP. Pick a tool from the grid; the fittings row appears while the Duct tool is on.</p></figcaption></figure>

## Draw a duct run

1. Pick **Duct**. Your first run is a rectangular 14 × 8 in supply trunk.
2. Click where it starts. Start on the open end of another duct, or on a register's or unit's collar, and the run takes over that shape and size.
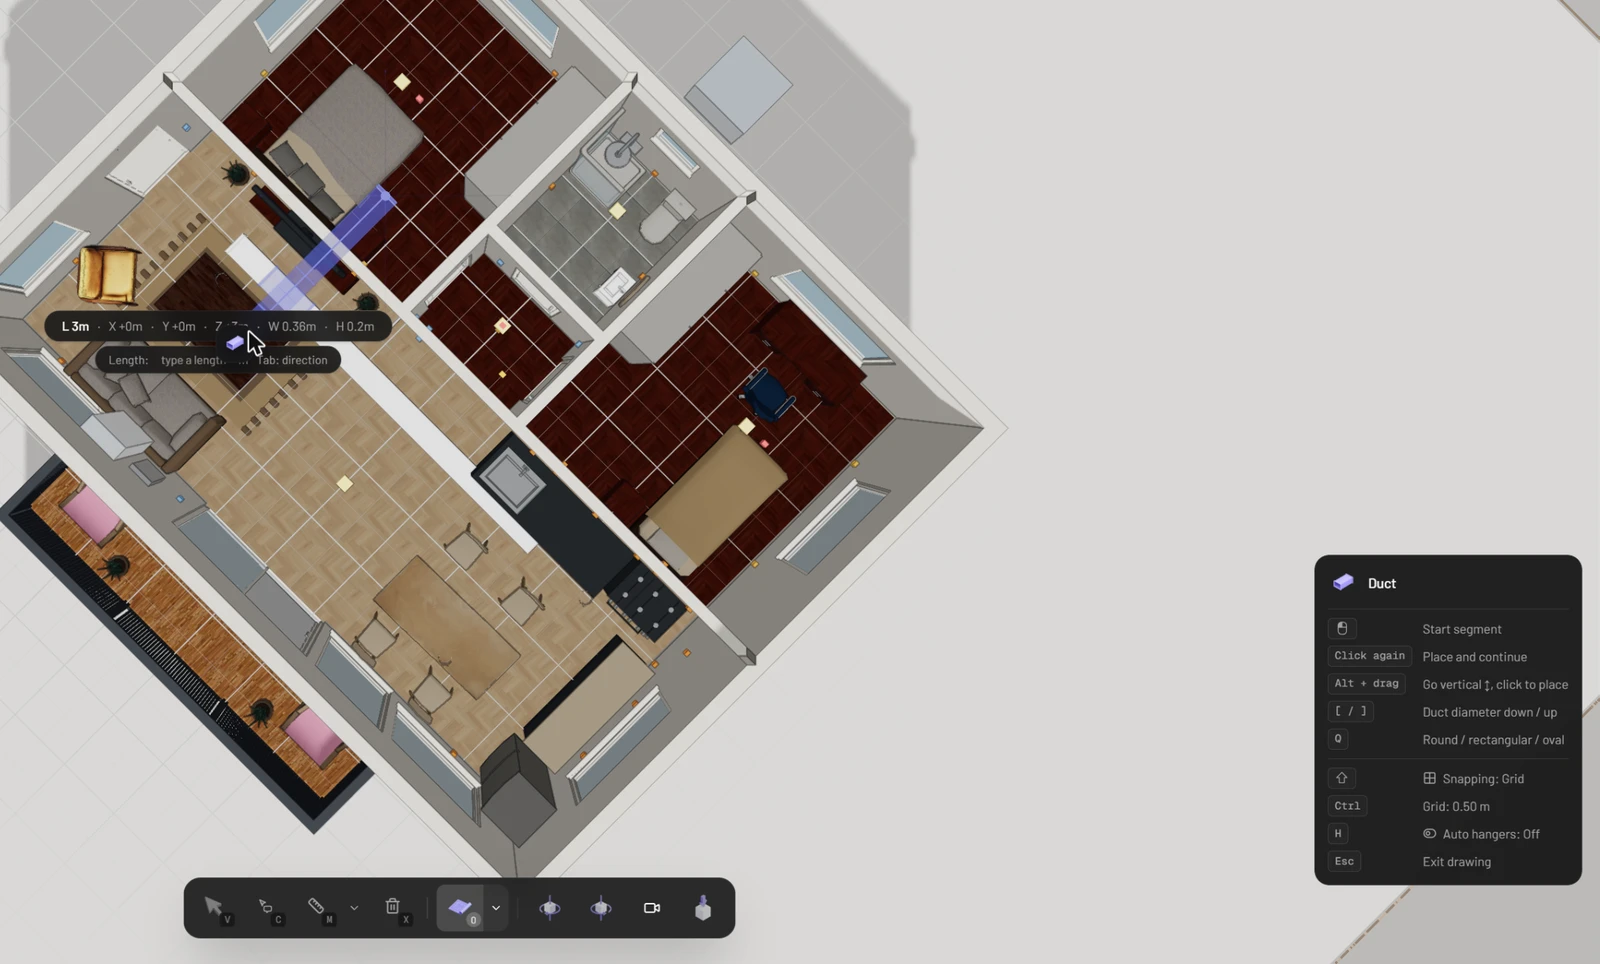
3. Move the pointer. A label shows the length (**L**), the X, Y and Z offsets and the size. For an exact length, type it in metres and press `Enter`; `Tab` steps through the directions on offer.
4. Click to place the segment. The run carries on from there, so keep clicking. Hold `Alt` and move the mouse up or down for a riser.
5. Press `Esc` when you're done.

`Q` switches between round, rectangular and oval, `[` / `]` step a round duct through the stock sizes from 4 to 20 in, and `Shift` changes the [snapping mode](/luw.ai-studio/building/walls.md#control-snapping). The [hint panel](/luw.ai-studio/getting-started/interface-tour.md#hint-panel) lists every key while the tool is in use.

### Let the Studio fit the joints

* Leave the end of a run at an angle of 15° to 90° and an elbow goes into the corner.
* Start or finish on the side of a run and it's split with a tee. Draw straight across one for a four-way cross.
* Change profile at a joint, say from a rectangular trunk to a round branch, and a transition or reducer bridges it.
* Open ends get an end cap, which goes when you draw on from there.

You see these fittings before you click. If a joint won't fit, a red line says why, for example **Not enough room for this fitting. Lengthen the run or move the connection.**

### Run it along a wall or under a ceiling

In 3D, the run follows the surface under the pointer. Start on a wall face and it locks to that wall: each segment stays in the wall's plane, just clear of it, and when you move the run later it slides along the wall. Start under a ceiling and it hangs just below; on the floor it rests on the floor.

<figure><img src="https://1629954275-files.gitbook.io/~/files/v0/b/gitbook-x-prod.appspot.com/o/spaces%2F3c2lKXqxOtmrzgrQQpGP%2Fuploads%2Fgit-blob-5780a582696ebb62c28b4eb5f8d45fe4a740b66f%2Fmep-duct-drawing.webp?alt=media" alt="Drawing a duct from above: the next segment previews in purple from the last point, a label reads L 3m with its X, Y, Z, W 0.36m and H 0.2m values and Length: type a length, Tab: direction, and the Duct hint panel lists Start segment, Place and continue, Go vertical, Duct diameter down / up, Round / rectangular / oval, Snapping, Grid, Auto hangers and Exit drawing"><figcaption><p>The Duct tool mid-run. The label tracks the length; the hint panel lists every key.</p></figcaption></figure>

## Choose size, shape and material

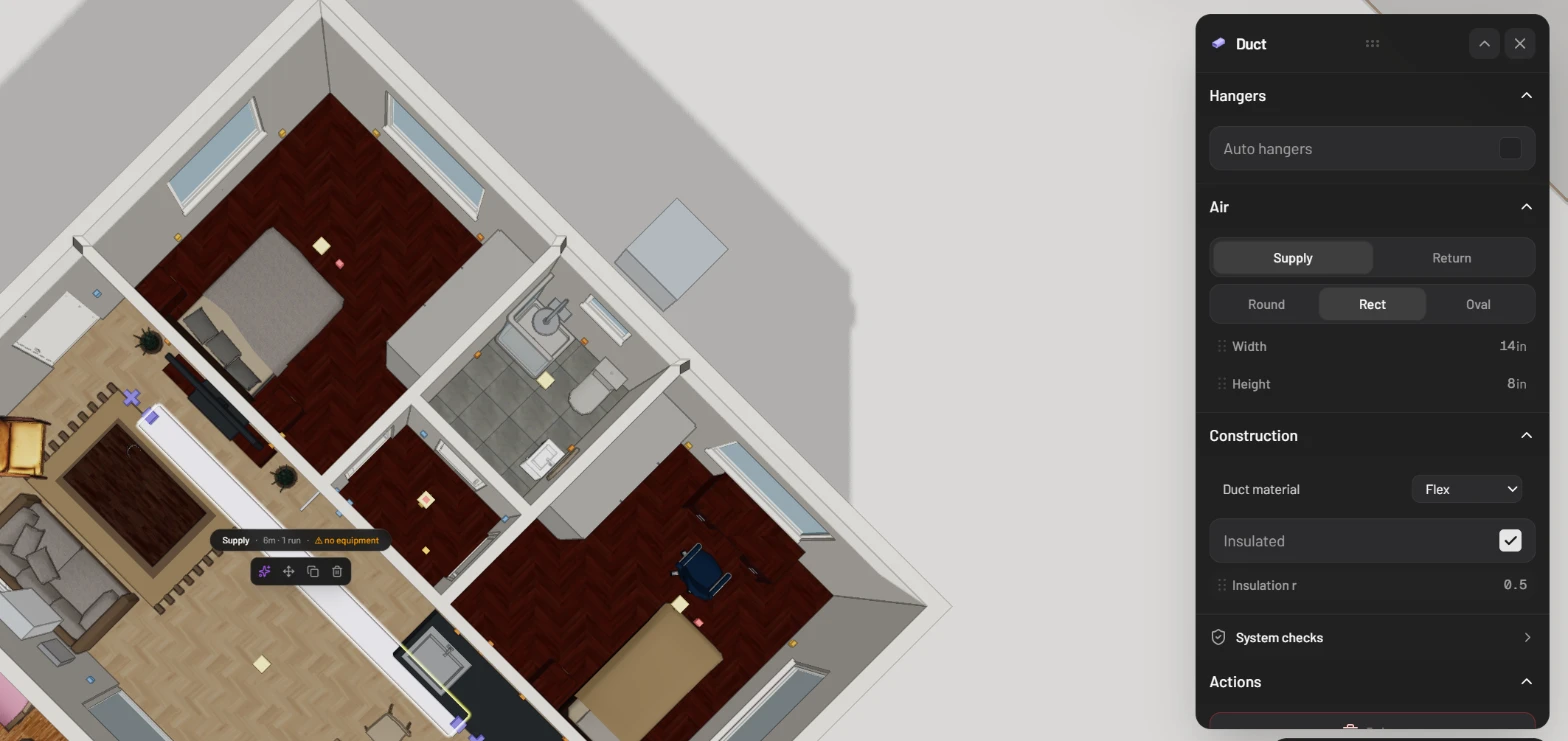
Select a run to open its **Duct** panel:

| Section          | Settings                                                                                                                                                                                                    |
| ---------------- | ----------------------------------------------------------------------------------------------------------------------------------------------------------------------------------------------------------- |
| **Hangers**      | **Auto hangers** adds supports to nearby walls or ceilings, 1.5 m apart to start, with single or double hanger lines. `H` toggles it while drawing.                                                         |
| **Air**          | **Supply** or **Return**; **Round**, **Rect** or **Oval**; **Diameter** (4–24 in), or **Width** and **Height**                                                                                              |
| **Construction** | **Duct material**: **Sheet metal**, **Spiral** (round only), **Flex** or **Duct board**. **Seam detail** draws the spiral seam or flex ribs. **Insulated** adds a wrap whose thickness follows its R-value. |

## Add fittings and accessories

While **Duct** is armed, the **Duct fittings & accessories** row offers **Elbow**, **Tee**, **Cross**, **Reducer**, **Transition**, **End cap**, **Balancing damper** and **Access panel**. Pick one and its choices follow, such as **Profile**, **Diameter (in)** or **Blade opening (°)**.

Hover a duct end or an open collar and the fitting jumps onto it, lined up; click to fit it. `R` / `T` turn it by 45°, and `Alt` switches the axis (Y, X, Z). An access panel goes on a duct's face.

For pipes, **Pipe fittings & accessories** offers **Elbow**, **Wye**, **Sanitary tee**, **Cross**, **End cap**, **Cleanout** (**End** or **Inline**), **Reducer** and **Coupling**, in **PVC**, **ABS** or **Cast iron**.

## Place registers and HVAC units

**Register**: click to place. `M` switches between floor, ceiling and wall mounts, and `R` / `T` turn a floor or ceiling register by 45°. Near a duct end it clicks on (**Snapped to duct**), facing the right way. Its panel sets the **Terminal type** (**Supply register**, **Diffuser** or **Return grille**), the face size and the collar.

**HVAC Unit**: click to stand a furnace on the floor. Its panel switches it to **Air handler** or **Condenser** and sizes the cabinet and collars. A furnace or air handler has its supply collar on top and the return on one side. Opposite the return, every unit has a refrigerant connection, a condenser's only one.

## Lay refrigerant lines

**Lineset** draws click by click, like a duct, and snaps only onto refrigerant connections. Its panel sets the **Suction diameter** (7/8 in to start), the **Liquid diameter** (3/8 in) and **Insulated**.

**Liquid Line** draws the same way. Or turn on **Follow lineset** (or press `F`) and click a lineset: a liquid line is laid along all of it, on the side your pointer is on.

## Draw drain and vent pipes

**DWV Pipe** works like **Duct**, starting as a level 2 in PVC waste pipe. `Q` switches waste and vent, `S` gives a waste pipe a ¼ in per foot fall (or levels it again), and `[` / `]` step through 1¼ to 6 in. Corners get elbows, side connections a sanitary tee, open ends a cap.

A P-trap (**Trap**) has its own panel too. The desktop **Build** tab has no tile for it; in VR, the build wand offers **Add Trap** (see [Walkthrough and VR](/luw.ai-studio/plugins/walkthrough-and-vr.md)).

## Edit a run

Click a run in 3D:

* A cube marks every end and bend. Click it for arrows and drag one to move that point; a dragged end snaps onto a nearby port.
* The middle cube moves the whole run. Lift or lower it and the Studio adds elbows and a riser to stay connected; a red preview means it can't. A curved arrow rolls a rectangular or oval duct (or press `R` / `T`).
* The **+** past an end carries on drawing with the same settings.
* The menu above the run has **Ask AI**, **Move**, **Duplicate** and **Delete**.

Delete a branch and the fitting it leaves adapts: a cross becomes a tee, a tee an elbow, and two straight pieces join up.

**System checks**, near the bottom of a duct or pipe panel, lists errors and warnings across all systems, such as open ends, mismatched connections and hangers without a support. Click an item in a finding to fly to it.

<figure><img src="https://1629954275-files.gitbook.io/~/files/v0/b/gitbook-x-prod.appspot.com/o/spaces%2F3c2lKXqxOtmrzgrQQpGP%2Fuploads%2Fgit-blob-c2689052e9a1883f56928f5843d813786b15eaaa%2Fmep-duct-panel.webp?alt=media" alt="A supply duct selected across the living room, with its tag Supply · 6m · 1 run · no equipment and the Duct panel: Auto hangers, Air set to Supply and Rect with Width 14 in and Height 8 in, Construction with Insulated on and Insulation r, System checks and Actions"><figcaption><p>A selected run and its panel. The tag warns that this run isn’t connected to any equipment yet.</p></figcaption></figure>

## See it in 3D and 2D

In 3D, ducts are plain matte white so they read as part of the building, and you can [paint](/luw.ai-studio/items-and-paint/materials-and-paint.md) them. PVC is white, ABS black, cast iron dark grey, and copper lines copper.

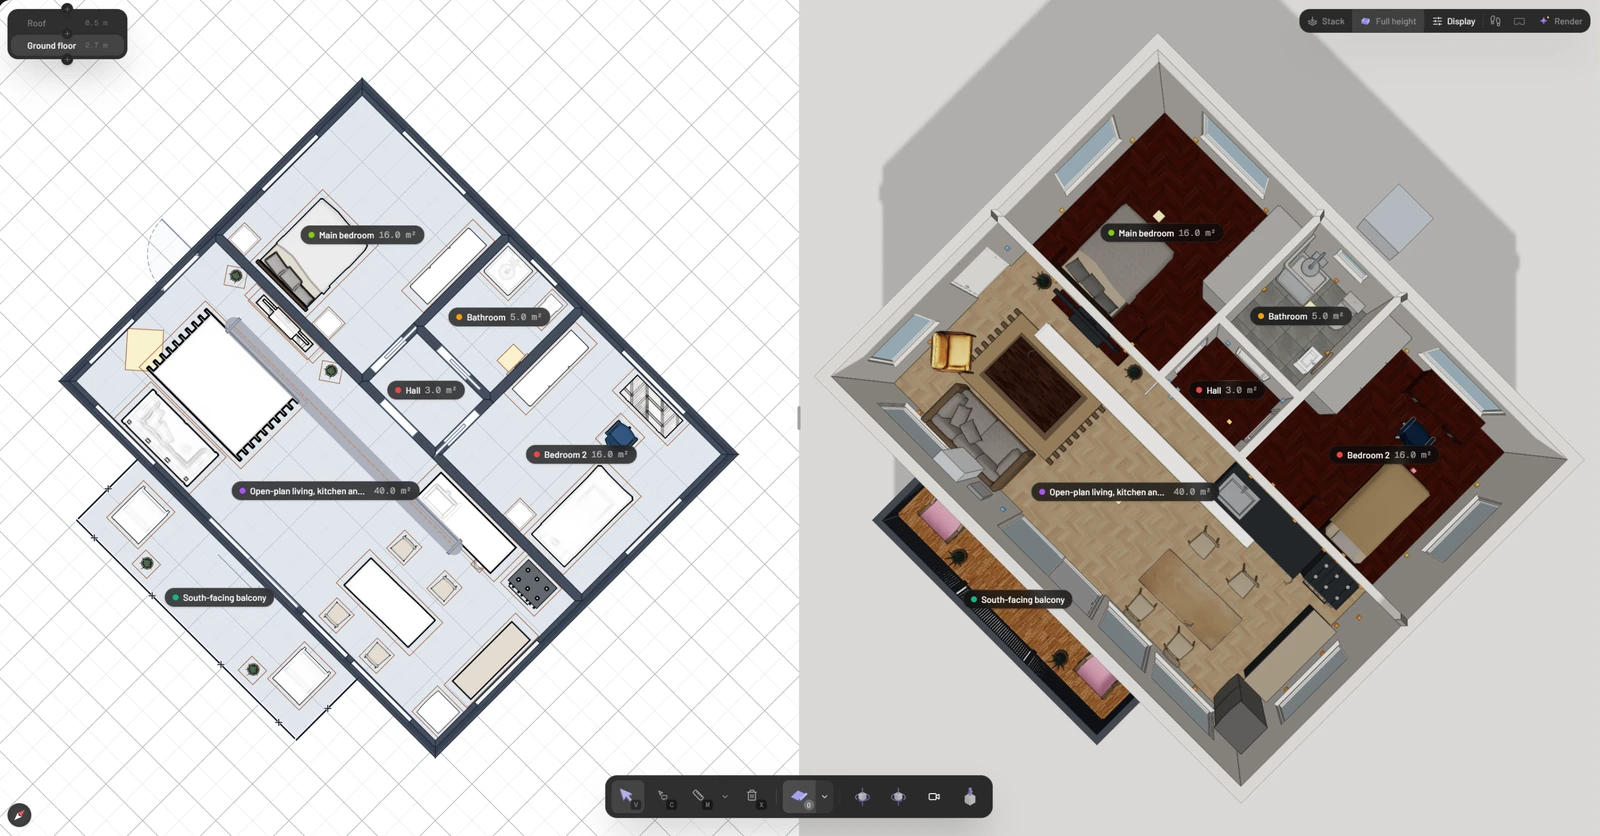
On the 2D plan, a duct is drawn at its real width with a dashed centre line: orange for supply, blue for return. Waste pipes are solid, vents dashed, and vertical ducts and stacks are circles. Select a duct in 2D to drag its points, slide a segment sideways or start a branch from the handle in the middle of a segment.

<figure><img src="https://1629954275-files.gitbook.io/~/files/v0/b/gitbook-x-prod.appspot.com/o/spaces%2F3c2lKXqxOtmrzgrQQpGP%2Fuploads%2Fgit-blob-f7cac5cce6ed94c3112e2869a0c76a2d312da64c%2Fmep-plan-view.webp?alt=media" alt="Split view of the flat from above: on the left the 2D plan with the duct drawn as a grey band with an orange dashed centre line, on the right the same duct in 3D under the ceiling"><figcaption><p>Ducts show on the 2D plan as banded runs with a dashed centre line, and in 3D at their real height.</p></figcaption></figure>

## Ask Archiagent

[Archiagent.ai](/luw.ai-studio/luw.ai-ai-tools/archiagent.md) has no tool for drawing ducts, pipes or lines, or for placing registers and units. It can change what you've drawn: select a run, choose **Ask AI**, and ask it to switch it to return, resize it, insulate it or delete it.

## Related pages

* [Walls](/luw.ai-studio/building/walls.md)
* [Floors and levels](/luw.ai-studio/building/floors-and-levels.md)
* [Materials and paint](/luw.ai-studio/items-and-paint/materials-and-paint.md)
* [Archiagent.ai](/luw.ai-studio/luw.ai-ai-tools/archiagent.md)