> For the complete documentation index, see [llms.txt](https://luw-ai.gitbook.io/luw.ai-studio/llms.txt). Markdown versions of documentation pages are available by appending `.md` to page URLs; this page is available as [Markdown](https://luw-ai.gitbook.io/luw.ai-studio/building/kitchens.md).
# Kitchens
Draw cabinet runs along your walls with the Kitchen tool, mix base, wall and tall units, set the countertop, add a sink, hob, oven or fridge, and finish the fronts, handles and colours.
In Luw\.ai Studio you draw a kitchen as a **run** of modular cabinets along a wall. Any cabinet in it can become drawers, a sink, a hob, a pantry or a fridge, and the whole run shares one countertop and one plinth.
## Open the Kitchen tool
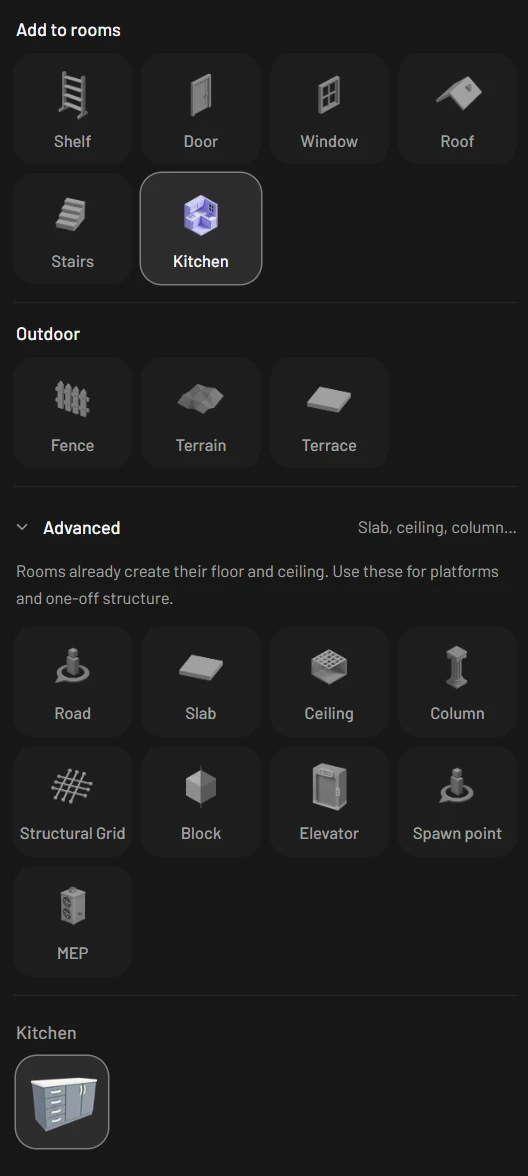
In the **Build** tab, under **Add to rooms**, click **Kitchen**. A **Kitchen** group with the **Modular Cabinet** tile opens below and the tool is ready. The tile is also in the **Items** tab, under **Furniture** (see [Finding items](/luw.ai-studio/items-and-paint/finding-items.md)).
## Draw a run along a wall
The helper panel on the right of the view shows the tool's mode on a chip. Press `C` or click the chip to switch between **Single cabinet** (the default: one click places one 50 cm cabinet) and **Continuous run**.
To draw a continuous run:
1. Move towards a wall. The cabinet backs onto it, an amber guide runs along the wall, and a label says **Wall snap**, **Corner snap** or **Edge snap** (against a cabinet that's already there).
2. Click where the run should start.
3. Move along the wall. The run fills with 50 cm cabinets, plus a narrower one at the end, and the label counts the legs and modules.
4. Click to fix the leg. Then head out into the room and the next leg turns the corner, so an L or a U takes a few clicks.
5. Double-click to finish. `Esc` drops only the leg you're drawing.
The preview turns red where a cabinet would hit an object, a door or a window. Pointed at an existing run, a new cabinet slots into it.
Build › Add to rooms › Kitchen, then the modular cabinet.
### Keys while drawing
| Key | Helper panel | What it does |
| ------------- | --------------------------------------- | ------------------------------------------------------------------------------------- |
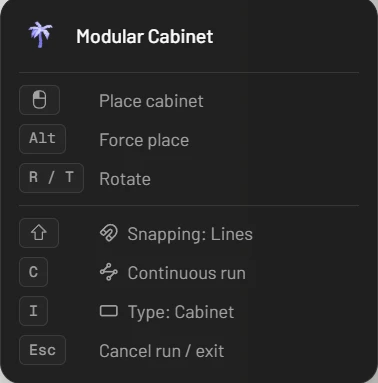
| `C` | **Single cabinet** / **Continuous run** | One cabinet per click, or a whole run. |
| `I` | **Type: Cabinet** / **Type: Island** | An island ignores walls and gets a 30 cm seating overhang and a finished back. |
| `R` / `T` | **Rotate** | Turns a free-standing cabinet 45° either way. |
| `Shift` | **Snapping** | Cycles **Lines**, **Grid** and **Off**. With **Off**, cabinets don't attach to walls. |
| `Alt` + click | **Force place** | Places it even though it overlaps something. |
| `Esc` | **Cancel run / exit** | Drops the current leg, or leaves the tool. |
## Build with base, wall and tall units
A new cabinet is a base unit: 50 cm wide, 60 cm deep, an 80 cm carcass on a 10 cm plinth, two doors over three drawers. Select it and the menu above it grows the kitchen:
| Button | What it does |
| ------------------------ | ----------------------------------- |
| **Left** / **Right** | Adds a cabinet at that side. |
| **L Left** / **L Right** | Turns an L corner at that end. |
| **Wall** | Hangs a wall cabinet above. |
| **Tall** / **Base** | Turns it into a tall unit, or back. |
In the panel, **Cabinet Type** switches between **Base Cabinet** and **Tall Cabinet** and offers **Add wall cabinet**, **Add chimney** (a cooker hood) or **Remove wall cabinet**.
* A **wall cabinet** is 32 cm deep, with its top in line with a tall unit's. **Height preset** offers 18″ (457 mm) to 42″ (1,067 mm).
* A **tall unit** has a 2.07 m carcass. Tall units and wall cabinets get **Top / Ceiling**: a **Top Cabinet** or **Trim / Soffit** above, or **Fill to ceiling**.
The **Planning checks** section warns about cabinets that overlap, leave gaps or reach through the ceiling.
## Set the countertop
Clicking a cabinet selects just that one; click the back arrow at the top of its panel for the whole run. The run's panel lists its **Modules** (with **Add left**, **Add right** and **Equalize widths**) and holds the shared parts:
| Setting | What it changes |
| -------------------------------------------------------------- | ------------------------------------------------------------------------------------------- |
| **Standard dimensions** | **Metric · 600 mm** or **US · 24 in**: depth, height, plinth and worktop thickness at once. |
| **Show plinth**, **Plinth height** | The kick board, 10 cm by default. |
| **Show countertop**, **Countertop height** | The worktop and its thickness, 2 cm by default. |
| **Countertop depth** | The overhang past the fronts: 0 to 12 cm, 2 cm by default. |
| **Seating overhang** | Extra worktop at the back for stools, up to 45 cm. |
| **Finished back**, **Finished end panels**, **Waterfall ends** | Panels for visible sides; waterfall ends run the worktop down to the floor. |
| **Bar counter** | A raised bar on the **Back**, **Left** or **Right** edge, 0.9 to 1.3 m high. |
The worktop's material comes from the Paint tab; see [Paint the kitchen](#paint-the-kitchen).
The keys of the cabinet tool. C switches between single cabinets and a continuous run.
## Add a sink, hob, oven or fridge
Select a cabinet and pick one of the **Presets** at the top of its panel. The other cabinets in the run shrink to make room; if they can't, the panel says so.
| Preset | What you get |
| --------------------------- | -------------------------------------------- |
| **Base** / **Drawer Base** | Doors over drawers, or three drawers |
| **Dishwasher** | A 60 cm dishwasher |
| **Gas Hob** / **Induction** | A 75 cm hob over two drawers |
| **Sink** | An 80 cm sink over two doors |
| **Tall Pantry** | A tall cupboard with four shelves |
| **Oven Tower** | Drawers, an oven, a microwave and a cupboard |
| **Single Fridge** | A 76 cm fridge column |
## Arrange doors, drawers and compartments
A cabinet is a stack of **Compartments**, listed from **Top** to **Bottom**. Each card's **Type** is **Shelf**, **Drawer**, **Door**, **Oven**, **Micro**, **Washer**, **Hob**, **Sink**, **Pullout** or **Fridge** (a wall cabinet offers **Shelf**, **Drawer**, **Door** and **Chimney**), and the card shows only what that type needs:
* **Drawer** and **Shelf**: how many **Drawers** (1 to 6) or **Shelves** (up to 8).
* **Door**: **Left**, **Right**, **Double** or **Glass**, **Flip hinge** and **Shelves inside**.
* **Hob**: **Gas** or **Induction**, the number of burners, **Burners on** and, for gas, **Top grate**.
* **Sink**: **Single**, **Double** or **60/40** bowls.
* **Fridge**: **Single**, **Double**, **Top Freezer** or **Bottom Freezer**; **Cabinet panel** under **Appliance front** hides it behind a matching door.
* **Pullout**: 2 to 8 **Baskets** on a **Wire**, **Tray** or **Glass** rack.
Set each **Height**, reorder with the arrows, or click **Add compartment**. To look inside, use **Open Animation** or press `E`; on a selected run, `E` opens every door and drawer.
## Choose fronts and handles
| Setting | Choices |
| --------------------------- | --------------------------------------------------- |
| **Fronts** › **Style** | **Slab**, **Shaker** or **Raised Arch** |
| **Fronts** › **Mounting** | **Overlay** or **Inset** |
| **Fronts** › **Reveal gap** | **2 mm**, **3 mm**, **4 mm** or **6 mm** |
| **Handles** › **Style** | **Bar**, **Knob**, **Cutout**, **Hole** or **None** |
| **Handles** › **Position** | **Auto**, **Top** or **Center** |
Set them on the run for every cabinet, or on one cabinet alone.
## Paint the kitchen
In the **Paint** tab (`P`), hover a cabinet and the chip names the part: **Front**, **Carcass**, **Countertop**, **Plinth**, **Hardware** (the handles), **Glass**, **Appliance** or **Appliance Interior**. Fronts and carcasses are painted cabinet by cabinet, while one click paints the run's whole countertop or plinth. Tap `Shift` to paint every part of one cabinet. Unpainted, cabinets are **Soft White** with a **Finewood 27** worktop. See [Materials and paint](/luw.ai-studio/items-and-paint/materials-and-paint.md).
## Kitchens and Archiagent
[Archiagent.ai](/luw.ai-studio/luw.ai-ai-tools/archiagent.md) furnishes kitchens with catalog pieces, not modular cabinets. Ask it to "furnish the kitchen" and it sets a **Kitchen** unit (or, on a short wall, a **Kitchen Counter**) against the wall facing the door, adds a **Stove** when that wall is long enough, and stands a **Fridge** on a side wall. Planning a home, it puts the kitchen next to the dining area and aims for 0.9 m clear in front of the counters.
Archiagent doesn't draw modular cabinet runs; that's the Kitchen tool's job. You can still select a cabinet and choose **Ask AI** to talk about it.
## Related pages
* [Placing and arranging](/luw.ai-studio/items-and-paint/placing-and-arranging.md)
* [Materials and paint](/luw.ai-studio/items-and-paint/materials-and-paint.md)
* [Walls](/luw.ai-studio/building/walls.md)