> For the complete documentation index, see [llms.txt](https://luw-ai.gitbook.io/luw.ai-studio/llms.txt). Markdown versions of documentation pages are available by appending `.md` to page URLs; this page is available as [Markdown](https://luw-ai.gitbook.io/luw.ai-studio/building/guide-images.md).

# Guide images

Lay a floor plan, sketch or survey under the grid, scale it to its true size, and trace your building on top of it.

Already have a drawing of the place? Then there is no need to rebuild it from memory. In Luw\.ai Studio, a guide image is a picture that lies flat on a level, underneath the grid: an architect's plan, a sketch on squared paper, a phone photo of a printed brochure. Give it its real scale once, and every wall you trace over it comes out at the right length.

Each guide belongs to one level, so a two-storey house can have one plan for the ground floor and another for the floor above.

## Open the floor plan picker

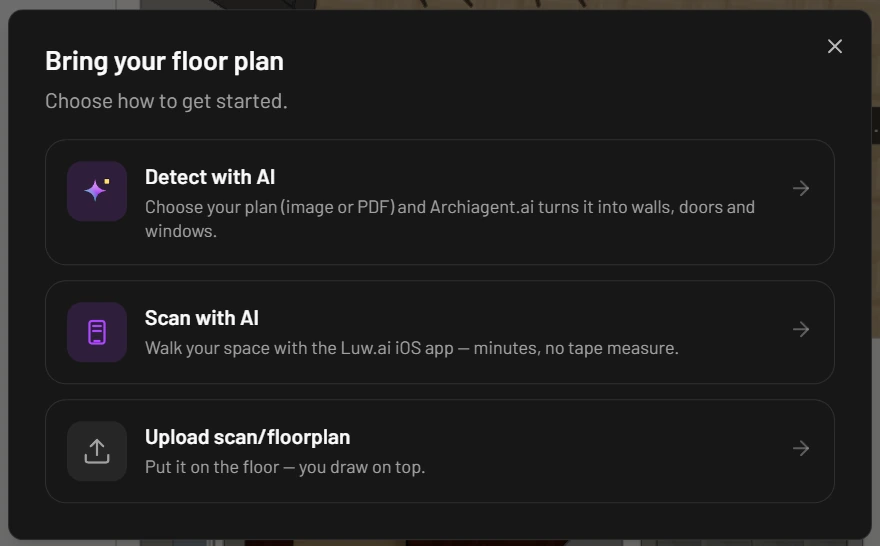
You can start from three places. They all open the same dialog, **Bring your floor plan**:

* The **Build** tab: in the **Bring in** group at the bottom, click **Floor plan**.
* The **Scene** tab: under the level you want, click **Scan or import floorplan**.
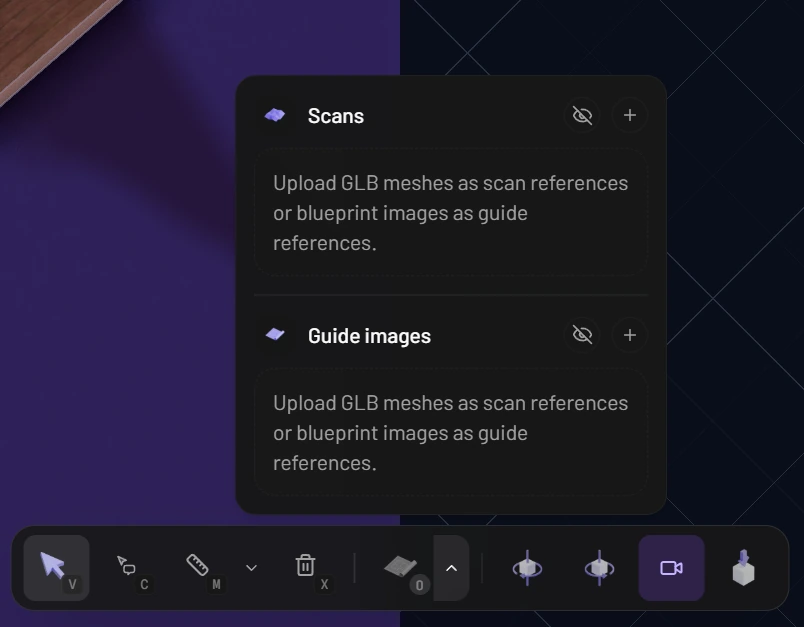
* The bottom toolbar: open the menu beside the **References** button, then click **+** in the **Guide images** row.

The dialog gives you three ways in:

| Option                    | What it does                                                                                                                                                                                                                                         |
| ------------------------- | ---------------------------------------------------------------------------------------------------------------------------------------------------------------------------------------------------------------------------------------------------- |
| **Detect with AI**        | You pick a plan (image or PDF). The **Edit with AI** tab opens and Archiagent.ai converts the plan into walls, doors and windows for you. For a PDF, only the first page is read. See [Archiagent.ai](/luw.ai-studio/luw.ai-ai-tools/archiagent.md). |
| **Scan with AI**          | Explains how to scan a room with the Luw\.ai iOS app, with an App Store link and a QR code.                                                                                                                                                          |
| **Upload scan/floorplan** | Puts your file on the floor of the level as a reference, so you can draw over it yourself. This is the option that creates a guide image.                                                                                                            |

<figure><img src="https://1629954275-files.gitbook.io/~/files/v0/b/gitbook-x-prod.appspot.com/o/spaces%2F3c2lKXqxOtmrzgrQQpGP%2Fuploads%2Fgit-blob-5dc51430adf194caf93333c6274c9fae86feea59%2Fbring-your-floor-plan.webp?alt=media" alt="The Bring your floor plan dialog with three options, Detect with AI, Scan with AI and Upload scan/floorplan, each with a one-line explanation"><figcaption><p>The floor plan picker: let Archiagent.ai build the walls, scan with the iOS app, or lay the plan under the grid yourself.</p></figcaption></figure>

{% hint style="info" %}
The two approaches combine well. Let **Detect with AI** draft the walls, then upload the same plan as a guide image and check the draft against it, correcting any wall that's off.
{% endhint %}

## Upload a guide image

1. In **Bring your floor plan**, choose **Upload scan/floorplan**.
2. Choose an image file (JPEG, PNG, WebP or GIF). (A `.glb` or `.gltf` file goes in as a 3D scan instead of a guide image.)
3. Wait for the upload. A small notice at the bottom of the screen counts up the progress. If the upload fails, it offers **Try again**.

Sign in to your Luw\.ai account before you upload. The picture is stored with your Luw\.ai project, so the guide is still there when you open the project on another computer.

The new guide lands on the level you have selected and is selected straight away, ready to position. To find it later, open the menu beside **References** in the bottom toolbar. The **Guide images** list shows the guides on the current level. Click a name to select one, use its **Opacity** slider to fade it, or hover the row and click the trash icon to delete it.

<figure><img src="https://1629954275-files.gitbook.io/~/files/v0/b/gitbook-x-prod.appspot.com/o/spaces%2F3c2lKXqxOtmrzgrQQpGP%2Fuploads%2Fgit-blob-d15b43bbff4dd4afe474d92a1d2a9800d86c0da3%2Fguide-images-list-references-control.webp?alt=media" alt="The References menu above the bottom toolbar, with Scans and Guide images sections that each have a visibility button and a plus button, both still empty"><figcaption><p>The References menu with its Scans and Guide images sections, before anything has been added</p></figcaption></figure>

## Line the image up

The **2D** view (top left of the canvas) is the most comfortable place for this. If you have turned the plan view, the compass button sets it back to north.

First select the guide, then:

* **Move it**: drag the image.
* **Resize it**: drag one of its corner handles.
* **Rotate it freely**: hold `Ctrl` (`Cmd` on a Mac) while you drag a corner.
* **Rotate in steps**: press `R` or `T` to turn it 45° at a time.

The panel that opens on the right, titled with the file's name, does the same jobs with exact numbers:

| Section             | What's in it                                                                                                                                                               |
| ------------------- | -------------------------------------------------------------------------------------------------------------------------------------------------------------------------- |
| **Image**           | **Replace** swaps in a different picture in the same position, but the new picture starts without a scale. Also **Delete**, **Hide** / **Show** and **Lock** / **Unlock**. |
| **Reference Scale** | The calibration status and the **Set Scale** button (see below).                                                                                                           |
| **Quick Actions**   | **Center** moves the image back to the origin, **Reset Rotation** squares it up, **Reset Image Scale** returns it to its original size.                                    |
| **Position**        | X, Y and Z sliders, in metres.                                                                                                                                             |
| **Rotation**        | A rotation slider plus **-45°** and **+45°** buttons.                                                                                                                      |
| **Scale & Opacity** | A uniform scale slider and the **Opacity** slider.                                                                                                                         |

## Scale it to real size

Dragging corners gets the plan close; calibrating gets it exact. You need one distance on the plan whose real length you know: a printed dimension line, the scale bar, or a room width you've measured yourself. Longer is better, because any small error in your clicks then matters less.

1. In the guide's panel, under **Reference Scale**, click **Set Scale**. If the 2D view is hidden, it opens.
2. Click one end of your known distance. A prompt at the top of the plan then asks for the other end. Click it.
3. The **Set overlay scale** dialog appears. **Drawn line** shows how long your line currently measures.
4. Type the true length in **Real length** and pick the unit beside it: **Meters**, **Centimeters**, **Feet** or **Inches**. You can also type the unit yourself, for example `4.2`, `420cm` or `13'9"`.
5. Click **Save Scale**. The image grows or shrinks around the first point you clicked.

Once it's calibrated, the status line reads **Scaled** followed by the length you entered, and the guide locks itself, so a stray drag can't shift it later. To redo it, click **Edit Scale**. **Hide Scale** and **Show Scale** toggle the measurement line on the plan. **Clear Scale** throws the calibration away and unlocks the image. To abandon a calibration halfway, press `Esc` or click **Cancel**.

## Keep the guide out of your way

* **Fade it**: lower **Opacity** until the lines are readable but don't compete with the walls you draw.
* **Lock it**: a locked guide ignores clicks and drags and won't rotate with `R` or `T`, so you can't knock it out of place while tracing. Click **Unlock** when you do want to move it.
* **Hide it**: **Hide** in the panel hides just that guide, which stays exactly where you put it. To switch every scan and guide image off or on together, click the **References** button itself in the bottom toolbar.
* **Delete it**: click **Delete** in the panel, use the trash icon in the **Guide images** list, or press `Delete` or `Backspace` while it's selected.

## Trace your building over it

With the plan scaled and locked, pick a wall tool in the **Build** tab and follow the lines of the drawing. In the **Rooms** group, **Polygon** is the quickest way round an outline and **Walls** suits single partitions. Tap `Shift` to change the snapping mode. **Angles** holds each segment to 15° steps, so corners stay square. When your walls close a space, the room gets its floor and ceiling automatically. [Walls](/luw.ai-studio/building/walls.md) covers the drawing tools in detail.

For doors and windows, try **Split** view (top left of the canvas). Drop the opening onto the wall in the 3D half, where you can judge its height, then slide it along the wall in the 2D half until it matches the gap on the plan. See [Doors and windows](/luw.ai-studio/building/doors-and-windows.md).

Once the model is finished, hide the guide or delete it.

## Related pages

* [Walls](/luw.ai-studio/building/walls.md)
* [Floors and levels](/luw.ai-studio/building/floors-and-levels.md)
* [Import](/luw.ai-studio/import-and-export/import.md), for DXF drawings, IFC models and room scans