> For the complete documentation index, see [llms.txt](https://luw-ai.gitbook.io/luw.ai-studio/llms.txt). Markdown versions of documentation pages are available by appending `.md` to page URLs; this page is available as [Markdown](https://luw-ai.gitbook.io/luw.ai-studio/building/doors-and-windows.md).

# Doors and windows

Click a door or window into a wall, then pick its type and style, size it, and choose which way it opens.

In Luw\.ai Studio a door or window is a real hole through the wall with a frame and a leaf or sash inside it, not a picture stuck on the surface. Remove the opening and the wall is solid again. This page covers placing openings, choosing what kind they are, sizing them and setting how they open.

## Put a door or window in a wall

1. In the **Build** tab, under **Add to rooms**, click **Door** or **Window**.
2. Move the pointer over a wall. A see-through preview of the opening comes along. It's tinted red while it isn't on a wall. On a wall, its outline turns green where the opening fits, and red where it would overlap another door, window or wall-mounted item.
3. Click to place it. The opening is named in order (**Door 1**, **Window 2**…) and selected, so you can adjust it straight away.

This works in the 3D view and on the 2D floor plan. In 3D the opening only attaches when the pointer is over a wall's face, and a window takes the height at which you point. In 2D the preview jumps to the nearest wall, and a new window is centred 1.5 m above the floor.

A new door starts as a **Hinged** door in the **Panel** style. A new window starts as a **Fixed** window in the **Single** style.

### Keys while placing

The helper panel lists these as you place:

| Key           | Helper panel                        | What it does                                                                                                                                                               |
| ------------- | ----------------------------------- | -------------------------------------------------------------------------------------------------------------------------------------------------------------------------- |
| `R`           | **Flip side**                       | Swaps which side of the wall the opening faces. On an exterior wall a door starts out facing outside, from whichever side you approach. A window faces the side you hover. |
| `O`           | **Type**                            | Steps through the door or window types. Garage doors aren't part of the cycle; choose those in the properties panel.                                                       |
| `L`           | **Style**                           | Steps through the styles. For windows it's available only on a **Fixed** window.                                                                                           |
| `C`           | **Place once** / **Place multiple** | With **Place multiple**, the tool stays active, so you can put a whole row of windows along a facade.                                                                      |
| `Shift`       | **Snapping**                        | Cycles **Lines**, **Grid** and **Off**. Openings start in **Lines**.                                                                                                       |
| `Alt` + click | **Force place**                     | Places the opening even though it overlaps something. The outline stays red as a reminder.                                                                                 |
| `Esc`         | **Cancel**                          | Stops placing.                                                                                                                                                             |

### Where an opening can go

* **Inside the wall.** An opening can't stick out past the end of a wall; it stops at the wall's edge. A window also stays between the floor and the top of the wall.
* **Not in curved walls.** Over a curved wall the preview stays red.
* **In roof walls.** The walls a roof creates under itself and its gable ends can hold doors and windows. Windows also fit in the triangle of a gable and on dormers. See [Roofs](/luw.ai-studio/building/roofs.md).
* **On the active level.** Only walls on the level you're working on accept openings.

## Choose a door

Select a door to open its properties panel. The **Type** section starts with three modes:

* **Door**: a door with a frame and leaf.
* **Opening**: just the hole, with no frame and no leaf. Good for an archway into a kitchen.
* **Garage**: a garage door, as **Sectional**, **Roll-up** or **Tilt-up**. All three start at 2.7 × 2.4 m.

In **Door** mode, the tiles below pick the type. Each type starts at its own size:

| Type        | Starting size (width × height) |
| ----------- | ------------------------------ |
| **Hinged**  | 0.9 × 2.1 m                    |
| **Pocket**  | 0.9 × 2.1 m                    |
| **Barn**    | 1.0 × 2.1 m                    |
| **Double**  | 1.5 × 2.1 m                    |
| **French**  | 1.5 × 2.1 m                    |
| **Sliding** | 1.5 × 2.1 m                    |
| **Folding** | 1.8 × 2.1 m                    |

The **Style** row sets the look of the leaf. Solid styles are **Panel**, **Six-panel**, **Shaker**, **Craftsman** and **Modern**. Styles with glass are **Glass**, **Paneled glass** and **French**. **Half-louvered** and **Barn** complete the set. Edit the leaf's segments by hand until they match none of these and the row reports a custom design.

<figure><img src="https://1629954275-files.gitbook.io/~/files/v0/b/gitbook-x-prod.appspot.com/o/spaces%2F3c2lKXqxOtmrzgrQQpGP%2Fuploads%2Fgit-blob-ade8d69cc653238384f08f6ce5393156d53ef2d5%2Fdoor-types-panel.webp?alt=media" alt="A green door preview on the back wall beside the tall plant, with a 4.1 m distance label, and the Door panel listing Type: Hinged and Style: Panel with the O and L keys"><figcaption><p>A door preview: the panel shows the current type and style. Press O or L to step through them before you click.</p></figcaption></figure>

## Choose a window

A window's **Type** section has two modes: **Window** and **Opening** (a bare hole). The **Window Type** section below it picks the kind of window:

| How it behaves | Window types                                                                                                                   |
| -------------- | ------------------------------------------------------------------------------------------------------------------------------ |
| Doesn't open   | **Fixed**, **Bay** and **Bow** (bay and bow windows come without a sill)                                                       |
| Sashes slide   | **Sliding**, **Single Hung**, **Double Hung**                                                                                  |
| Hinged sash    | **Casement** (choose **Single** or **French**, hinged **Left** or **Right**) and **Awning** (with an **Up** / **Down** toggle) |
| Slats          | **Louvered**                                                                                                                   |

For a **Fixed** window, the **Style** row arranges the panes: **Single** (one big pane), **Grid**, **Tall grid**, **Wide grid**, **Double-hung**, **Triple-hung**, **Casement**, **Sliding**, **Horizontal bands** or **Transom**. Every other window type draws its own sashes, so the row is hidden for them.

## Set the size

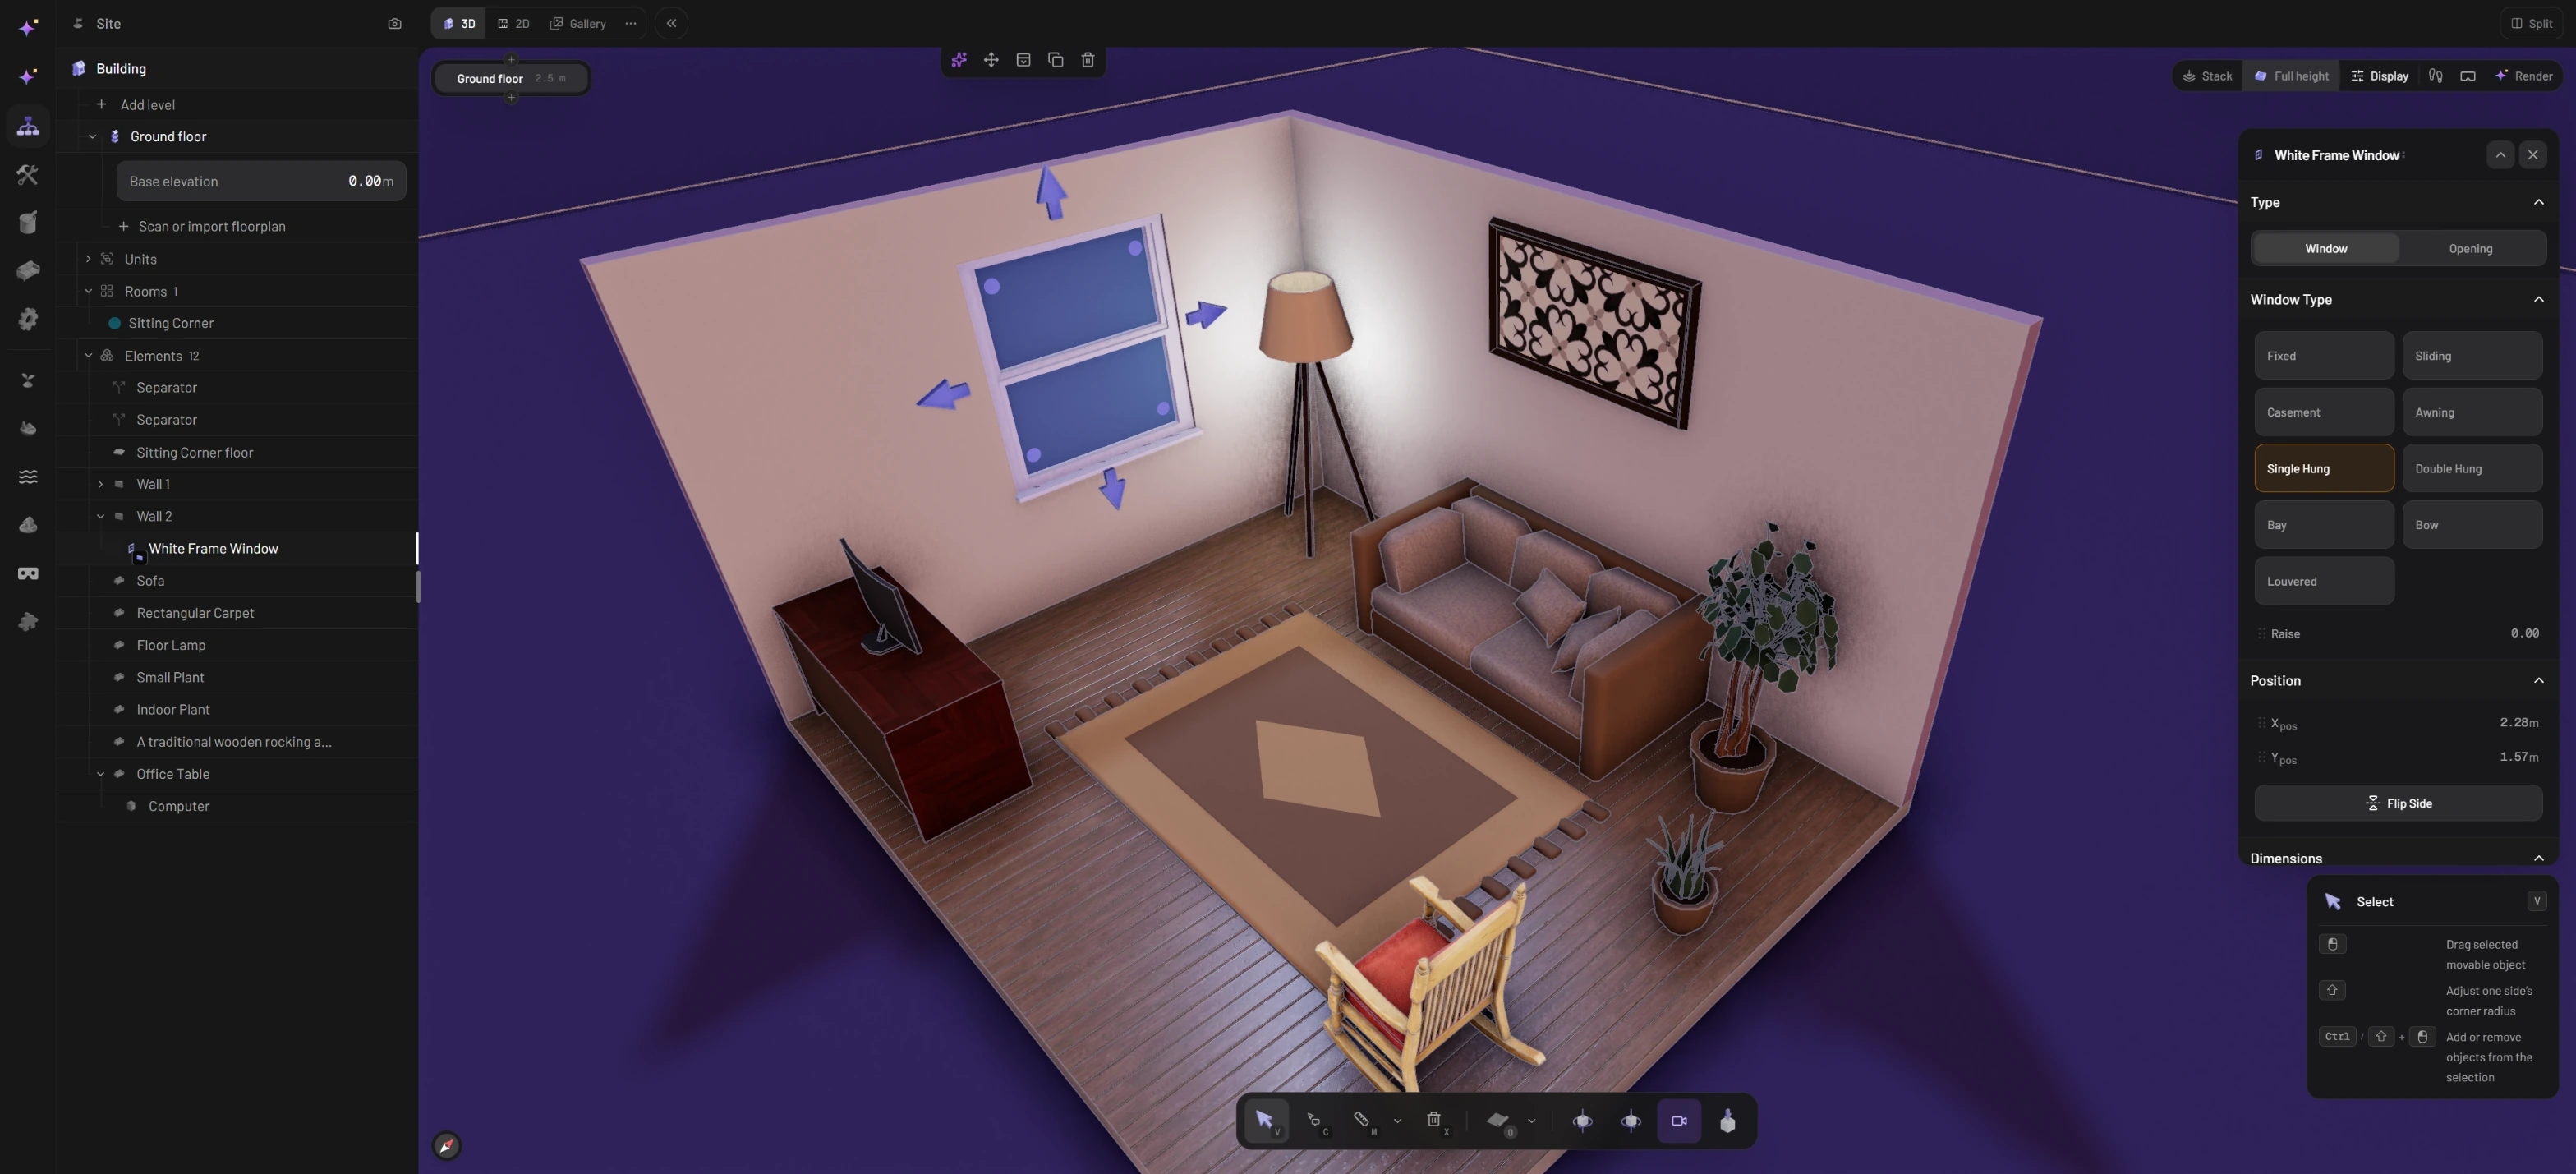
* **In the scene**: drag the arrows on the selected opening. A door has width arrows left and right and a height arrow on top. A window also has one underneath. Neither gets narrower or lower than 0.3 m.
* **In the panel**: the **Dimensions** section has **Width** and **Height** sliders for exact values. A door can be 0.5 to 3 m wide (up to 6 m as a garage door).

## Move an opening

An opening always stays on its wall. To move one:

* drag the cross-shaped handle in the middle of a selected door, or
* click **Move** in the panel's **Actions** section or in the small menu above the selection (windows move this way).

While you drag, the opening keeps to its wall and stops at the wall's ends. Pull it over a different wall, or over a roof wall, and it transfers to that one. If you let go away from every wall, nothing changes: the red preview can't be dropped there.

With **Lines** snapping, a moving opening lines up with the doors, windows and wall-mounted items around it. A window also snaps to the sill, centre or top height of its neighbours, so a row of windows stays level.

For exact positions, use the **Position** section. A door has a slider for its distance along the wall. A window has sliders for both its horizontal position and the height of its centre. Doors always stand on the floor; raise or lower a window to set its sill height.

<figure><img src="https://1629954275-files.gitbook.io/~/files/v0/b/gitbook-x-prod.appspot.com/o/spaces%2F3c2lKXqxOtmrzgrQQpGP%2Fuploads%2Fgit-blob-6a6762f6f329a8774e26aaf1be7af0a117b37d70%2Fsliding-an-opening.webp?alt=media" alt="The White Frame Window selected on the side wall, with arrows for resizing it (left and right for width, top and bottom for height), the action bar above it, and its panel with Window or Opening, the window types, Raise, Position and Flip Side"><figcaption><p>A selected window: drag its arrows to resize it. To move it, use Move or type exact values under Position.</p></figcaption></figure>

## Decide how it opens

* To reverse an opening through the wall, click **Flip Side** in the **Position** section or press `R` while it's selected.
* **Hinged**, **Double** and **French** doors have a **Swing** section. **Direction** chooses **Inward** or **Outward**. A **Hinged** door also chooses its **Hinges Side** (**Left** or **Right**).
* A **Hinged** door's **Handle** section turns the handle on or off and sets its height and **Handle Side**.
* **Pocket**, **Barn** and **Sliding** doors have a **Slide** section that picks the direction they slide, **Left** or **Right**.
* **Folding** doors have a **Fold** section where you choose 2 or 4 **Panels**.

## Open and close it

Doors and opening windows actually move. Select one and press `E`, or click **Open** / **Close** in the menu above it.

* Folding, sliding, pocket, barn and garage doors have an **Open** slider (0 to 100 %) in their **Fold**, **Slide** or **Garage** section.
* Windows have a slider in the **Window Type** section. Its name tells you what it does for that type: **Slide**, **Raise**, **Swing**, **Slats** or **Tilt**.
* In walk mode, aim the crosshair at a door or window within reach and click it to open or close it. `E` toggles it too, and `T` closes it.

Frameless openings and **Fixed**, **Bay** and **Bow** windows don't open.

## Fine-tune the details

Further down the panel you'll find sections for the finer points:

| Section       | Door                                              | Window                                                         |
| ------------- | ------------------------------------------------- | -------------------------------------------------------------- |
| **Top Shape** | **Rect**, **Rounded** or **Arch**                 | Same choices, for Fixed, Casement, Awning and Louvered windows |
| **Frame**     | **Thickness** and **Depth**                       | **Thickness** and **Depth**                                    |
| **Threshold** | On or off, with a height                          | —                                                              |
| **Hardware**  | **Door Closer**, **Panic Bar** and **Bar Height** | —                                                              |
| **Segments**  | Split the leaf into panel, glass or empty parts   | —                                                              |
| **Grid**      | —                                                 | Columns, rows and divider for Fixed windows                    |
| **Sill**      | —                                                 | On or off, with depth and thickness                            |

Colours and materials aren't in the panel. Use the Paint tool on a door's panel, frame, glass and hardware, or on a window's frame and glass. See [Materials and paint](/luw.ai-studio/items-and-paint/materials-and-paint.md).

## Duplicate or delete an opening

The **Actions** section has **Duplicate** and **Delete**. The keyboard works too: select the opening, then press `Delete` or `Backspace`. The wall closes up where the opening was.