> For the complete documentation index, see [llms.txt](https://luw-ai.gitbook.io/luw.ai-app-docs/llms.txt). Markdown versions of documentation pages are available by appending `.md` to page URLs; this page is available as [Markdown](https://luw-ai.gitbook.io/luw.ai-app-docs/working-with-images/selecting-an-area.md).

# Selecting an area

How to mark the part of a photo you want changed in Magic Wand AI and Landscape AI, with automatic object selection or the brush.

Magic Wand AI and Landscape AI only change the part of the photo you mark. This page covers the **Select editing area** step, where you make that selection.

The step has two tabs: **Brush Tool** and **Automatic**. Magic Wand opens on **Brush Tool** and Landscape opens on **Automatic**, but you can switch at any time and combine both.

3DSpace AI also has a **Select editing area** step, but it works differently: see [3DSpace AI](/luw.ai-app-docs/3d-and-video/3dspace-ai.md).

## Select objects automatically

The **Automatic** tab reads "Automatically or manually select objects, with the ability to combine both methods." It has two buttons, each costing 1 credit:

* **Magic Select** finds the objects in the photo by itself.
* **Prompt & Select** asks you what to look for (for example "lawn" or "fence") and finds matching objects.

<figure><img src="https://1930792265-files.gitbook.io/~/files/v0/b/gitbook-x-prod.appspot.com/o/spaces%2F4yESzclcaZeSiIDZ8eIa%2Fuploads%2Fgit-blob-ec657c73c8363604e8ea26abe1527d96bc1ec960%2Fselect-area-automatic.webp?alt=media" alt="Landscape&#x27;s Select editing area step with a backyard photo on the left and the Automatic tab on the right, showing Magic Select and Prompt and Select, each marked 1 token / generation, above a Continue button"><figcaption><p>The Automatic tab before you run a search</p></figcaption></figure>

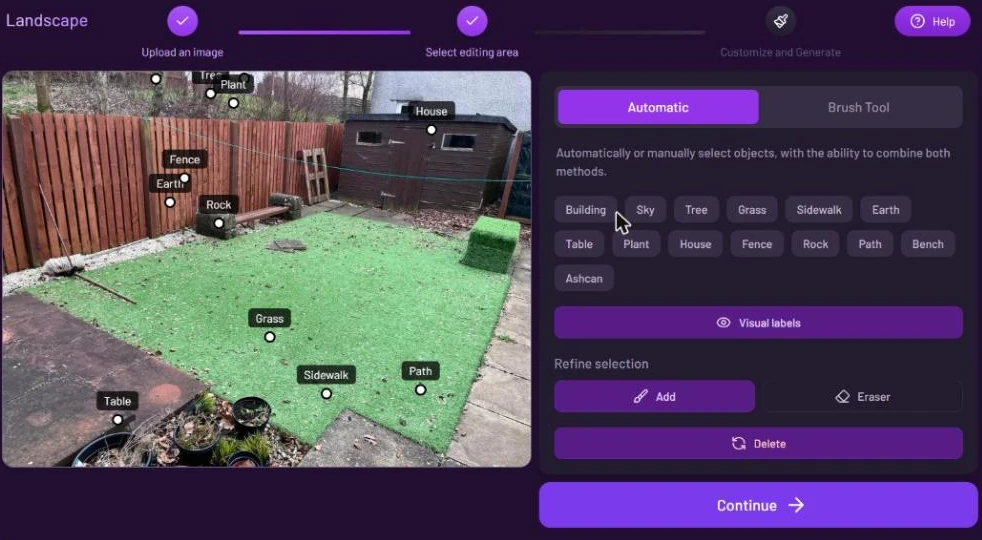
When the search finishes, labels appear on the photo and matching chips appear in the panel, for example Building, Sky, Tree, Grass, Sidewalk, Fence and Path.

<figure><img src="https://1930792265-files.gitbook.io/~/files/v0/b/gitbook-x-prod.appspot.com/o/spaces%2F4yESzclcaZeSiIDZ8eIa%2Fuploads%2Fgit-blob-29e39f01fff88f02cae2fd9bae494b1d4cfd3695%2Fmagic-select-results.webp?alt=media" alt="After Magic Select: labels such as Fence, Rock, Grass, Sidewalk, Path and Table on the photo, and chips for Building, Sky, Tree, Grass, Sidewalk, Earth, Table, Plant, House, Fence, Rock, Path, Bench and Ashcan, with Visual labels, Refine selection Add and Eraser, and Delete"><figcaption><p>Every object found gets a label on the photo and a chip in the panel</p></figcaption></figure>

To build your selection:

1. Click a chip, or a label on the photo, to select that object. Click it again to deselect it.
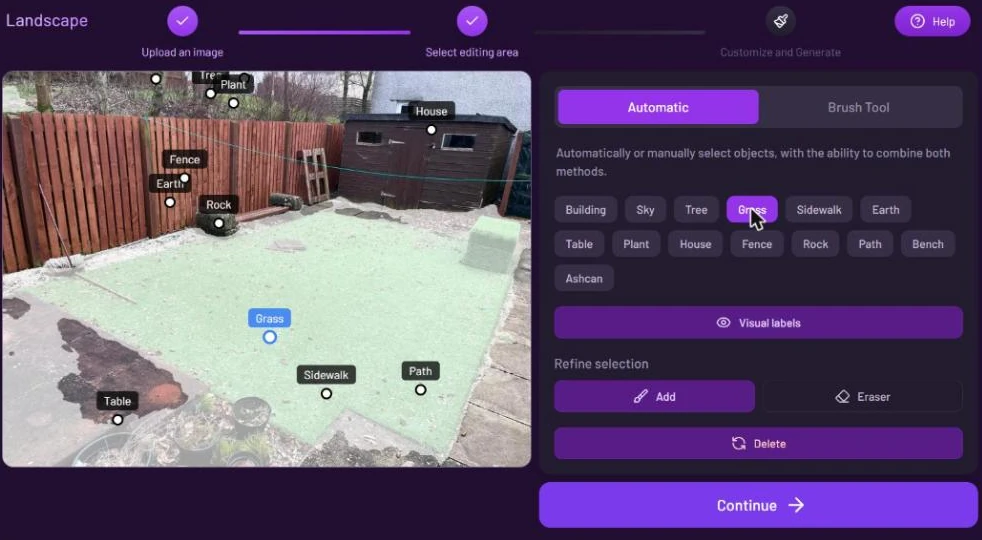
2. Select as many objects as you need. Selected areas are tinted on the photo.
3. Use **Visual labels** to show or hide the labels if they get in the way.
4. Fine-tune the edges under **Refine selection**: **Add** paints extra area in, **Eraser** takes area out.

<figure><img src="https://1930792265-files.gitbook.io/~/files/v0/b/gitbook-x-prod.appspot.com/o/spaces%2F4yESzclcaZeSiIDZ8eIa%2Fuploads%2Fgit-blob-abc0f7968acf709766adcb4b9907b5d4b33d24f1%2Fmagic-select-grass.webp?alt=media" alt="The Grass chip selected and highlighted, with the lawn in the photo tinted to show it&#x27;s selected"><figcaption><p>Grass selected: the lawn is tinted, ready for a new garden</p></figcaption></figure>

**Delete** clears the automatic selection after asking you to confirm, so you can start over.

## Paint the area with the Brush Tool

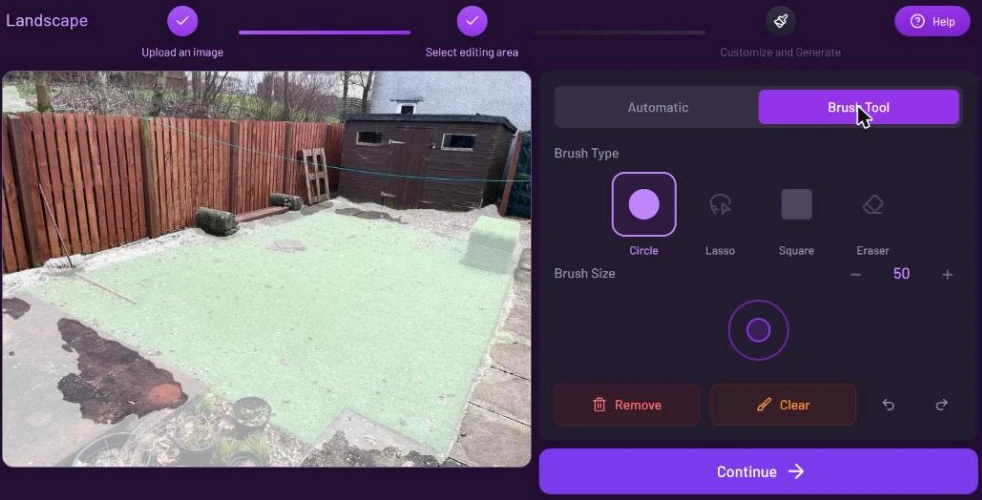
The **Brush Tool** tab lets you paint the area yourself.

| Control                   | What it does                                                                                                                    |
| ------------------------- | ------------------------------------------------------------------------------------------------------------------------------- |
| **Brush Type** **Circle** | Paints with a round brush.                                                                                                      |
| **Lasso**                 | Click points around the area. Close the shape by clicking the first point again or by double-clicking. `Esc` cancels the shape. |
| **Square**                | Paints with a square brush.                                                                                                     |
| **Eraser**                | Removes paint.                                                                                                                  |
| **Brush Size** − / +      | Makes the brush smaller or larger, from 10 to 100.                                                                              |
| **Remove**                | Clears your drawing and removes the uploaded photo. Asks you to confirm.                                                        |
| **Clear**                 | Clears your drawing only.                                                                                                       |
| Undo, redo                | Step back or forward through your strokes.                                                                                      |

<figure><img src="https://1930792265-files.gitbook.io/~/files/v0/b/gitbook-x-prod.appspot.com/o/spaces%2F4yESzclcaZeSiIDZ8eIa%2Fuploads%2Fgit-blob-62f460e75c8a08ca4671cb8808e1c0a5ffed231a%2Fbrush-tool.webp?alt=media" alt="The Brush Tool tab with Brush Type Circle, Lasso, Square and Eraser, Brush Size set to 50, a preview of the brush, and Remove, Clear, undo and redo buttons above Continue"><figcaption><p>Brush shapes, size, and the buttons for clearing or undoing your work</p></figcaption></figure>

{% hint style="warning" %}
**Remove** doesn't just clear your drawing; it also removes the photo you uploaded. To start the selection over and keep the photo, use **Clear**.
{% endhint %}

Whatever you paint is the part that gets changed. In Magic Wand, that's the object you want to remove or replace.

<figure><img src="https://1930792265-files.gitbook.io/~/files/v0/b/gitbook-x-prod.appspot.com/o/spaces%2F4yESzclcaZeSiIDZ8eIa%2Fuploads%2Fgit-blob-3b070ebd2e2bf2c15d638144634492370bf9de81%2Fmagic-wand-brush.webp?alt=media" alt="Magic Wand&#x27;s Select editing area step with an armchair in a hotel bedroom painted over in white with the Circle brush"><figcaption><p>An armchair painted with the Circle brush, ready to be replaced</p></figcaption></figure>

## Continue to the settings

When the area is marked, click **Continue** to go to **Customize and Generate**.

If nothing is selected, or the whole image is selected, you see "No area selected. Use the brush to mark where you want changes." Mark a smaller area and try again.

To change the selection later, click **Back** in the settings step, or click **Select editing area** in the step bar.

## Related

* [Magic Wand AI](/luw.ai-app-docs/edit-images/magic-wand-ai.md)
* [Landscape AI](/luw.ai-app-docs/redesign-spaces/landscape-ai.md)
* [The image menu](/luw.ai-app-docs/working-with-images/image-menu.md)
* [Credits and engines](/luw.ai-app-docs/getting-started/credits-and-engines.md)