> For the complete documentation index, see [llms.txt](https://luw-ai.gitbook.io/luw.ai-app-docs/llms.txt). Markdown versions of documentation pages are available by appending `.md` to page URLs; this page is available as [Markdown](https://luw-ai.gitbook.io/luw.ai-app-docs/render-and-create/render-ai.md).

# Render AI

Turn a screenshot of your 3D model into a photorealistic render, with the time of day and lighting you choose.

Render AI turns a screenshot of a 3D model into a photorealistic render. It keeps the geometry and textures of your model, so it suits architects and designers who want a realistic image without setting up a render engine.

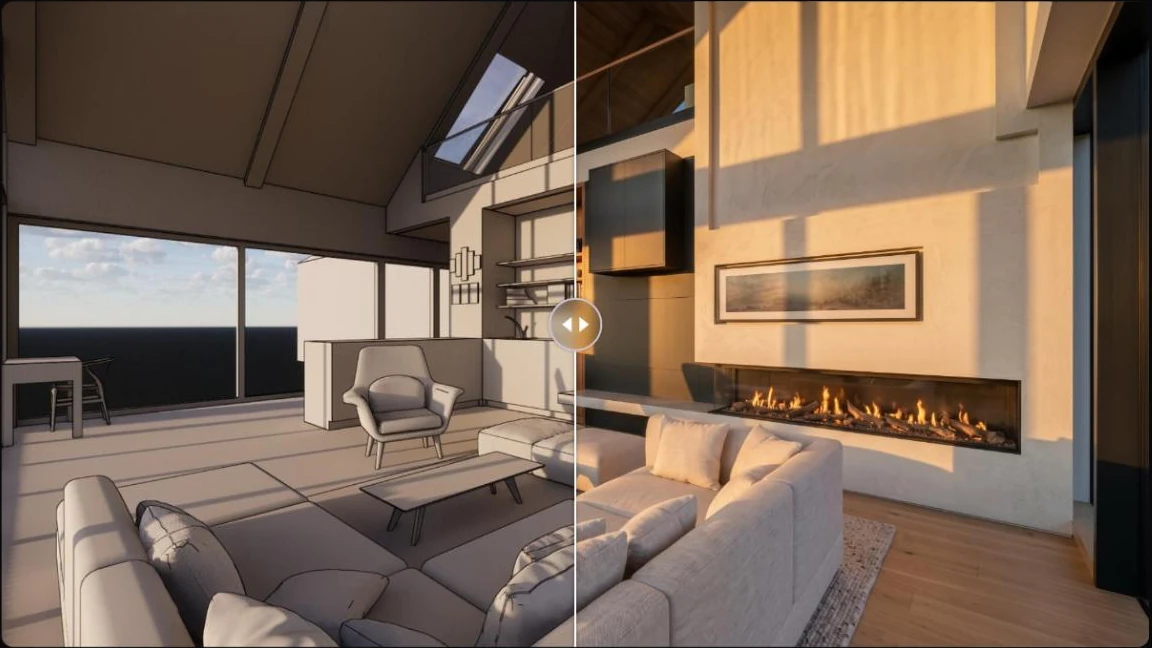
<figure><img src="https://1930792265-files.gitbook.io/~/files/v0/b/gitbook-x-prod.appspot.com/o/spaces%2F4yESzclcaZeSiIDZ8eIa%2Fuploads%2Fgit-blob-b1ba5e349619448a3ca5e5ef05a5e6854b30c92f%2Frender-result.webp?alt=media" alt="Before and after slider: a plain white 3D model of a living room with a fireplace on the left, the same room rendered with warm evening light, wood floor and furnishings on the right"><figcaption><p>A white 3D model rendered with Evening and Warm. The camera angle and layout stay the same.</p></figcaption></figure>

## What you need

* A screenshot or export of your 3D model, from any 3D program. A plain white or untextured model works.
* Credits for each design. See [Credits](#credits).

## Make a render

1. Open **Render** from the Dashboard, or pick **Render AI** in **All Tools**.
2. Upload your screenshot. See [Uploading images](/luw.ai-app-docs/working-with-images/uploading-images.md) for formats and other ways to add a picture. The form moves on to **Customize and Generate** by itself.
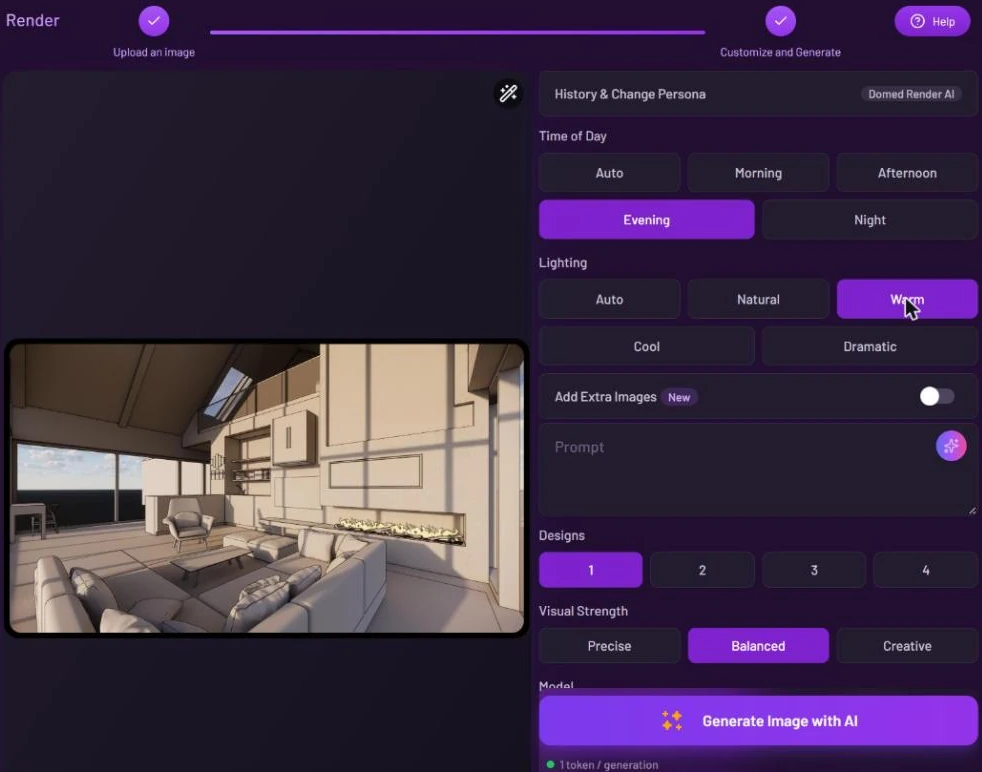
3. Under **Time of Day**, pick **Auto**, **Morning**, **Afternoon**, **Evening** or **Night**.
4. Under **Lighting**, pick **Auto**, **Natural**, **Warm**, **Cool** or **Dramatic**.
5. If you like, write a **Prompt** (for example the materials you want) and add reference pictures with **Add Extra Images**.
6. Choose **Designs**, **Visual Strength**, **Model** and **HD**.
7. Press **Generate Image with AI**. The result appears in **Latest Designs** below the form.

<figure><img src="https://1930792265-files.gitbook.io/~/files/v0/b/gitbook-x-prod.appspot.com/o/spaces%2F4yESzclcaZeSiIDZ8eIa%2Fuploads%2Fgit-blob-fbf00a477a13d7e77d04555eaa69e5a9908c57f5%2Frender-settings.webp?alt=media" alt="Render AI form with a white living-room model on the left; on the right Time of Day set to Evening, Lighting set to Warm, Add Extra Images switch, Prompt box, Designs, Visual Strength and the Generate Image with AI button with 1 token per generation"><figcaption><p>Time of Day and Lighting sit at the top of the Render AI settings.</p></figcaption></figure>

Click the result to open it in the [result viewer](/luw.ai-app-docs/results/result-viewer.md), where you can compare it with your screenshot, download it or keep editing.

## Settings

| Setting                      | What it does                                                                                                               |
| ---------------------------- | -------------------------------------------------------------------------------------------------------------------------- |
| **History & Change Persona** | Switches to another persona or starts a new one. See [Personas and history](/luw.ai-app-docs/getting-started/personas.md). |
| **Time of Day**              | Sets the time the scene is lit for. **Auto** leaves it to the AI.                                                          |
| **Lighting**                 | Sets the mood of the light: **Natural**, **Warm**, **Cool** or **Dramatic**. **Auto** leaves it to the AI.                 |
| **Add Extra Images**         | Up to six reference pictures, for example materials or a mood you want to match.                                           |
| **Prompt**                   | Optional. Describe materials, colours or details in your own words.                                                        |
| **Designs**                  | How many renders to make at once (1–4). Each one is a separate generation. The free plan makes 1.                          |
| **Visual Strength**          | **Precise** keeps closer to your model, **Creative** changes more. **Balanced** is the default.                            |
| **Model**                    | **Symphony** (default) or **Aria**.                                                                                        |
| **HD**                       | Output resolution, **2K** or **4K**. On the free plan the output is 0.5K and 2K/4K are locked.                             |

These shared controls are explained in more detail in [Prompts, styles and settings](/luw.ai-app-docs/working-with-images/prompts-styles-settings.md).

## Credits

Each design uses 1 credit, and **4K** adds 1 credit. Symphony and Aria cost the same here. See [Credits and engines](/luw.ai-app-docs/getting-started/credits-and-engines.md).

## Tips

* Start with **Precise** if the walls, windows or furniture must stay exactly where they are in your model.
* Try a few **Time of Day** and **Lighting** pairs on the same screenshot. **Evening** with **Warm** and **Night** with **Cool** give very different moods.
* Fix small details afterwards with **AI-Powered Magic Edit** in the result viewer instead of rendering again. See [Edit and reuse a result](/luw.ai-app-docs/results/edit-and-reuse.md).
* To show the space in motion, open the render in Video AI with **Open with…**.

## Related

* [Sketch](/luw.ai-app-docs/render-and-create/sketch-ai.md)
* [Video AI](/luw.ai-app-docs/3d-and-video/video-ai.md)
* [Prompts, styles and settings](/luw.ai-app-docs/working-with-images/prompts-styles-settings.md)
* [The result viewer](/luw.ai-app-docs/results/result-viewer.md)