> For the complete documentation index, see [llms.txt](https://luw-ai.gitbook.io/luw.ai-app-docs/llms.txt). Markdown versions of documentation pages are available by appending `.md` to page URLs; this page is available as [Markdown](https://luw-ai.gitbook.io/luw.ai-app-docs/organize-your-work/projects.md).
# Projects
Group your designs into projects and folders, upload your own files, download in bulk, and share a project with other people.
This page covers projects: creating them, saving designs into them, organising them in folders, and sharing them.
A project is a named collection of designs that you put together yourself. One project can hold results from any tool, split into folders, which makes projects the place to gather the work for one client, one property or one job.
## My Projects
Click **Projects** in the left sidebar (on a phone, it's in the menu in the top bar). The page is called **My Projects**.
My Projects, with the button for starting a new one
Each project appears as a card with its name and how many folders and items it holds. Click a card to open the project.
If you don't have any projects yet, the page shows "Create your first project" with a **Create Project** button instead.
## Create a project
1. On **My Projects**, click **+ New Project**.
2. Type a name in the **Project name** box.
3. Click **Create**.
The new project appears in the list. Click **Cancel** to back out.
You can also create a project on the spot while saving a design, as described next.
## Save a design to a project
1. Click a result to open it in the result viewer.
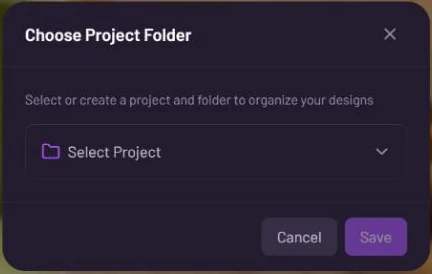
2. Click **Save to Project**. The **Choose Project Folder** window opens: "Select or create a project and folder to organize your designs".
3. Open **Select Project** and choose a project. To make a new one, choose **New Project**, type a name and click **Create**.
4. Under **Select Folder**, click the folder you want. To make a new one, click **New Folder**, type a name and click **Create**. You can also skip this step.
5. Click **Save**.
Choose a project, and optionally a folder, then save
If you don't pick a folder, the design goes to the top level of the project. The **Save** button only becomes available once a project is chosen.
## Save several designs at once
You can save a whole batch of results from a tool's **Latest Designs** in one go:
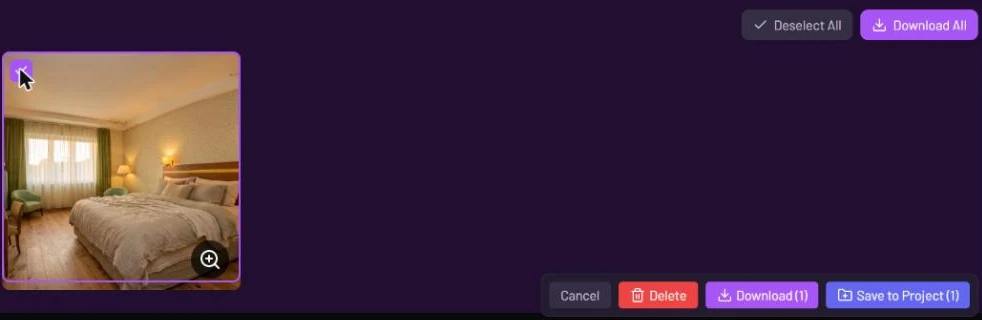
1. Tick the checkbox on each result you want, or click **Select All**.
2. In the bar that appears, click **Save to Project (n)**, where n is the number of selected designs.
3. Choose the project and folder in the **Choose Project Folder** window, then click **Save**.
Select results in Latest Designs, then save them to a project together
See [Latest Designs](/luw.ai-app-docs/results/latest-designs.md) for the other selection actions.
## Inside a project
When you open a project, its name appears at the top left with a back arrow. Inside a folder, the folder name follows it after a slash. Click the back arrow to go up a level. The browser's Back button works too.
The project page has two parts:
* **Folders**: a card for each folder, with its name and item count. "No folders found. Create a new folder to get started." appears when there are none.
* **Media**: the designs and files at the current level. Inside a folder, you see only what's in that folder.
Click any item to open it in the result viewer.
### Make a folder
1. At the top level of a project, click **New Folder**.
2. Type a name and click **Create**.
Folders sit at the top level of a project; you can't put a folder inside another folder. To put a design in a folder, choose that folder when you save the design.
### Upload your own files
On paid plans, **Upload** adds a file from your computer to the project. Uploads go to the level you're looking at, so open a folder first if you want the file there. Choose one file at a time.
On the free plan, **Upload** shows an "Upgrade your plan" message instead. See [Account and plans](/luw.ai-app-docs/account/account-and-plans.md).
### Select, download and delete
Each item has a small checkbox in its top-right corner.
* Click checkboxes to select items, or click **Select All** (it changes to **Deselect All** once everything is selected).
* **Download All** downloads everything at the current level, one file after another, with a "Downloading" progress bar.
* With items selected, a bar appears at the bottom right with **Cancel**, **Download (n)** and **Delete (n)**.
**Delete (n)** asks you to confirm in a **Delete Selected Items** window before it removes the items from the project. This can't be undone.
### Rename or delete a project or folder
Click the gear button at the top right of the project.
* The first option renames what you're looking at: **Settings: Projects** for the project, or **Settings: Folders** when you're inside a folder. Type the new name and confirm.
* **Delete Project** (or **Delete Folder** inside a folder) asks you to confirm first.
What deleting does:
| You delete | What happens |
| ---------- | ---------------------------------------------------------------------------- |
| A folder | The folder goes, and everything in it moves to the top level of the project. |
| A project | The project and everything in it are deleted for good. This can't be undone. |
You can also delete a folder from its card: click the ⋮ menu on the card and choose **Delete Folder**.
## Share a project
You can share a project with other Luw\.ai users through an invite link. Sharing is set up from the top level of the project.
1. Open the project and click **Share**.
2. Turn on the **Share** switch.
3. Under **Access Level**, choose **Read only** or **Read and write**.
4. Click the copy button next to the link to copy it, then send it to the people you want.
| Access Level | What people with the link can do |
| ------------------ | --------------------------------------- |
| **Read only** | View the project and its folders. |
| **Read and write** | View it and also edit and upload to it. |
The app shows a warning for each level as a reminder that anyone who has the link gets that access, so only send it to people you trust.
{% hint style="info" %}
The access level is part of the link. Choose the level first, then copy the link.
{% endhint %}
### Change the invite link
If a link has gone further than you meant, click **Change Invite Link**. After you confirm, every link you sent before stops working, and you get a new one to share.
### See who has joined
Under **Team Members** in the share panel you see everyone who has accepted, with a **Read only** or **Read and write** badge. Click the bin next to a person to remove them (you're asked to confirm). Until someone accepts, the list says "Nobody accepted yet".
To stop sharing the project, turn the **Share** switch off.
## Accept a project invitation
When you open a project link someone sent you, a **Project Invitation** window appears: "You've been invited to join an exciting new project!"
* **Accept Invitation** adds you to the project and takes you to your projects.
* **Decline** closes the invitation and takes you to your projects without joining.
## Related
* [Save, share and download](/luw.ai-app-docs/results/save-share-download.md)
* [Latest Designs](/luw.ai-app-docs/results/latest-designs.md)
* [Favorites](/luw.ai-app-docs/organize-your-work/favorites.md)
* [Teams](/luw.ai-app-docs/account/teams.md)