> For the complete documentation index, see [llms.txt](https://luw-ai.gitbook.io/luw.ai-app-docs/llms.txt). Markdown versions of documentation pages are available by appending `.md` to page URLs; this page is available as [Markdown](https://luw-ai.gitbook.io/luw.ai-app-docs/getting-started/tool-workspace.md).
# The tool workspace
The parts every Luw\.ai tool page shares, from the step bar and Help at the top to the Generate button, its credit line and Latest Designs.
Most Luw\.ai tools share one page layout, so once you know it you can find your way round any of them. This page goes through it from top to bottom.
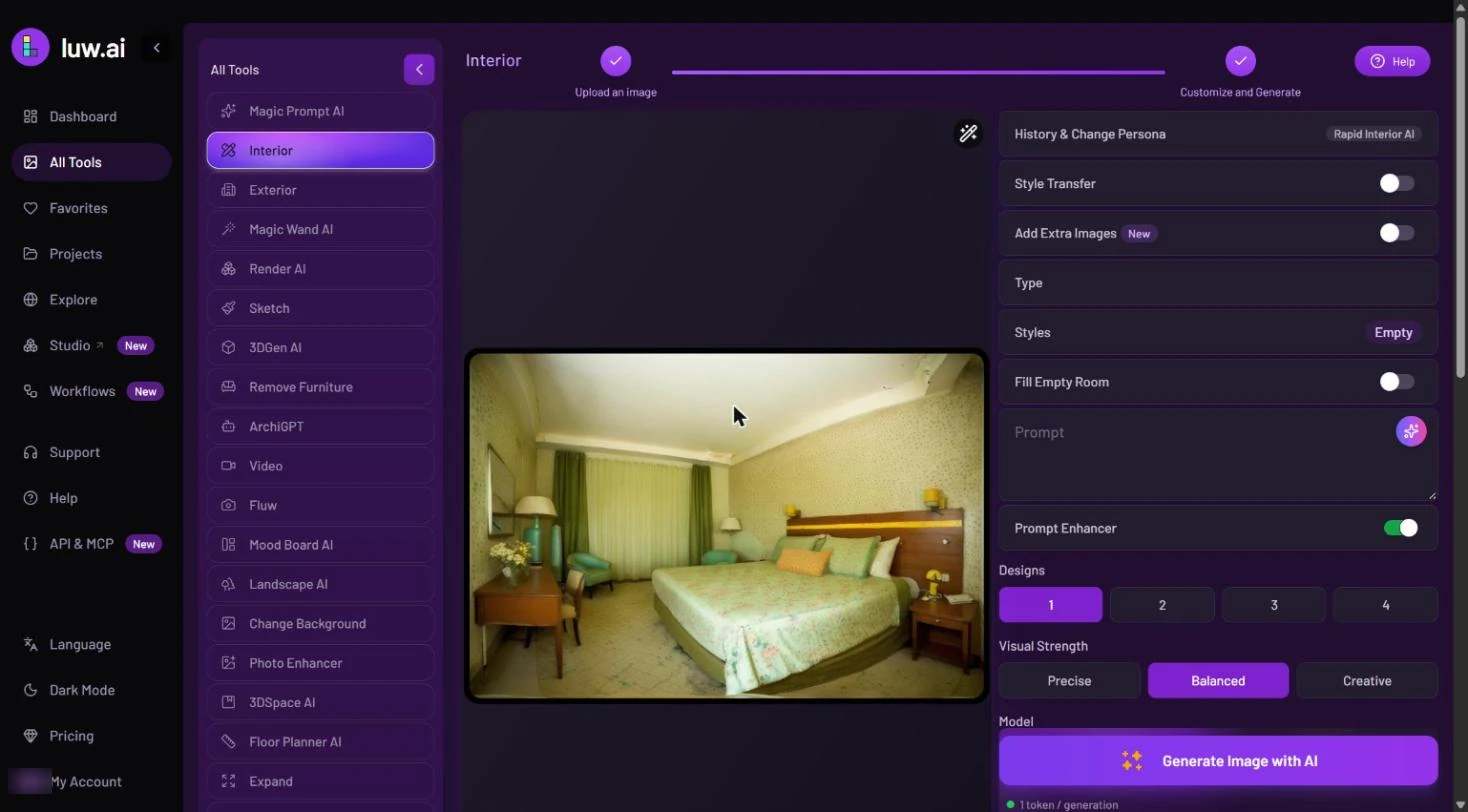
Interior's workspace; the other tools follow the same layout
## The header: tool name, step bar and Help
The tool's name sits at the top left. Next to it, a step bar shows where you are:
* Most tools have two steps: **Upload an image** → **Customize and Generate**.
* Magic Wand, Landscape and 3DSpace have three: **Upload an image** → **Select editing area** → **Customize and Generate**. The middle step is where you mark the part of the photo to change; see [Selecting an area](/luw.ai-app-docs/working-with-images/selecting-an-area.md).
* Fluw and Video show no step bar.
When an upload finishes, the form moves to the next step by itself. To go back, click an earlier step.
**Help**, at the top right, opens the tool's how-to video or a before/after example.
## History & Change Persona
The first row of the settings is a bar labelled **History & Change Persona**, with the name of the current persona as a badge. A persona is a workspace that keeps this tool's photos and results together. Click the bar to switch personas, start a new one, or rename it. See [Personas and history](/luw.ai-app-docs/getting-started/personas.md).
## The photo area
The left side holds your photo. Before you add one, it's an upload area with **Upload your image**, "Drag and drop your image here", an **Upload your image** button, and **Generate Image with AI** for when you'd rather create the starting picture from a description.
* [Uploading images](/luw.ai-app-docs/working-with-images/uploading-images.md) covers the upload window, file types and the example photos.
* [Generate an image to start from](/luw.ai-app-docs/working-with-images/generate-an-image.md) covers **Generate Image with AI**.
Once a photo is in place, a wand icon in its top-right corner opens a menu with **Magic Wand**, **Open with…**, **Delete** and **Settings**. See [The image menu](/luw.ai-app-docs/working-with-images/image-menu.md).
Fluw and Pattern AI start from words, so they put the prompt box at the top and offer a small upload area under it ("or, generate prompt from image").
## The settings
The settings column on the right changes from tool to tool, but many settings appear in several tools:
| Setting | What it does |
| ------------------- | ------------------------------------------------------------------------------------------------------------------------- |
| **Type** | The kind of space, such as Bedroom or Kitchen. |
| **Styles** | Up to 3 design styles, chosen in a full-screen picker. |
| **Prompt** | What you want, in your own words. The sparkle button in the box opens ArchiGPT to help you write it. |
| **Prompt Enhancer** | Rewrites your prompt into a fuller one before generating. |
| **Designs** | How many results to make at once, from 1 to 4. Each one uses credits. |
| **Visual Strength** | How closely the result keeps your photo: **Precise** keeps more, **Creative** changes more, **Balanced** sits in between. |
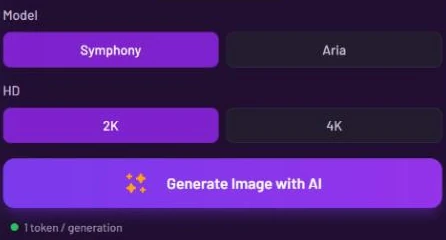
| **Model** | The engine: **Symphony** (the default) or **Aria**. |
| **HD** | The output resolution, **2K** or **4K**, in tools that offer it. |
[Prompts, styles and settings](/luw.ai-app-docs/working-with-images/prompts-styles-settings.md) explains each one in detail. Each tool's own page lists exactly which settings it shows.
Some options show a lock on the free plan. Clicking a locked option explains what's needed and offers a **Pricing** button.
## The Generate button and the credit line
The big button at the bottom of the settings starts the work. It reads **Generate Image with AI** in most tools, **Generate Video with AI** in Video and **Generate 3D Model with AI** in 3DGen.
The credit line under the button shows the price of one design
The line under the button, such as "1 token / generation", shows what one design costs. It updates when you choose **4K** or, in Video and 3DGen, when you switch **Model**. It doesn't multiply by **Designs**: four designs cost four times what the line shows. See [Credits and engines](/luw.ai-app-docs/getting-started/credits-and-engines.md).
If the tool needs a photo and you haven't added one yet, pressing the button shows "Waiting for image".
## Latest Designs
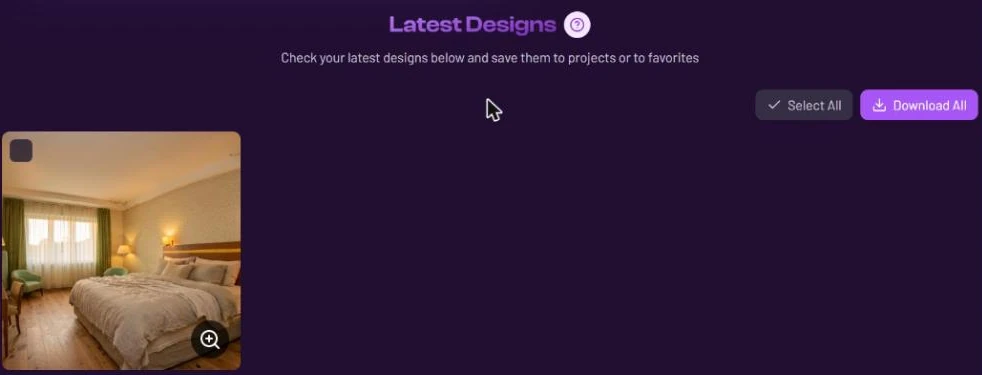
Below the form, **Latest Designs** collects your results: "Check your latest designs below and save them to projects or to favorites". The **?** next to the heading shows the tool's help again.
Finished designs, ready to open, select or download
* As soon as you press Generate, placeholder cards appear here and the page scrolls down to them. Each one turns into the result when it's ready.
* Results sit in four columns, newest first. **Show All** appears when there are many.
* Click a result to open it in the [result viewer](/luw.ai-app-docs/results/result-viewer.md).
* Each finished card has a checkbox and a zoom button. **Select All** / **Deselect All** and **Download All** work on the whole list.
* With some designs selected, a bar offers **Cancel**, **Delete**, **Download (n)** and **Save to Project (n)**.
Latest Designs only shows the results of the current persona. Before you've made anything, a section named after the tool (for example "Interior AI") appears under it, with its own **Help** button for the how-to video or before/after example.
More in [Latest Designs](/luw.ai-app-docs/results/latest-designs.md).